
I think that my favorite room to decorate is a bedroom. My guest room is the Lady Bug room with an iron bed, vintage garden hats on the wall, and a lady bug patchwork quilt that I made some time ago--the only quilt that I will ever make. The room is red and white and I love it. I enjoy preparing it for company, washing the sheets with Clorox to get them bright and white, adding Downy Lavender and Vanilla fabric softener to make them sweet and soft, then ironing the pillow cases with lots of spray starch to make them crisp and fresh. I do cheat by ironing only the sheet cuff that will be turned down. I don't iron sheets, though I knew a lady who did. I never knew why.
A good night's sleep begins with a nicely made bed. My grandmother taught me long ago how to properly make a bed, unlike mom who did not make her bed, nor did she train me to make my bed each day. She wasn't a housekeeper; in fact, she admitted to hating housework. In all fairness she did work along side my dad and her father-in-law in the family egg and poultry business. She was a busy, hard working mother, who cooked fresh food, canned, sewed all of our clothing, seldom complaining about her heavy load in life. I, in order to get out of hard work outside, tended to the housework. At a very young age. I ironed, scrubbed floors, did dishes, and tended my baby sister.
Now I make beds for fun.
 You might remember this bed in an earlier post that I made for the Ballet Studio, but decided not to use. This week I have been making bedding for the other two beds that I made from kits. I used my mistakes to dress this bed. For example, the fitted sheet is wrong side out because I sewed the corners on the wrong side. It was easier at the moment to cut a new sheet than it was to rip out the four corners. And the pink top stitching on the top sheet is not so perfect. But you won't tell, will you?
Grandma taught me how to make square or as she called them hospital corners for the flat sheets. Today we have fitted sheets, so of course I made fitted sheets for the dollhouse beds. I tried to make the mini bed as I would I my own bed, but we have to remember that much of the mini world is for show and real life does does not always work in miniature.
I searched Pinterest for How To's on mini sheets and found this great tutorial for all of the bedding; however, her patterns and instructions are sized for 18 inch doll beds. For my 1:12 scale, I looked up the standard sizes for sheets and pillow cases. The math is pretty simple: 1 inch=1 foot. Full sized sheets are 54x72, so my full sheet was 5 1/2x6 1/2 inches finished. I added at least 1/4 inch on each side and the bottom for the hem. But the top sheet needs to be longer if you want a nice fold-down at the top, so my top sheet pattern is 7 1/2x10 inches. I may make the next one even wider so that it will lay more naturally.
To make the fitted sheets, I traced around the mattress and added 1/2 an inch on all the way around for the hem. Visit Made: Pieces for Reese because she has a really good tutorial on how to sew the fitted sheet.


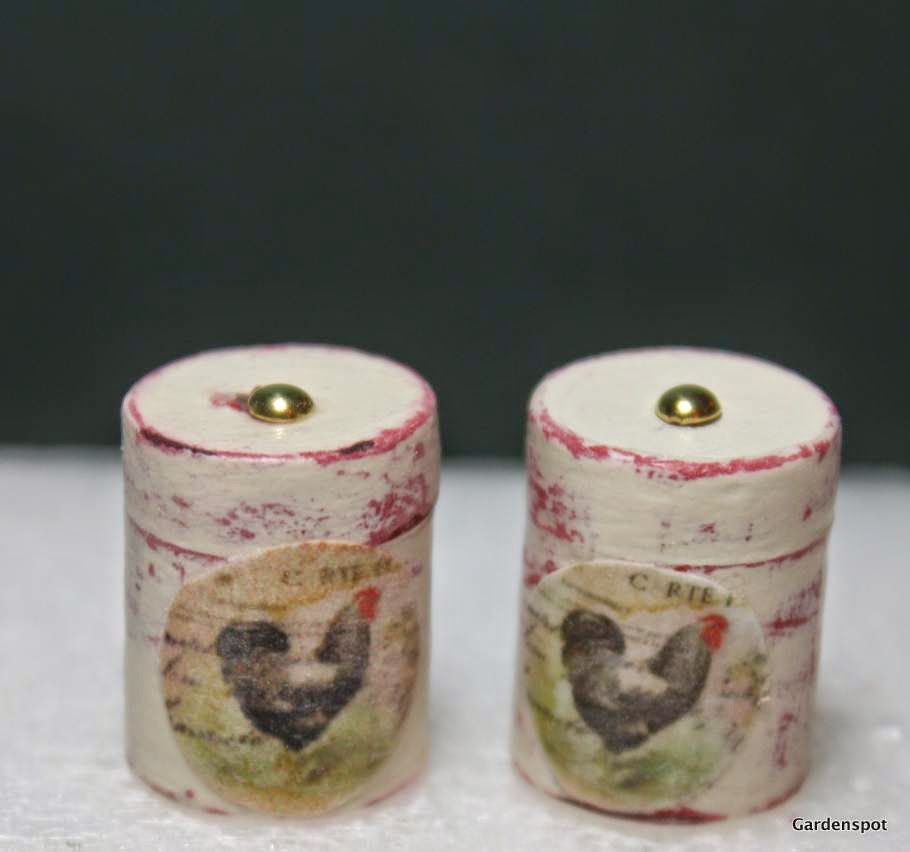
I trimmed the red border from the image, but I do wish I had used a black fine tipped scrapbook pen to draw around the image once it was glued on the canister to give a little more definition, but I was afraid that the Modge-Podge would smear the black ink.


A good night's sleep begins with a nicely made bed. My grandmother taught me long ago how to properly make a bed, unlike mom who did not make her bed, nor did she train me to make my bed each day. She wasn't a housekeeper; in fact, she admitted to hating housework. In all fairness she did work along side my dad and her father-in-law in the family egg and poultry business. She was a busy, hard working mother, who cooked fresh food, canned, sewed all of our clothing, seldom complaining about her heavy load in life. I, in order to get out of hard work outside, tended to the housework. At a very young age. I ironed, scrubbed floors, did dishes, and tended my baby sister.
Now I make beds for fun.
 You might remember this bed in an earlier post that I made for the Ballet Studio, but decided not to use. This week I have been making bedding for the other two beds that I made from kits. I used my mistakes to dress this bed. For example, the fitted sheet is wrong side out because I sewed the corners on the wrong side. It was easier at the moment to cut a new sheet than it was to rip out the four corners. And the pink top stitching on the top sheet is not so perfect. But you won't tell, will you?
Grandma taught me how to make square or as she called them hospital corners for the flat sheets. Today we have fitted sheets, so of course I made fitted sheets for the dollhouse beds. I tried to make the mini bed as I would I my own bed, but we have to remember that much of the mini world is for show and real life does does not always work in miniature.
I searched Pinterest for How To's on mini sheets and found this great tutorial for all of the bedding; however, her patterns and instructions are sized for 18 inch doll beds. For my 1:12 scale, I looked up the standard sizes for sheets and pillow cases. The math is pretty simple: 1 inch=1 foot. Full sized sheets are 54x72, so my full sheet was 5 1/2x6 1/2 inches finished. I added at least 1/4 inch on each side and the bottom for the hem. But the top sheet needs to be longer if you want a nice fold-down at the top, so my top sheet pattern is 7 1/2x10 inches. I may make the next one even wider so that it will lay more naturally.
To make the fitted sheets, I traced around the mattress and added 1/2 an inch on all the way around for the hem. Visit Made: Pieces for Reese because she has a really good tutorial on how to sew the fitted sheet.
Following other dollhouse builders who say to save everything that might be used for a mini, I saved these packing materials from some UPS shipment.

This mattress is some sort of shipping packing, paper pouches filled shredded stuff, soft and fluffy. I trimmed down the packet, rounded the corners, and scotch taped the edges back together then taped the sheets to it, wrapping them around the mattress.

The finished bed. My dear blog friend at Cornish Cream in England sent me some (as she would say) bits and bobs of lace, ribbon, and the vintage crocheted pieces that I am thinking were dainty little coasters. I folded one up to make it look like grandma's crocheted afghan at the foot of the bed.

This is a bed that I built from a vintage XACTO kit. The mattress is piece of foam that was easy to measure and work with. Easier than the packing material.

The pillow cases are so much fun to make. Cute 2 pieces of fabric 3 1/3x2 1/4 for each pillow case. Choose a light weight, thin batiste or cotton. Stitch on the sewing machine 1/8 inch seam. I stitch one side seam first, press it open, then add the lace on the wrong sides together then press it flat. Then I stitch the other two seam. This bit of lace is so special.
In 2006 I toured England with a group of university English Education majors who were going to be teachers. Our favorite stop was Haworth, home of the Bronte sisters. I was searching for bits of lace that we could use on the christening gown for my first grand child. In an antique store just down the hill from the Rectory, I found an entire bolt of this edging, so I use it very sparingly. Such good memories of a fabulous English tour.
I still have to make the little pillows which will be 2 3/4x 3 inches with a 1/8 seam. As a side note, the pillow cases are just a wee bit big to fit nicely on the bed, so I will probably cut the pillow case the same size and take a large seam next time. I finish all of the bedding pieces by ironing them with a coat of spray starch to give them a nice crisp, clean, fresh look--just like the bed in the guest room.

I adore this Tester bed purchased as a kit from Houseworks Ltd. It is a canopy bed; I followed the same principle to make the canopy as I did for the fitted sheet: traced around the top of the canopy then added inches until I thought I had the correct length. My friend is cleaning out her attic and she keeps sending me lace and stuff, so here I added one of the vintage lace trims that Patti sent me. Thank you, Patti Rose. Another note: I am finding that mattress sizes vary from bed style to bed style, so measure to make sure that your bed sheet will fit.

My daughter scored a dozen XACTO furniture kits at the thrift shop yesterday. (I'll share a photo next time). There is another Tester canopy bed, so I will be making more bedding.
Meanwhile, back in the kitchen I have made a set of rooster canisters. I have ordered some really cool items from Etsy shops, but I drew line when the cute little ceramic rooster canister sets were $12+ with shipping doubling the price. I decided to make my own. Dollhouse Miniature Furniture Tutorials: 1 inch minis has this fabulous tutorial, which, of course I tweeked--a lot.
While she uses card stock to make her canisters from scratch, I used the moisture absorbing plastic thingies that come in my prescriptions.

Materials: Moisture absorbing thingy, an image, scrapbooking brads, paint, Modge-Podge.

Step 1: the canister may have a paper wrapping around it, so remove it. This one has the cautions printed directly on it. I covered it with 3 layers or red craft paint to to get good coverage.


I was going for a vintage shabby chic worn-out look like the canisters my mom had. Her's were tin, white with red flowers and green leaves, chipped and dented, well aged.

After 3 coats of white over the 3 coats red, I sand them with a light 180 grit sanding block. If I sanded too hard, all of the paint wore off, exposing the plastic underneath. I was okay with that.

This is a shot of the computer screen: Word document with image sized to fit the canister. Trial and error here, friends. I found the image tumbling upon printables in Pinterest. You can search Pinterest, finding a plethora of good images.


I worked with the little canisters on these t-pins so that I could hold on to them and then poke them in to work stir-foam so that they could dry. Once painted and sanded, the canisters are ready for the decal. I used Modge-Podge to glue the image on and then covered the entire canister with Modge-Podge, giving them a final buffing when the Modge-Podge had dried.

For lid handles, I used little brass scrapbooking brads from that stash of stuff, using two sizes. The little absorbing thingies had natural ridges that worked as lids. 1 inch minis tutorial will show you how to make lids and handles for a different look than mine.

They look cute in this little Hobby Lobby hutch, though I am not sure that it will be in the dollhouse or not. For display purposed only. The canned foods? Printables. And another blog post.
Well, I certainly am having fun with dollhouse building and making. I am not so good at it sometimes; I feel clumsy and awkward, but I am enjoying myself. And I love your visits to the blog and the comments that you leave.
Until next time. Take time to play.


I have a pair of tiny blue teddy bears, that my niece once gave me as an anniversary present.
ReplyDelete(Me and my teddy bear, got no worries ...)
They would fit comfortably on your guest beds.
I love the canisters. They are so vintage looking. The 4 poster bed is so incredible. The bedding with the lace edge is very beautiful. I usually just glue my "fitted sheet". You are quite the sewer! I get confused a lot when I sew. LOL! Oh! And when I was a teenager I ironed my sheets! You just reminded me. I just loved slipping my feet in the freshly washed and ironed sheets. Weird! Don't worry I'm over that now. I don't even iron anymore. LOL! I love my visits to your blog.
ReplyDeletehugs♥,
Caroline
I enjoyed this post/photos so much. Your memories of your grandmother teaching you to make a proper bed are wonderful. I adore the little canisters. Hope you have a wonderful afternoon.
ReplyDeleteHi, Mildred sent me this site and I thoroughly enjoyed your making up of your beds. My mom taught me hospital corners also. I have only dressed 2 beds. One for my doll house and one for a friend. They are fun to do. You can visit me at http://fortheloveofminis.blogspot.com/ Although I don't do as much with it as I use to cause I am sewing more now and post on http://ourcozyabode.blogspot.com/ more than the mini site. Now that warmer weather is here I will frequent our mini club more and do more minis. Visit and become a follower. I would enjoy your visits. LJ
ReplyDeleteOh Ann, those canisters are sooooo cute!! I haven't been visiting here lately I'll have to check out your other posts.
ReplyDelete