Friday, November 25, 2016

Turn on the Lights

One holiday down, a few more to go. I am hoping that I can survive December. We have a party of some sort every weekend, including New Years and a month of birthdays that blend into January. The second weekend of December is the most brutal when we will take a road trip for friends' annual Christmas party on Saturday night then back on Sunday to see our granddaughter dance in the Nutcracker. She is 8 and this is her second year to perform in my favorite Christmas tradition. She will be an angel and probably dance for 30 seconds. It will be worth it.

So with all of the festivities, I have put away the dollhouse building materials. The workshop is now a sewing room and a print shop. I will also make my Christmas cards. I don't actually know what I will sew yet, something.

Before I put all of the dollhouse tools and supplies away, I wanted to get the lighting done. If there is one thing I dislike the most it is lighting. I use the peel and stick copper tape that works very well. I have watched this YouTube video several times and Linda makes it look so easy: https://www.youtube.com/watch?v=VaswR0TcQRE&t=1344s. She will take you through all of the steps. I have watched others, but hers is cleanest and neatest of all of them. However, installing the lights is not as easy as she makes it look.

I began by drawing in pencil a line an inch below the ceiling so the I run one tape run along the top of the door, but then I had cut the upstairs door opening taller. The trim for the door will then cover up the tape an even if tape is under wallpaper I want access to it, so I ran tape across the floors, making it more assessable. Later when I install the floors I will use double sticky carpet tape to adhere them so that they will be removable.


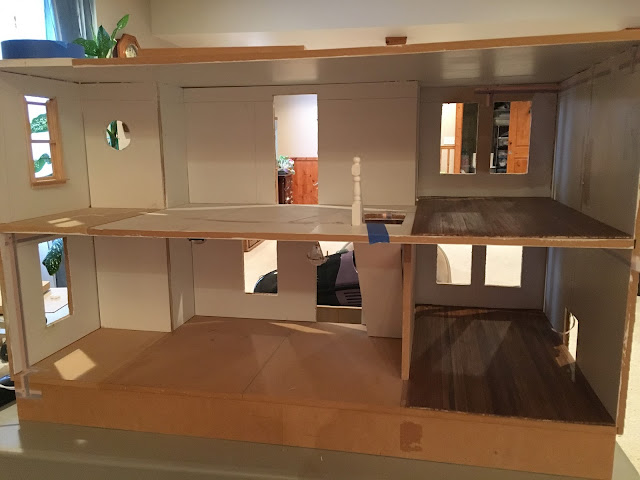
This photo shows that some of  the tape runs the have been painted over. Tape will show through some wall coverings, so I painted over it to hide it more.


A Cir-Kit light ordered directly from the company on line.
http://cir-kitconcepts.com


This is the first light that I installed for the kitchen. The kitchen will also get a chandelier; more on that one later, for it was a nightmare.

I opted to paint the ceiling in this house instead of paper it. I had a very hard time getting the lights to adhere to the ceiling covers in the Farm House, and same here. I use a lock-tight type glue, but still it took a long time for it to grab and hold.


This light can be purchased at Hobby Lobby


This is a very pretty light.


This is the chandelier that I made for the bathroom on the blue Farm House, but ran into lighting problems there, so I had to take it out. It has a new home. I love the shadow patterns that the lights cast on the painted ceiling, a good argument for a nice shinny painted ceiling.


Another Cir-kit light ordered from the website. These two chandlers were expensive, but aren't they lovely?


The living room light centered over in front of the fireplace.


I have found that it works best to wire ceiling lights on the above floor. I use the dremel to drill a hole in the floor, glue the light in place, and wire it in using the eyelets. The Youtube video has excellent instructions. 
I have not yet install the interior walls, nor have I added the attic and the roof. I don't know if I am going to add wall sconces either. I have another big decision to make on wallpaper. The selection of wallpapers is very limited and I am leaning toward scrapbook paper, but I am taking my time. 


Here it is all lit. I have two more lights to install, the kitchen chandelier in front of the window and a ceiling light for the second floor hallway. I am not sure just what I will use, a chandelier one that I might make or button type light like the one in the kitchen or a hanging light  that I have in my stash that I removed from the farm house. A decision that I will make after the first of the year. 

Thanks so much for visiting. I love your visits and I appreciate your comments. Enjoy this holiday season. 

Sunday, November 6, 2016

Basket Weaving Part II

I have had more fun weaving little baskets this week. Let me show you what I have been doing and what I have learned.

To begin, I purchased new cording that I found in the jewelry making aisle at Hobby Lobby. It is heavier with more body than the crochet thread that I used for last week basket. Each spool will lend two baskets with a little left over depending on how big your basket will be. I especially like the variegated cord. One web tutorial that I visited recommended waxed twine, but said it was difficult to find. I did fine with the cording that I used.


This is basket 3. The second attempt didn't turn out so well. I cut a piece of bass wood 1.1/2 inch long and 1 wide then measured where I would place the tooth picks at about 1/8 inch apart. I found that with the first two baskets, I didn't have enough toothpicks so the weave wasn't as nice and the corners were not square.

        
With this basket, I also used two strands of cording. You can see that I crossed them around each tooth pick to get a more even weave. Essentially, I zig-zagged around the tooth picks. I anchor the basket to a small block of florist Styrofoam so that I easily turn it as I weave around the tooth picks.


You want a tight weave, but not so tight that you move the tooth picks. They should remain tall and straight.


I use T-pins to hold ends of cording in place


This photo demonstrates why more tooth picks more closely spaced are needed to create better corners. This is attempt #2 with the tooth picks further apart. Take not of the corners.


Here I ran out of cording and had to cut more. I will work the ends through the weave to the inside of the basket where I will trim them off.


I finish the basket with a coating of diluted Modge Podge so that it does not go on so heavy.


With the Modge Podge dried--several hours or over night--I am ready to pry the tooth picks out of the Styrofoams. I had to use the thin bladed tool that I use on my Circut to pry the tooth picks out. The tooth picks on the bottom of the basket will need to be sanded down even with the wooden bottom.


Next I clip the tooth picks as closely to the weaving as possible using my jewelry making wire cutters that cut with out smashing the the wood.


You can see how I have poked the tail ends to the inside of the basket. This one has a better shape than the last one I did (not shown).


I braid cord to place on top of the basket to make the rim.


and adhere it with Elmer's glue. I will need to let it dry. The basket needs work: sanding and shaping the bottom. I have discovered a better way to work the bottom. See the next basket.


I decided to do a round basket this time, using a wooden round that I purchased by the bag at Hobby Lobby in the wood crafts section. You will find a bag of various sizes of rounds that are made of a decent quality of wood, thicker and stronger than the bass wood that I used on the other baskets.


Again using two strands, I wove round and round and round until I had a basket with nice, high sides. I will work the ends in this time before I apply the Modge Podge. I will also make a handle. I'll show how I do that next week.


Here are the miniaturists that I consulted on basket weaving:

1 Inch Minis by Kris: this blog has the most amazing instructions to made a wide range of dollhouse miniatures. I will follow her instructions to make the handle for the round basket.

Cinderella Moments: If you haven't visited Caroline yet, you are missing out. You will have read her entire post to find the her basket directions, but you won't mind.

Studio Dollhouse Miniatures: I love this little tutorial on how to make mini towels. I have made some for the first basket that I made. More pics next week.

From Baskets to Lamps


I have written about making mini lamps before, but I have improved my method. Still using the small spindles used in early American type shelves and railings, I have improved the way I drill them. I purchased them at Hobby Lobby, located in the wood working section.


Last summer my husband purchased this work bench for me at Harbor Freight. What dear he is. It sells for under $200 and is easy to assemble. 


My favorite feature is the wooden vice that it has on the end so that I can clamp the spindle in it tightly and saw the ends off with my craft saw. The vice makes drilling so much easier. In the past I held the spindle in my left hand to drill it, praying that I wouldn't miss the spindle and drill my finger. 


After cutting off the ends, I lightly sand the ends to get a smooth surface, especially on the bottom so that the lamp stands straight. 


Once I have drilled the holes, I cut a channel for the electrical cord to fit in, using the dremel.


I will use a rechargeable dremel tool to drill the holes. This versatile tool will come in handy for a lot your miniature projects. It comes with attachments and a nice selection of drill bits.


I purchased large crimping tubes in the jewelry section to help secure the lamp shade. I am not sure exactly how I will attach the lampshade yet. I used the smaller bit to drill the hole clear through then I used the 1/8th bit to drill a large opening to fit the crimp tube in. I will glue the tubes in to secure them.


As you can see, this lamp has a hole in the side. I will fill it with wood putty and paint over it. It is difficult to get the holes drilled straight and entered. Takes a good eye and steady hand because the drill bit tends to jump around when it first contacts the spindle. Nor are the holes perfectly centered, another very difficult thing to accomplish. I tend to get in a hurry, but I think I should use a little hand drill to begin the hole so that the drill bit has a small hole to fit in then switch to the dremel.


I save these ends just in case I might find a use for them.

I needed some help from hubby because I wanted to upgrade the doors for the Bellingham. The kit doors are rather not very attractive as are the windows, so I have purchased House Works, Ltd. windows and doors. While the windows fit perfectly, the doors didn't, so I enlisted hubby to cut door holes larger.


He used the dremel tool to start the cut. This door needs to be made taller.


He finishes the cut with his handy dandy saw.


Now the doors fit perfectly. The top doorway needed to be taller while the bottom doorway had to be widened.  Thank you, dear.

There you have it another week's worth of work on the Bellingham. 

Thanks for visiting. Please come again. Love your comments, too.

The Tale of Two Projects: Trials and Tribulations

  Murphy's Law says if anything can go wrong it will, and so it is in dollhouse building. I set out today to get the wallpaper installed...