
Hello. Thank you so much for stopping by. I have promised myself now that I hope I have at least 4 faithful checking on the Blue Farm House that I will do a better job of updating each week the progress that I am making. So come along on a brief tour of this week's work followed with a quick tutorial on how I made a vanity--all by myself.

First, I want to remind you of the house that I am working on. I purchased it a junk/antique store down the road for $100. You can return to the original post to see what clean-up had to be done. I don't think I ever mentioned the dimensions so here they are:


In my work area I set about designing my dollhouse dream vanity using bits and scraps that I had along with a couple of very special items. This was an easy project--had to be since I am much like Winnie the Pooh, a bear with a very little brain, especially when it comes to building from scratch.
First, I sorted through the doll house furniture that I have assembled from the vintage XACTO kits that I have to find a table that would give me the size for the dressing table.


First, I want to remind you of the house that I am working on. I purchased it a junk/antique store down the road for $100. You can return to the original post to see what clean-up had to be done. I don't think I ever mentioned the dimensions so here they are:
- From the side view: 18 inches wide
- across the back side: 32.5 inches long
- at the side peak: 30 inches tall
- the center of the house where the hallways are located: 23 inches long
- the rooms on either side measure 11.5 x 18 inches

So You can see that it is a very large house with large rooms. The upstairs has been primed ready for wallpaper.

The living room is now papered and the wiring completed. I found these neat extension cords that are wired in on the floor underneath the carpeting. They will mount on the walls just above the base boards. The carpet will be mounted to poster board and not glue down so it will be removable to allow access to the wiring. I am learning a lot about wiring, knowing that I am making a mess of things. I need for the next house to have a very specific plan in place before I start wiring. Remember, too that this house was already wired so I had repairs to make.

This is the beaded chandelier that I made. I'll do a lesson on it, too. Soon.

Trying furniture just to see how it will look. I love it so far.

The chandelier is wired in on the upstairs bedroom floor. This carpeting will also not be permanently installed. Just in case.

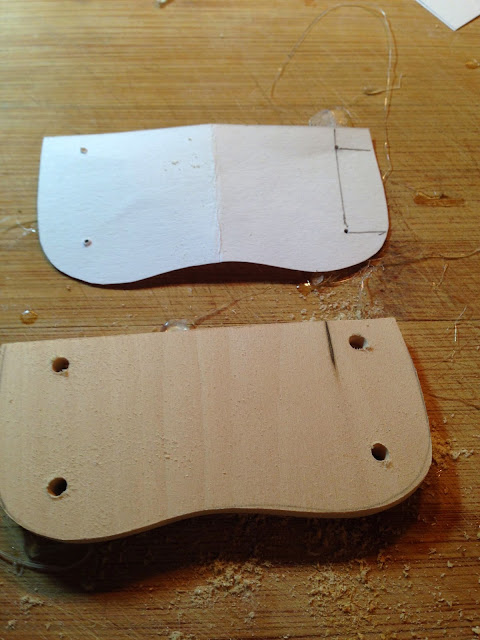
I decided to locate the bathroom above the kitchen on the second floor. It is large and deep, so I am toying with the idea of putting in a false wall. I had seen a similar setup on another blog and since this is a large room, I like the idea. I made a paper pattern of the false wall first then cut it out of cardboard

While hubby made some cuts for the false wall on his skill saw, I finished the wood cutout with my scroll saw.

Amazingly I have a perfect fit. I have not decided if I will use these vintage fixtures or if the tub will fit up against the right wall. Still playing. I will use a Hobby Lobby blue floral wall paper. The inside of the wall still needs some more sanding to straighten the line or wainscoting will cover up the uneven lines
Vanity Tutorial
I wanted a dressing table/vanity for the bedroom and decided to make one.
As I child growing up in old farm houses, one built in 1890, I always wanted that frilly pretty dressing table. As it was, I did have my aunt's 1940s waterfall bedroom set from my grandmother's house. It had a pretty dressing table with a big round mirror on it and I loved it. When my daughters were little, I did find a vanity table covered in pink satin on garage sale that we used in one of the girls' rooms.
My mother in law had a vanity table in her bedroom in her mother's old farm house that was our wedding suite when we first married. So poor that we couldn't afford a home of our own, we lived with hubby's grandparents for a while. The dressing vanity in that room was covered with hideous 1940s' floral fabric. And while on the outside it looked well assembled, the ugly material covered orange crates assembled to make a table. Rather ingenious. It was a very practical piece made out of whatever the mom could find to provide a girly piece of furniture for her only child.

In my work area I set about designing my dollhouse dream vanity using bits and scraps that I had along with a couple of very special items. This was an easy project--had to be since I am much like Winnie the Pooh, a bear with a very little brain, especially when it comes to building from scratch.
First, I sorted through the doll house furniture that I have assembled from the vintage XACTO kits that I have to find a table that would give me the size for the dressing table.

I drew a pattern by hand to get a general shape. To make sure that the top was uniform and even on each side, I redrew the shape on the fold. After tracing the pattern on a piece of 3/8 thick base wood, I cut it out on the scroll saw. I used the Dremel to drill the holes for the spindle legs. The 1/8 inch drill bit was a bit small for the spindle to fit in so I had to work the drill around in the hole to get it big enough to work the leg in. The spindles are a bit long, so I placed them in the hole, marked a line to cut off the excess, then sanded them down once they were glued in.

The table is 2.5 inches tall X 4 inches long. I used Elmer's school glue to glue on the skirt.

The skirt is made from a scrap of material and antique lace that I had purchased at an antique store to make vintage doll dresses. I sewed a bottom hem on the material, sewed the lace to material, stitched a gathering line to fit the skirt to the table then sewed on the trim. If you don't sew, many miniaturists use fabric glue. I am more comfortable at the sewing machine.
The trim is very special. I have blog friend who lives in England. She had emailed me asking if I wanted some bits of lace that she was going to get rid of. Of course, I did. So I have use a little piece that she sent. Thank You, Barbara.

I cut a cover for the top out of the same scrapbook cloth paper to match the lamp shade. I am now totally out of this sweet pattern. I can still order it on line.
The stool is and XACTO kit. You can still find theses kits on Ebay. Daughter and I got lucky when she found half a dozen kits at a thrift store a few weeks ago, so they are still floating around.

Barbara's little package also had a little lavender sachet in it, so I put some of the lavender in a little jar. What dressing table is complete without lavender? I also made the perfume bottles from my bead stash.

I think I will look for cream colored cording to finish the edges and to cover the wood up to give a more finished edge, but I am otherwise very pleased with the dressing table. The bedroom is nearly wallpapered now, but I am holding off to add some more lighting.
Right now work has come to a bit of as standstill as I am trying to decide on wallpaper for the upstairs hallway which will be a library at the front of the hall. It will be so cute with a red leather wing back chair and a library filled with classic literature. (I am a retired English professor with an MA in English Lit., so of course I will have a library full of the classics). I am also out of the eyelets that I use to connect my lighting to the tape wire. Unfortunately Hobby Lobby does not carry them so I have to order then on line. I need to be working in the garden anyway.
At night I will be working on accessorizing the the rooms already finished. So I will have more tutorials for you.
Everyone loves the kitchen. It is cute, I have to admit myself, but is so nice to hear you tell me that you like it. Thank you. I am still waiting for the the sink. It seems to be out of stock not only at Norm's, but at the online sources, too.
Thanks for stopping by. I love your comments. Have a fabulous week.


This comment has been removed by a blog administrator.
ReplyDeleteI wish I was there to play....oh, I mean help! haha! I love the little lamp that you made on your table now. And the pretty color blue looks perfect. I love seeing what's new. What fun! And I notice you have a bad comment above mine. You'll want to get rid of it and NOT click on the link! Sweet hugs, Diane
ReplyDeleteThe bathroom looks like an awesome space! I can't wait to see how you put it all together. The vanity is fantastic! Thanks for your tips on that. I haven't tried to drill holes for the legs on my pieces. That looks like it makes the table sturdy. It will be hard to get back to work mode after the beach. LOL!
ReplyDeletehugs♥,
Caroline