Monday, September 19, 2022

(Note: I try to increase the size of text, but if it still isn't large enough on your computer screen, you can manage your Safari screen size by pressing option command + or - to zoom in or zoom out)

Once again life has a way to getting in the way, so I've not made much more progress on the Manchester kitchen. The countertops are glued into place and I still have to install cabinet door and drawer handles then I have some tedious painting to do. Here are the projects that I'll be working on.

These kitchen and bathroom plumbing items were from Paper Doll Miniatures Shapeways shop. I ended up with two different styles because, um, well, I lost the original one on the right the one with vintage look. I didn't lose it actually. I just couldn't find it, mostly because it is clear. So I ordered a new on, the modern look which is what the kitchen is supposed to be. I think it will be black.


I should have retaken the photo. I love the pot filler with its movable arm. My cooktop is on a center island, so I don't need such a faucet, but I love the idea.


For the Bellingham Texas Farmhouse, I made my own bathroom hardware from paperclips and jewelry findings, but I wanted a more modern look. Gold for these--unless I change my mind.


Back to the kitchen, I've played with ideas for kitchen canisters. Here's how I made canisters for the The Blue Farmhouse Now Pink, using the moisture absorbing fillers in the low dose aspirin containers. While I didn't use the pull tops from OJ containers, with some work, they can be transformed into dinner plates.

My original post "A Good's Night's Sleep" brings back the sweet memories of my early beginnings as I worked on renovating and decorating my first farmhouse. So scroll past the bed to find the tutorial on how to make your own canisters. 


I still like these little canisters. After layers of acrylic craft paint and sanding to age each layer, I printed and mode-podged the hens in place. A nice way to use odd pieces that we find around the house, but it does take a long time to collect enough of these little gems to make a canister set.


I've played with clear glass canisters, too,  like I have my real kitchen. That plan calls for black labels the I would make from printable waterslide transfer paper. I've been collecting mini glass jars, mostly from the jewelry finding aisles at Hobby Lobby and Michales. Some are found in the Tim Holtz collection and the steampunk wrack. The drawback to these jars is that they seem a little out of scale, a little large for 1:12, and black lettering may not show up well depending on what is in the canister, but I had decided on the clear glass for the modern look. 


These jars come with the cork stopper, but I took these wooden buttons that I bought at HL, sanded them down until they fit. I don't know what they are are called, but this is their function on furniture I think to cover up screws. They work really well on the larger vial, but the bottom has to be sanded until it will fit in the mouth of vial. The above photo show two different jars and lids.

The shorter jars with the flatter wooden lids were ordered on Etsy as 1:12 canisters, so they are more to scale. I'm more inclined to use these rather the jeweler's jars. You can see the shape of the furniture button lid.


More jeweler's jars with homemade polymer clay pasta. I'll probably make better lids than the awkward cork lids.


With a test run in on the kitchen counter, I'll use the Etsy jars--or will I? I thought I had my mind pretty well made up for the top of the kitchen counter food storage, but. . .


. . . then came a most rare opportunity from a favorite blogger with an irresistible request: She was looking for volunteers to test her 3-d printed items that she was creating for her 1940s kitchen. Visit Jodi at My Miniature Maddness to see what she has planned. At this point, she sent out the call for miniaturists to be willing to take a few of her items to play around with at no charge with only the requirement to fill out and return to her a product review. I'm honored that she thinks that I'm good enough to receive a very generous gift of kitchen accessories. 


A coffee pot, a serving tray, muffin tin, and the most amazing measuring cups.


The 1940s style stand mixer is amazing and the mixer lifts back on the stand. It even comes with an electric cord. Cool.


The toaster most certainly was worth a WOW! with its little lever to lift the toast and an electrical cord to add that touch or realism. The cake plate is awesome. 

My mom always served our birthday cakes on a vintage glass cake plate that eventually disappeared, but to pass on the tradition of a nice cake plate for the birthday, I purchased hobnail milk glass cake plates for my daughters. So I think this one will be milk glass. And of course a tube pan, perfect for angel food cakes. You know that you never grease you angle food cake pan, so you keep a separate tube pan just for the angle food cake. Any oil residue on the beaters, bowl, or bake pan will react with the egg whites and deflate them. So this pan will be dedicated to angle food cakes. 

I love my Le Creuset dutch oven. Mine is pink--of course. What color will this dutch oven be? I haven't made homemade bread in ages, but I can envision  lots mini breads coming out of this little loaf pan.


And now you know the answer to which will I use in the Manchester kitchen? The Moisture absorbing canisters or the glass canisters or the unique 3-D printed ones? The Etsy canisters will be used for what I originally ordered them for: Coffee and Tea on the coffee bar and these 3 will be Flour, Sugar, and ?

I have my design pattern picked, the labels made in Design Space and ready to print of waterslide transfer paper. I'm pretty excited. 

I'll begin by painting and applying the transfer to the moisture things as practice. So be patient with me, for this is going to take a while--and real life will get in the way, too.  


As a little gift, Jodi printed and painted these adorable honey pots for each of her test artists. I have just the spot for it in the Manchester kitchen.


My only request--since I couldn't make any decisions--was the flour sifter. This is Jodi's own design. How clever! And cute! And unique!


Just for Fun

Daughter Heather and I met in Denver for the Denver Museum of Miniatures, Dolls, and Toys. The museum hosts the show every year, which offers a wonderful roster of artists and miniaturists. I came home with a few little items, mostly for the toy store. 


Donald and Mini for the toy store.


A neat pull toy


The typewriter has a story--a memory. My mom typed on an old Underwood typewriter. I played on it.  I didn't it get rescued for the old home, so this one will do.


He's not quite an elf on the shelf, but I could not resit him!


While we don't use or serve alcohol in our home, the Manchester will have a little bar. The X.O bottle didn't have a label so it was $3 instead of $15. I can make a label. The decanter and glasses came from SMA miniatures on Etsy, and the whisky jars came from the show. And that's about to extent of the bar supplies--so far.


And the hand cultivator. Turns out, it can be purchased on Factory Directly Craft.com for about the same as I paid for it. I avoided shipping.


My husband uses his grandmother's hand cultivator in our own garden, these will go the Bellingham's garden--yet to be built.


Daughter Jennifer made these cute little gnomes. One hangs out with my antique cup collection and the other one hangs with the Barbies, but they have a habit of disappearing--mostly after Jen and the girls have been here-- then the hunt is on.


So, who knows where the mistress of the Manchester will find her gnome friend.


Thanks for joining me. I hope you've had a much fun as here as I have had writing this entry.


Monday, September 5, 2022

In the Mood

 Work on the Manchester cabinets goes slowly due part to the tediousness of the finishing touches and real life projects and responsibilities taking time away from play time. I am glad to announce that I made some good progress this week. The cabinets still are not finished; while, I have made good progress, I'm procrastinating the painting. 

Countertops have posed one big challenge because I didn't know how to create a realistic look.  For the kitchen countertops, cut two tops on the Cricut maker from 1/16 basswood and gluded the together to get a thicker counter. I used 12x12 sheet adhesive vinyl to give the look of shiny quartz or granite countertops. It is very easy to work with, giving a very, clean finished look.

The cook top cutout made it hard line up the cut vinyl so after a failed attempt to get the cut final in place, I drew guide lines to help line up both sides of the cut out. After three tries, I finally got it right.


The guide lines made a big difference in applying the vinyl evenly on both sides.


I used my Cricut scrapper to press down the vinyl to get a good, smooth seal. The vinyl is easy to work with and gives good results.


All the cabinet needs now is paint touch up, 3 drawer pulls; and the top glued in place.


The next counter top I covered was for the bathroom vanity and the repurposed kitchen cabinet that I'll use on the 3rd floor. I used a heavier card stock with a pattern that resembled a marble finish. The paper, of course, required glueing in place.

After the glue on the paper had dried, I first sprayed countertops with Krylon Sealer to strengthen the paper for the next step, a coat of the triple thick clear glaze to give a shiny a surface. 

Paper does not hold up as well as the vinyl. Too much tacky glue will soften the paper, causing it to tear, so the less glue, the better.


I used the chemical sprays in the garage and wore a left over COVID mask--which really didn't protect much from the fumes, so I sprayed outside because the fumes are so awful. I also let the pieces cure 24 hours.

Next I painted the plastic sinks that ordered from Paper Doll Miniatures Shapeways Store. I used a primer-paint spray for the base then I'll paint them white with acrylic paint.


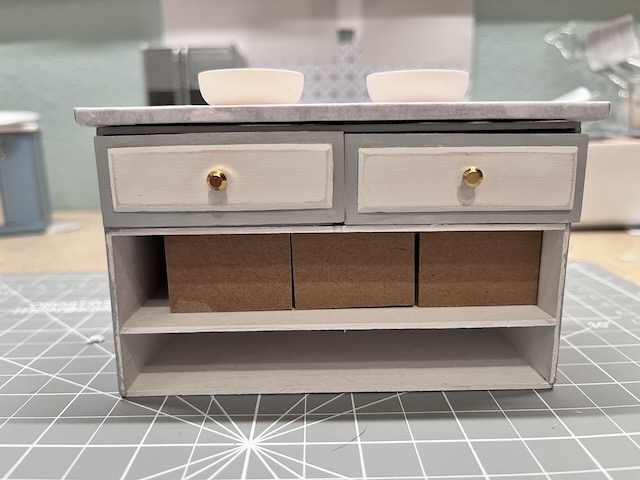
I'm really liking the gray cabinet, but I'm questioning the gold handles now. I may change them out. I had already painted the plumbing gold, but the the bathroom is gray and black, and the handles will be nickel, so I will repaint the faucets and switch out the gold knobs. Why do I keep changing my mind?


Just to see if they would fit, I inserted the chipboard boxes that will become "baskets" for storage. 


I'll add feet so that the cabinet doesn't sit on the floor and faucets to finish the bathroom vanity. I found the "feet" at Hobby Lobby in the craft lumber. They are actually for furniture making to cover recessed screws, but they work nicely as feet. The vanity just didn't look right siting directly on the floor. The feet will give it a finished look.


Back in I have struggled with how to hang the upper cabinets with the vent hood removable so that I could access the light that will be behind the hood. I watched a quick video where the upper cabinets were glued to some sort of art board and then attached to the kitchen wall. I decided then to use illustration board over the wall, cutting a hole where light will be hang. I've wallpapered the board and will use carpet tape that is double sided sticky to attach the board to the wall of the kitchen, so that if I have to change out the light, I can--I hope.


So all of the counter tops are made but need to be glued in place and once all the touchup work is finished the kitchen cabinets will be installed and then I can install the stair case by week's end--I hope.


But I do have an important project to finish, my grandson's photo album. I have all the photos selected and now am adding the embellishments. He and grandpa came home early from elk hunting, so I didn't get it finished for him. More Procrastination, which I defend by saying, "I have to be in the right mood," which really has caused a lot of procrastination in making countertops. I wanted them to look right and authentic. I think they will be okay.


Thanks for visiting. Have a wonderful week.

Houseworks, LTD Garage Kit, a Perfect Fit

It's late April and we are supposed to be doing spring garden clean up, cutting back last year's canes on the roses, hacking away at...