Wednesday, April 28, 2021

Scale: What Works for You

I belong to several FaceBook miniature groups, but one is especially interesting and informative, Miniatures Tutorials and DIY. Hardly a week goes by without a member asking about scale. This week was a particularly hard project, a tiny pull toy with what appeared to be an elephant figurine that might have been larger than what a 1:12 toy might be.  The artist was wanting to create a pull toy with the elephant on a 3/4 inch long piece of wood. I hope I gave her a good answer about scale by explaining that  scale is often relevant and asked if the piece would look out of place in the spot where she wanted to use it and finished by saying that if the piece works for her, then it was okay even if it was out of scale. I also advised that she could look up real pull toys to get sizes so that she would have an idea as how proportional her toy would be.  I didn't get any feedback from the artist, so I hope I didn't offend her. 

Thus this post on scale.

Scale can be deceiving, especially if you are an artist who insists on having every thing perfect. I often go about the house measuring items to see what their exact size it and then using a conversion chart to help me decide if the item is close to scale. Ordering from online sources can be tricky because a vender will describe an item as a specific scale, and when it arrives, you wonder if it dreally is scale. Here, let me demonstrate.

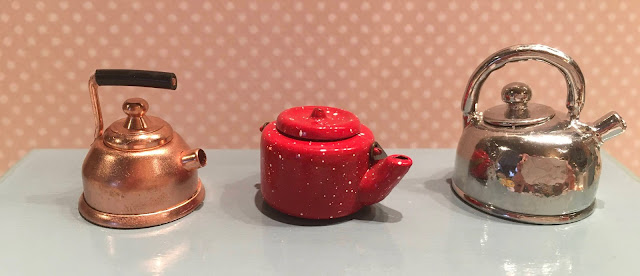
I ordered these pieces from an Etsy store and when they arrived, I was so excited, but the tea kettle seemed larger than    1:12 scale, so I took out my corresponding items to do a comparison.


While I didn't actually measure these, I lined up the pieces side to side with both sets and discovered that basically the tea kettle is pretty much in line with other two pieces. It seemed comparable the real life kettle. I'm satisfied with it.

 
On the counter top they seem to work. I love the cooktop that Jodi at My Miniature Madness designed and 3-D printed--if only I had such a cooktop in my real kitchen. Love the 6 burners, especially for a miniature kitchen because the pots aren't crowded together. 


The coffee mug (ordered 4 from Factory Direct Crafts) is just too large, but it was advertised as 1:12 scale. So the lesson here is to not just trust the scale, but look at the numerical size dimensions.


I have stand mixers in each of my farmhouse kitchens. I love them because they add that touch realism. This is the first one that I bought that actually is labeled "Kitchen Aide."


The red mixer was my first purchase from an Etsy vender that I purchased years ago. Now there are dozens of venders with products that vary in price from the very expensive, detailed mixers to more generic ones. The blue one was only $4., but is authentic enough and workmanship is good. They are all consistent in size.


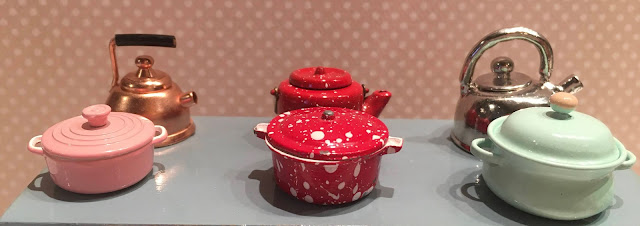
I compared the Dutch ovens, too and the green one is a bit larger than other two. The pin one is a more detailed reproduction of what might be the Le Crueste Dutch oven. I probably ordered the red splatter Dutch oven from Miniatures.com that came in a full set of pots and pans and it certainly is the smallest of the 3, but in the Pink Farmhouse, it fits. You can barely see it in the background on the cooktop.


And the stainless tea kettle certainly is larger than other two, still each one works in its setting, which is the important factor: does it work where you want to use it?


Perhaps a key factor is that each set ordered from a variety of sources are all 1:12. Side by side each pair works in its setting. 


Of course, you won't know until your order.

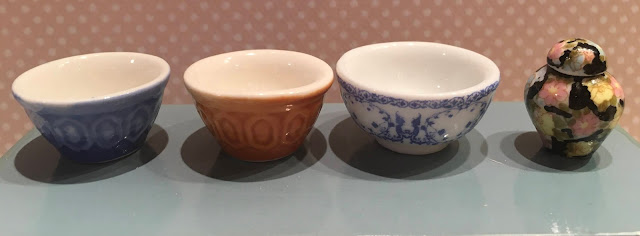
On vender/builder/artist whom we all love can be trusted to get things right, Julie Warren. I love these bowls and they were actually larger than I thought they would be which is great because sometimes these little things are so tiny that the detail is lost. 

The ginger jar, however, seems a little small in comparison, but it will be used elsewhere.

This set of bowls came from FactoryDirect Crafts, another favorite vender.


Jodi sent this lovely towel set with the cooktop as a Thank You gift. I love that it is handmade and is a sincere customer appreciation gift. I know that she probably 3-D printed the pump bottle, too. Thank You, Jodi. The set will be perfect in the Manchester kitchen.

 
Now the real test to see how these items will fit in the kitchen cupboard. On the left, Bits and Pieces by Julie fit perfectly. On the right, I ordered the "glass" bowls and drinking glasses from 
Factory Direct Crafts. The glasses seem to be more juice glass size than water glass size. The dinner plates are large, but I think in scale. I ordered them from Thai Miniatures for another project. Ten came in the set.


I have decided that scale really is relevant, but if you want to run the numbers and do the math, here are some links that might help: 

Mini Doll Kits https://minidollkit.com/1-12-scale-calculator.asp


Good Calculators: https://goodcalculators.com/scale-conversion-calculator/


Metric Conversions: https://www.metric-conversions.org/length/inches-to-centimeters.htm (too many ads)


Rapid Tables https://www.rapidtables.com/convert/length/inch-to-cm.html?insel=u&fracsel=u&f=&x=11&n=&d=


All said and done, scale really is relevant, just as pots and pans, bowels, kettles, and glasses all come in various sizes and styles in real life, so it is the mini world. Sometimes you will get it wrong and hopefully you can make it work. In the end, unless you are selling your items or entering them in competitions, it is what you prefer, what you like, what looks good to you that matters.


Thanks for joining me today. 


Saturday, April 17, 2021

For a Little Vanity


 I can't believe that I've spent the better part of 3 days on this project. I want a pretty vanity display for the Manchester bathroom, so I decided to make a collection of polities. I remembered seeing a simple Youtube video on making tiny containers, so I watched it again then declared: "I can do this."

Supplies: Gel Caps. I had some fiber gel caps in my pantry, so I pulled them apart, emptied them, and cleaned them out with a Q-tip to get all the residual fiber out.

Play Dough: I poked the caps into the ball of dough that would hold them upright and in place, but I didn't poke the first batch down to the rim, as I should have.


Candle wax: I used what I had on hand: an old tapered, a red votive candle, and a peach colored tea light. CAUTION: This is not a child safe project. Little ones are very curious, so I suggest that you work on this project while they are either asleep or elsewhere.


Once the wax is set (you can speed it up by placing the project in the refrigerator to cool more quickly), peel away the dough which has broken down the gel cap--unless the cap was not shoved deeply enough into the dough. Once you peel away the dough and the gel, you will have a nicely shaped bottle. If the bottom is rough, use an Xacto blade to gently scrape the bottom to the even it up.


Clear Nail Polish (no photos of this step): Paint the bottle with clear nail polish to protect the wax. 

I found that handling these tiny wax bottles was difficult, so I put some museum wax on push pins and thumb tacks to hold the bottles securely so that I could work on them.

Beads or other jewelry findings: In the video, the artist uses hot glue to secure the bead lid to the top of the bottle, but that just didn't work for me, so I used jewelry glue to adhere the beads to the wax bottle, but that didn't work, so I used a dab of Aleene's tacky glue, which worked fine.

I found labels by searching Pinterest. I didn't want the vintage Victorian perfume bottle look. I found more modern labels which I really liked. The Manchester is anything but Victorian. I printed the labels on regular computer paper then coated them a layer of glossy Modge Podge and let it dry. I cut them out and used tacky glue to adhere them to the jars.

Now finished, I have nice collection of little bottles and soaps. I sliced one bottle that didn't turn out to make little cake soaps, but another way to get more uniform soaps is to slice a hot glue stick about .2 cm thick


I would suggest that you make more bottles than what you need just incase you ruin one or two or more.😬. The bottles that weren't usable didn't go to waste because I used my Xacto blade to cut round disks for little soaps. I wrapped the little soaps in a layer of tissue paper, securing it with dabs of tacky glue. 

 I cut a towel and wash cloth from a baby wash cloth that I bought at dollar store, folded them and secured them with tacky glue.

I've been fiddling around to make vanity trays, too. I found these wooden disks at Hobby Lobby, though I think this size is too large. at a little over 1 1/2 inch in diameter, so I'm going to use a smaller disk. You can use other materials: Kraft board, mat board, chip board, or multiple layers of card stock. I painted the disk with acrylic craft paint and sanded it to give smooth surface. I cut the side rim from Kraft Board about 1/4 inch thick. After I glued it to the disk, I added Washi tape after the rim is glued in place because the Washi tends to wrinkle when it is bent.


On the left are my homemade bottles. I am quite pleased with them; on the other hand, I very much like the ones that I made from a kit that I ordered from Etsy. I have a kit someplace but I can't find it, so I made my own. The kit is a very nice alternative to get really nice, clean toiletries for you tiny bathroom. 


My inspiration soaps in the little shell soap dish were ordered from an online catalog, but I thought it would be fun to have more organic soaps to match my bottled soaps, so I decided to try making bar soap.


Then I decided to try my hand at making soaps using Fimo oven bake polymer clay. I began with rolling a very small pinch in the palm of my hand into a little ball, but I soon realized that I couldn't get consistent sizes that way, so I rolled out a rope of Fimo and cut it in the same lengths. I started with .5 cm, but that was too small, so I cut a 1 cm length and that was perfect.

Next I rolled the clay in my palm into a nice ball then rolled it just enough to get an egg shape. I transferred it to the tile and pressed it into the bar shape with better results, but I'm not really happy with the color; these look really gray and not the sweet lavender that I wanted,  so I think I'll remake my soaps in colors to match my liquid soaps.


There are different  ways to get tiny toiletries:  
There is one more way that I may try and that is to make the bottles using resin. I'm not quite brave enough to that yet, but if you are thinking about doing an apothecary shop where you need lots of potions, lotions, soaps and other sundry toiletries, and want nicer containers the resin method would be the most efficient--but I'm not there yet. 


Thanks for visiting. Stay tuned for there are more projects on my To List. 


Sunday, April 11, 2021

 The kitchen cabinets are beginning to take shape. Currently I have planned 5 large pieces for the kitchen:

  • the lower cabinet where the cooktop is located with plenty of drawers
  • The upper cabinet has two cupboards with "glass" doors on each side of the exhaust hood
  • A center island that will house the sink and dishwasher
  • A tall column cabinet that holds the microwave and the oven
  • A cabinet that will be the coffee bar


None of the pieces are finished yet. I still have to finalize gluing various pieces in place, do some sanding, add the final touches, find affordable drawer pulls, and paint. I also have to construct the center island and finish the coffee bar. 

This counter has six working drawers, but non-working cabinet doors. It is cut from 1/16 inch basswood.


Once I glue on the countertop,  the gaps won't be so extreme. I'll do some more sanding to even out the high places. 


I ordered the refrigerator from Elf Miniatures in the UK. I tried to make my own refrigerator, but I just couldn't get it to turn out. The inside of this refrigerator will hold all kinds of good food. The cook top is really special. It is hand made, actually 3-D printed by Jodi at My Miniature Madness

I've followed Jodi for a some time now and learn so much from her well written tutorials. She introduced her gas cook top that she created using her 3-D printer for a kitchen that she is making for her daughter. At the end of the post she offers her cooktop for sale with two choices:  a kit that you can assemble or a completed appliance that she will assemble. I chose to have her assemble my cook top because by the time I purchased the glue and the paints to to finish it, I'd spend that much in supplies, but mostly because I feared that I would mess it up if I built it. In just a little over a week, I had this fabulous little stove top in my little house. 


The cooktop will be the focal point of kitchen, won't it! I've already starting accessorizing. I ordered the blue serving bowls just this week from Factory Direct Craft, an all purpose craft supply site with an amazing miniatures section. I borrowed the red teakettle and the mixer from the Pink Farmhouse, but I have a mixer and teakettle on order.


The upper cabinet with the exhaust hood has been particularly troublesome. I had thoughts of remaking it, I think I'll be remaking but decided that I put too much work into this one to scrap it. I've decided to re-cut it because I'm not totally happy with the design the more I think about it. 

Instead of making the cupboards individually, I attached all the pieces to one back board, which caused problems getting all the pieces to fit together nicely. I had thought about  doors that didn't open, but I also wanted to display pretty dishes. I thought about a plate rack to display white dinner plates, but the building the racks turned into a nightmare and looked unfinished, so I decided to add doors with glass (plexiglass) and glass shelves. I hinged the doors using straight pins, a bit tricky, but I managed to get the pins located where I wanted them. I used 3/32 inch bass wood for the doors to give a wider edge to locate the hinge pin.


(The problem with this exhaust hood is that it is too tall, so I'll shorten it up. In all the examples that I see, the hood housing does not reach to the bottom of the cabinets, I'm definitely remaking it.)


I designed the upper in the Cricut Design space. I am so pleased with myself as I am getting better and learning how to measure more accurately. My designs are still pretty simple, but simple works for me.


Once cut out, the pieces  fit together nicely but I realized that I needed to make adjustments and add reinforcement pieces for a sturdier piece. I also need figure out how of if I want to add a light inside.


With the upper cabinet ready to paint, I move on to the column cabinet that will house the oven and microwave. It was a tricky piece to fashion, and I was determined to have working doors, so I used this process to hinge the doors for both the upper cabinets and the doors on this cabinet.

Using seamstress straight pins can work very nicely to create hinged doors, but this little project can also go badly very quickly because basswood tends to split easily.  With the help of my Cricut Maker and taking careful measurements to get the doors the right size, the doors fit nicely. For the cabinet bodies, I use 1/16" basswood, but for the doors, I use 3/32" thick to give a wider edge to center the hole for the pin hinge, reducing--not eliminating--the tendency for the wood to split.


Before I attempted to drill the holes for the pins, I rounded the hinge side of the door by dragging the edge on both sides across sand paper to round the edge so that door would open then I positioned the door in place and used an 1/32 drill bit to begin drilling the pin whole in the top of the cabinet.

Once I can see the drill bit had gone through the top of the cabinet and  begin to penetrate the door, I remove the bit and then remove to the door and finish the hole to make sure that it is centered on the edge of the door. I start the hole then use pliers to push the pin into the unfinished drilled hole for a tight fit.


At this the point, the door can easily be ruined if you don't have the pin hole centered. If the pin is off centered, likely the wood will split.


Once I have the pin hole in place, I remove the pin, put the door in place, insert the pin, and then cut the excess away. Repeat the process for the bottom hinge.


The bottom hinge does pose a challenge because it is hard to get a straight angle to drill the hole. 

Jeweler's pliers are helpful in positioning the pins. Once you have the hinge pin inserted, you can cut the excess away, leaving enough to reinstall the door and then trimming away the rest of the pin so that it is flush with the surface of the cabinet.


Yes, my worst fear, the pin didn't go in straight and the wood split, but I'll add so glue to secure it and the plexiglass window will add support--it's not like this little door will get a lot of heavy use.


And there you have it: Hinged cupboard doors--looking good even upside down.


I ordered the assembled microwave and oven kit from Elf Miniatures. They are nonworking--that is the doors don't open and they are supposed to look built-in for a clean, modern kitchen. I wasn't sure how to mount the appliances, so I cut a piece to back the front of the cabinet so that I would have something to adhere the appliances to keep them in place. Cutting to cut-outs for  the front of the cabinet was so easy in Design space.

I still am mulling over a working drawer or a faux drawer front beneath the oven. 


And that's how I have spent my week, obsessively working on the cabinets for the kitchen, ignoring real house chores like doing the laundry and beginning the spring clean-up in the yard--it's been too cold and windy anyway to get any work done outside. 

I end with a special thank you to Jodi for creating a great cooktop and then sharing her talents with those of us who for one reason or another don't take our miniature obsession to another level. 

Thanks for joining me today. If nothing else, I hope I have given you courage to build your own pieces for your miniature project. I am learning a lot, mostly as I go along and making a lot of mistakes along the way, too, and always learning. I am especially excited about the gas cooktop, hoping that I do justice to Jodi's amazing workmanship as she masters her 3-D printing skills, and so willing shares her talents.





The Tale of Two Projects: Trials and Tribulations

  Murphy's Law says if anything can go wrong it will, and so it is in dollhouse building. I set out today to get the wallpaper installed...