|
| https://annsdollhousedreams.blogspot.com/2016/06/new-project.html |
I began the project in earnest in 2016; in fact my first post was June 3, 2016, and still I have not finished it. Your can read that fist post by following the link. I which I have become quite adept in covering the up. I wrote the first of the year that I would finish this house, so that is what I am doing.
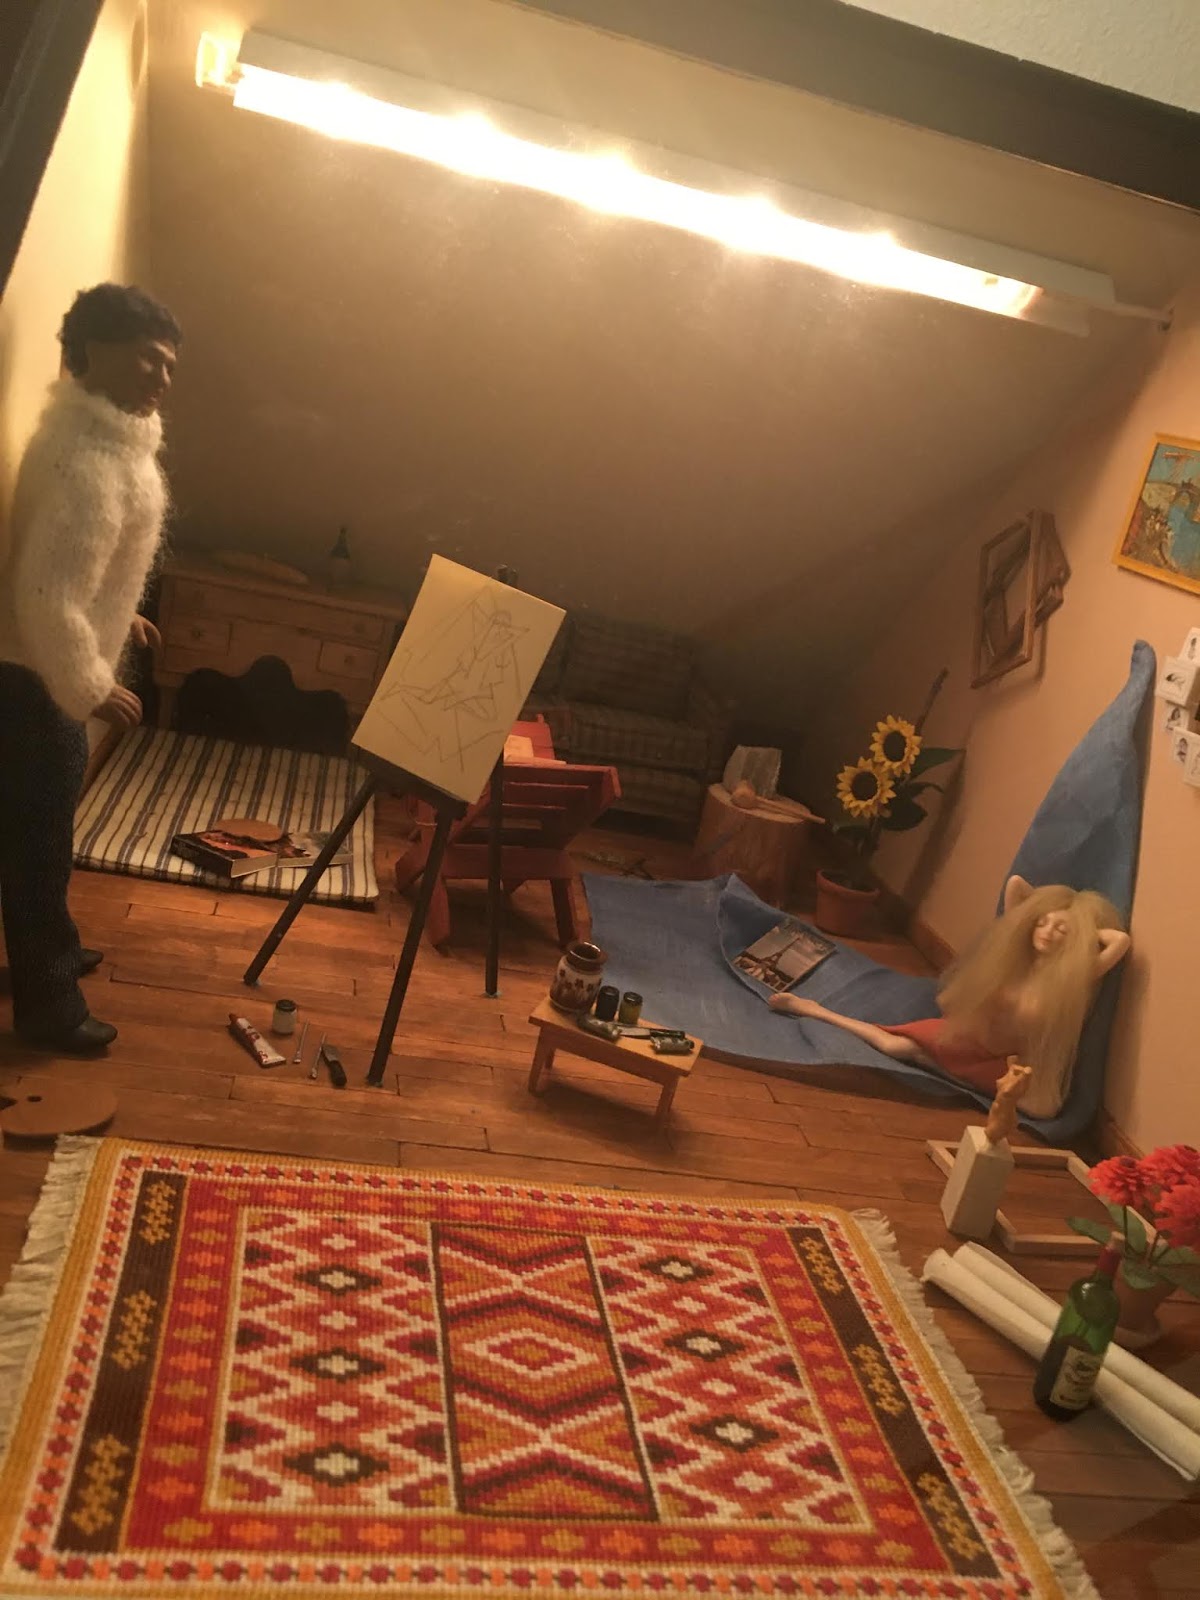
Project 1: The Attic Bedroom
The attic bedroom where I envision a teen aged girl hangs out. It's not quite as rustic and shabby as I wanted it, but it turning out nicely. It's an odd shaped room that is difficult to work with.

With the tape wire running across the floor, the flooring won't be glued down. I've considered my options, including the paper tile flooring, carpeting, and wood. I even contemplated painting the floor. In the boy's room to the left, I made a hardwood floor out of the wide craft sticks, and so I decided to do the same for the girl's rooms to give the attic a sense of continuity.

First I made a template--the photo out of focus, but you get the idea.

From the template I cut a 12x12 cardboard to fit the space, but as one piece it was too wide to be installed, so I cut it down the center, taped it together on the underside and began placing the craft sticks from the center working to the outer edge on each side. I decided not put flooring in the very front alcove.

When I found this rug on Melvin's Minis on Etsy, I knew that I was headed in the right direction. It is perfect.

Before I separate the flooring pieces, I sand the wood using 120 grit and 220. My sanding blocks have been well used, so I cut sheets of sandpaper to size and pinned them in place.


And then the stain. I am waiting for it to dry.

Tomorrow the floor will be installed, the baseboards added, the crown molding will be installed, and the furniture moved back in and that room will be finished.
Project 2: The Roof
I have put off this job because I could not face installing all of those tiny. little, single shingles then Jodi at My My Miniature Madness suggested speed shingles sold on the Greenleaf Dollhouse Company Store. I had my husband help figure the square inches of this multi level roof with several different elevations. Originally I figured that I would need five stacks of shingles, but our math indicated 4 would do the job since each stack would cover 225 inches. The roof measured over 800 square inches.

Laid out together, the choice seems simple: nice, neat, simple strips of shingles as opposed to a plastic bag of wood chips. In all honesty, the choice is up to each builder. At $15 dollars a stack, the speed shingles are pricey. This shipment cost me $60, but I am quite pleased with them. Certainly a better choice than the punch-out shingles that come with some kits.
Before I began, I did some research, visiting these blogs. Both links have great instructions from beginning to end.
- Otterine has a very good tutorial on speed shingles.
- My Miniature Madness
- Youtube: https://www.youtube.com/watch?v=4tvwdi16uewhttps://www.youtube.com/watch?v=4tvwdi16uew. This is a great video of how to apply the shingles.
So between these three miniaturists, I decided that I'd go with the speed shingles.
The wood chips would have to dyed, allowed to dry, sorted, and put in place one by one. I had used them on the Ballet Studio, which was so tedious. I used liquid nails to adhere them which didn't dry clear and leaked out from under the shingles, so I couldn't bare to work on an 800+ inch roof.

I began by making templates of each elevation first by using computer paper then cutting a better, sturdier template from card stock.

The roof has some unique problems. I didn't get the pieces properly placed, so the gables don't fit tight against the main roof. I'll have to accommodate that. You can also see my failed attempt at drawing the shingle lines.


With my cardstock templates all made, I began laying shingles on a small roof first. I had to fiddle around with the shingles to get the layout correct. I fixed each row in place with masking tape.

I made a small measure to make sure that my lines were evenly spaced.

This roof is finished. I have to figure out how to finish the very top row.

I flip over the template where I will use my utility knife with a new blade to cut the along the template.


It's a tough cut. I learn that the shingles are not secured with enough tape and the ones at the bottom slip, even with a guide.
Still, I get a good cut. I'll be able to even up the edges just a small amount when I glue them down.

I am pleased. The template fits nicely on the small roof. Next I will glue each shingle sheet in place, one by one.

And so the work continues. Still some shingles are not secure in place and slip when I put the template on the roof, but I'm not worried because they will be straight when glued in place.

To close the gap, I will place trim over the gap--unless some else has a better idea. A gutter would be an option. I just don't know yet how to make one.
I learned after my struggle with the utility knife that if I taped the edge that would be cut away with masking tape and used my Fiskar scissors, the shingles stayed in place and cut much easier and cleaner.

This elevation has been the other reason for my procrastination. The brick chimney must go here. I traced its base and cut out the shingles where the chimney would fit.

It is a brick chimney and very heavy so I have long pondered and stewed over how I would attach it. What sort of adhesive should I use?
Don't breathe; its just resting in place.


Progress. All of the elevation templates are made. Ready to be install. I have used exactly 4 stacks of shingles, hoping that when I trim the last piece that I will have enough to finish the front elevation. I do not want to have to order another $15. worth of shingles for this small space.

And now for the adhesive.
I used liquid nails on my first build, the Ballet Studio, because it is not water based. Water based glues such as the white glues and tacky glues that clean up with water will curl the shingles. Here is my test strip. I like the E6000 best, the fumes are awful and the tube comes with a stern warning about the vapors. Since I work in the basement, especially this time of year, I don't have good centralization. I purchased two tubes of Quick Grip, expecting to use it, but it will be require several tube and at $7 a tube it will be expensive and the glue stinks. I'll be returning it unopened after smelling the E6000.
The Tacky Glue will curl the very thin shingles, though will some tender care I managed together my ten piece to lay flat and not curl.

I even used Grandmother Stover's that I use for all of my wallpapering, but it didn't set up quickly. I envisioned my shingles slipping when I added the next row.
I have always resisted hot glue but David Nelson who helped his mother manage her dollhouse store in Denver and builds dollhouses for a living said that he used hot glue to apply the shingles. I'll see him at the Little Show hosted by the Denver Museum of Miniatures, Doll and Toys next month--hopefully I'll have most of the roof done by then.
The hot glue isn't as problematic as I thought it would be. I found that if there was leakage I could quickly remove the excess glue as it had cooled enough to touch it but not so much it wouldn't release. So I think I'll give hot glue a try.

I am determined to finish the farmhouse this spring and begin something new.
Thanks so much for visiting.