Tuesday, August 22, 2017

Progress

It's the day after the eclipse. Were you in the path of the Great Shadow? We had a 96% eclipse. I didn't have glasses for eye protection, so the eclipse passed by without much fanfare. Here, the weather was perfect for viewing with a bright sun. As the shadow grew, the sun light dimmed, but not as it would with cloud cover. It was a bright light, yet softened. The house did grow darker and the parakeets stopped chattering. The temperature dropped and a slight breeze came up. The world was odd for a few minutes. I was otherwise occupied downstairs working on the Bellingham Farmhouse. Would you like to see my progress?


I have spent most of the week working on the front porch, which has been quite a challenge. This photo shows how the finished porch and balcony should look, but it wasn't it an easy task getting everything in place.

First I fit all of the pieces before painting and gluing. Looks good. Ready to glue. Most house builders will glue to bare wood to make a more permanent bond by bonding wood to wood rather than painted surface to painted surface.


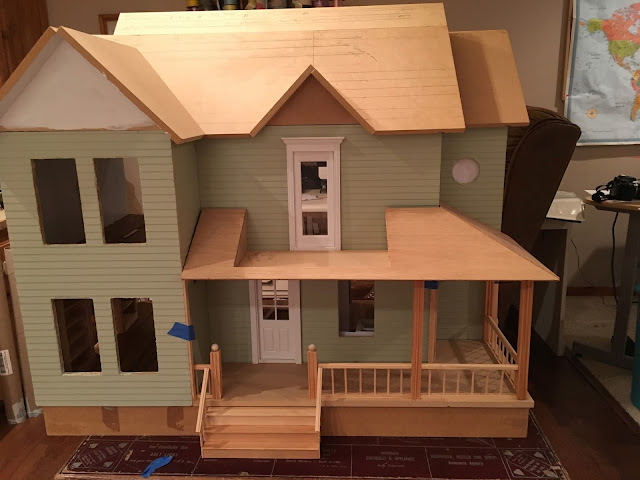
The balcony has a roof that comes in two pieces, supported triangles that have to be positioned perfectly in order for the pieces to fit seamlessly. I glued them in place following the directions in the institution booklet. Wrong. I thought that I had them positioned perfectly, not so. In fact I had to remove them more than once. I used a heat gun that I had purchased when I was trying to remove pieces from the Blue Farmhouse restoration to soften the glue. A heat gun is a valuable tool. I know that other dollhouse bloggers have microwaved pieces to loosen glue, but the roof pieces would not fit in the microwave. Finally after a couple of repositionings, I got the triangles in place. The roof fits nicely in place now.


The floor does not fit as tightly up against the outer wall as I would like. I had to trim the smaller section of roof to get it fit, but I am not worried about the pieces not fitting so tightly on the larger piece because the shingles will cover up the small gap.


Gluing the bottom porch floor in place was a major commitment to making progress. 


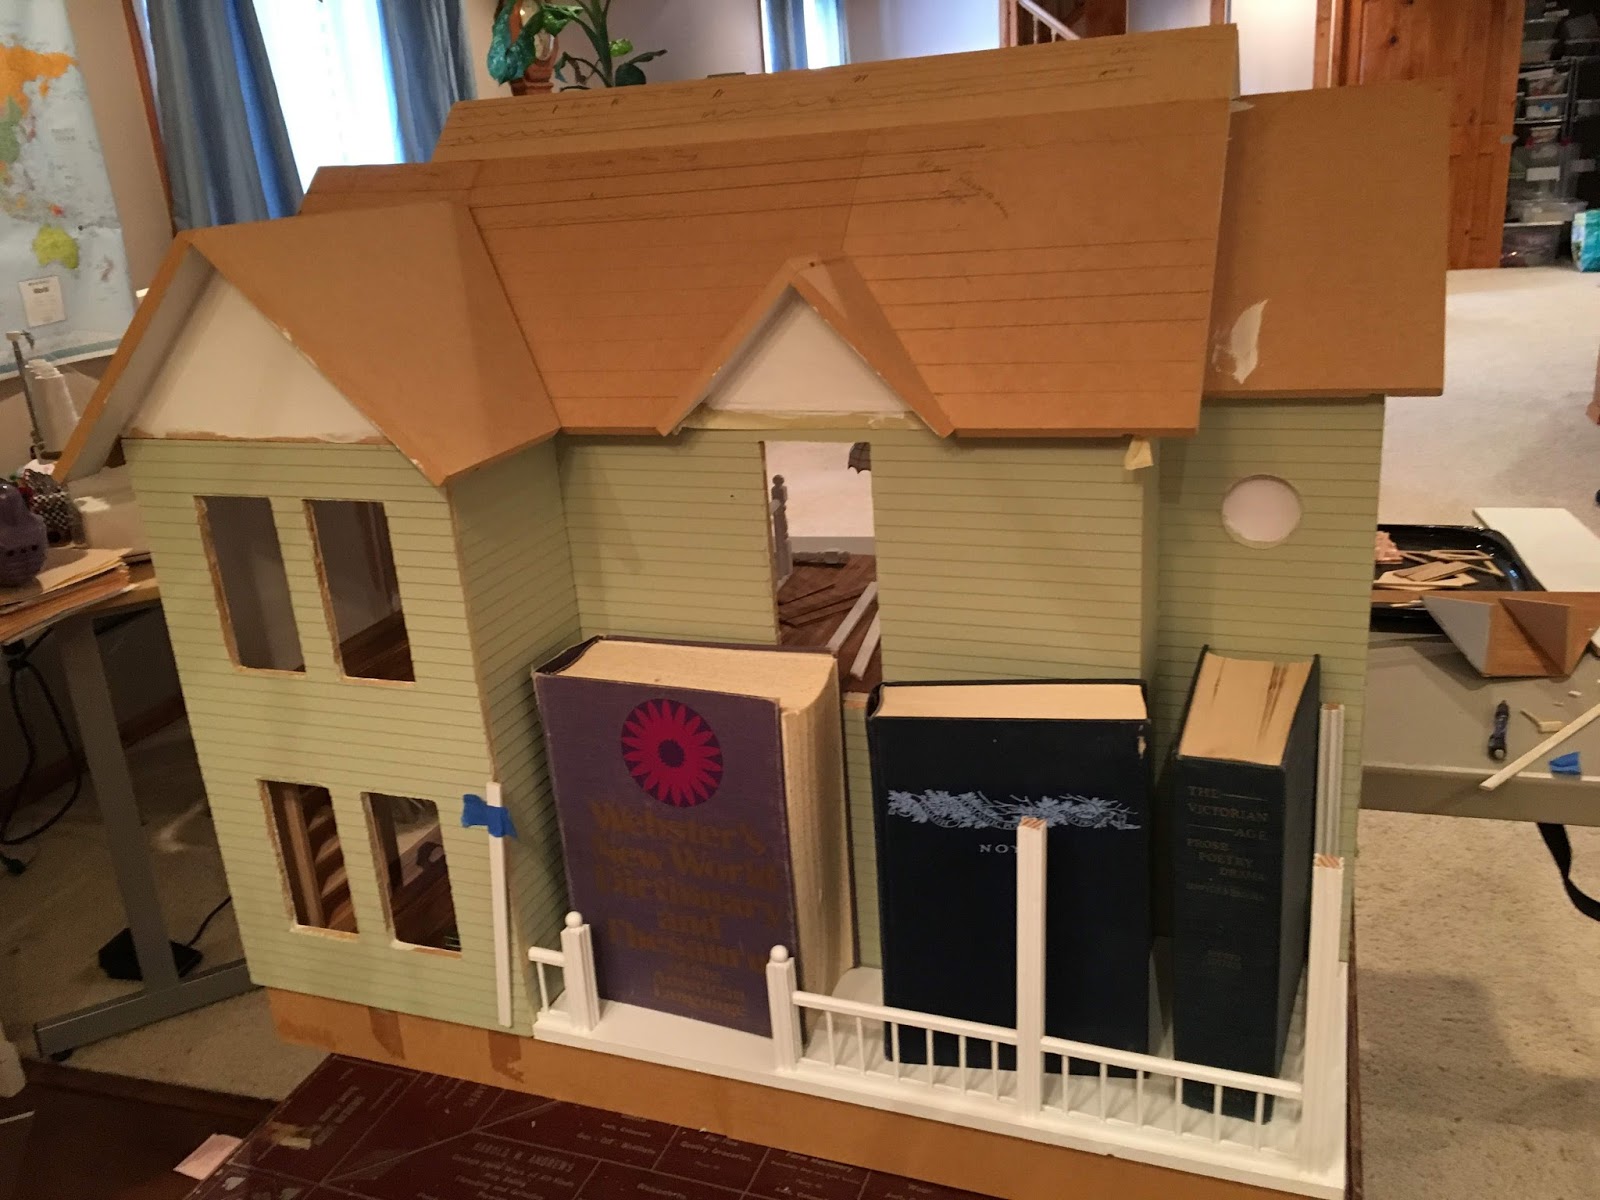
I am by profession a retired English professor, having studied English (and American literature) for five decades, now my treasured books make very good weights to keep the porch floor in place.


Great reading, by the way.

 I am deviating from the kit's balcony design by creating my own. These old kit pieces are sometimes very hard to work with, such as the design pieces for the balcony railing. When I was building railing for the lower porch, I made a mistake, so I decided to use the mistake piece for the balcony, but it was too short, so added more railing.


I introduced this wood filler in another post. It is a handy product to fill gaps and holes, to patch and piece wood pieces together. It cures quickly, sands nicely, and makes oops, boo-boos, and mistakes more easily repaired. I am learning more as I go along out of necessity because I do make a few mistakes and it is nice to have a product that will cover up my mistakes. 


I 'll have more photos soon as I finish up the trim on the outer surface. I also need to share the final steps in assembling the third floor--and other tedious and challenging adventure.

See you soon. Thanks so much for visiting. 


Sunday, July 30, 2017

Work on the Bellingham Farmhouse has been slow. I feel guilty sometimes hiding in the basement working on the dollhouse when I should be outside in the sunshine fighting weeds. We also took our Texas vacation to the Texas hill country where we stayed on a ranch out in the country. One of the fun things that I did was to visit the Junk Gypsy, that little antique shop hidden in a grove of trees at Round Top, Texas. If you are an antique collector, you will know Round Top for it's lively antique businesses and is written up often in the decorating magazines. The store, now famous for its HGTV show a few years ago, that when by the same name, is such a fun place to visit. You can visit my Garden Spot blog ( July 24th post: Elinore Has a Horse) to see the photos of my visit. It was a fun stop and there I got my inspiration for the bedroom for the farmhouse. But first let me show you my bathroom vanity project.

I struggled with deciding on a vanity and sink. I have a standard oak-type bathroom sink, but it was too bland, boring. Too dollhouse. So I decided to build a modern one since the farmhouse is an old farmhouse that is is being remodeled into a clean, updated farmhouse.


This is my first vanity made from scratch. I looked on the Internet to find inspiration. After I got this assembled, I decided that I didn't like the front of it. It was too wide.


These are the supplies, mostly bass wood purchased at Hobby Lobby, cut and trimmed to size. The the slats for the bottom shelf are cut from one of the very narrow craft sticks


I use stair spindles for the legs.


If I finish this piece, these are my options for faux drawer fronts:Two craft sticks cut to size and layered to give the raised panel look. For the knobs I could use a small craft brad, or dollhouse brass handle, or a crystal bead on a head pin with a finding for a base. I could also insert the brad on the 
finding.


Not liking the front of the first vanity, I made a second one, using different balusters spindles for the legs and instead of bass wood for the front, I used a wide craft stick to get a narrower front. I had a bit of flooring left over from the shower project that I put on the top. I love the sink. I had a various ideas for a sink, but I really wanted the round bowl for modern look. The only place I could find them was on Etsy for around ten dollars plus shipping, making it around twenty dollars to have it shipped for Europe. I found this one for $5.95 Buy Now on Ebay, costing me half the price, shipping included. The back splash is flooring baseboard from my stash. Actually, the only item that I purchased was the sink.


Now isn't this really cute? Yes, grape jelly. I have been saving the jelly containers from the Village Inn where we like to go eat. They are perfect little storage tubs. I had thought about using one for the sink, but it just didn't look right. I needed the modern round bowl. The bathroom is nearly done now. I was began trimming craft paper for the wallpaper, using a white embossed shiny paper, but the white is the wrong color now with the white vanity, so I have to find new paper. 

Saturday I drove to Denver to an estate sale of three dollhouse/miniaturists held by the Colorado Doll and Toy Museum. I didn't know what to expect because it was held at the Methodist church in a small meeting room. While there weren't a lot of people there picking trough a lot of stuff--everything you can imagine, except for dollhouses--there were a few room boxes. These are the things that I came home with.

We feed the wild birds, so this bird feeder was a must: $10.


Miscellaneous things that caught my eye: a tiny house, toy blocks, a handmade fall center piece--such detail-- a fishing creole, and a basket trashcan, handmade. .50 cent baggies. The baskets were in the same baggie.


I don't seem to have the patience to make these dainty, delicate undergarments: $5. And the mannequin. I have two already. They are black plastic. Sell for $10. or so on line. This one was $2 and painted.

But the best find was this brass bed: $12. I have seen it online for $ 45- $65. with bedding and as much as $850 on one dollhouse site (sort of suspicious of that- description says handmade.) There were two of these beds and a brass canopy bed that I am wishing that I bought. It had been painted pink over the white, so I passed.  I passed a a couple of other things, but I am happy with what i brought home. It was a fun way to pass the morning--all except for the hour and half drive to Denver, thought traffic was light, actually.


I don't know why purpose the Styrofoam servers, maybe a bedding foundation for a dust ruffle. I was inspired by the bedding at Junk Gypsy that was on the brass beds, big fluffy comforter, tea stained bed skirts. Pricey. Vintage looking. Romantic. So that will be my next project--to make the bedding.

I have more projects, too, that I have been working one, like a brick fireplace, but I am not ready to share it yet. 

I am so glad that you stopped by. I hope you enjoyed my little "how to" vanity. 

See you soon. Thanks for visiting.


Monday, May 29, 2017

I Need A Shower: A Tutorial

Surprise. Sarah at Villa Emilia thought that I should do a mosaic from the Ann's Dollhouse Dreams , my dollhouse blog, for Mosaic Monday. Frankly, things are fairly quiet here at the Garden Spot this week, so I thought I would take her up on her suggestion.

We took time off from weed control yesterday to visit two of our favorite garden centers only to find plants over priced and picked over. I did come home with some perennials that I'll show off once we plant this week. Here in Colorado we are slow to get our gardens in because it has been so cold and wet. Hey. Not complaining. When it rains, the Garden Spot greens up and looks like a country estate. This week night time temperatures will reach 50 degrees, so the HG says we will plant tomatoes when the soil has warmed.


Gradually the HG has been getting some nagging little chores done such as stretching this rope from the crooked Locust tree to the pine tree to try to straighten the Locust's trunk We shall see how successful that attempt is.


I miss having a closes line here at the Garden Spot, which would be so handy when you have large items to dry. I washed this quilt and the washer didn't spin out the water, so I had the HG fling it up on the new line. (I still am without my washer.) The line is a bit high for me to reach. Nor is it in the best location--a bird fly-way to the feeders.

Now for the progress on the Bellingham Farmhouse.


Image from Miniatures.com catalogue, pg. 59
I have a hard time working on the dollhouse when the sun shines, so I do most of my work downstairs at night. I haven't worked on it much the past several weeks, so the last few nights I have been working on building a shower for the Bellingham Farmhouse. I decided that instead of a tub, I'd do a shower. The nice modern shower carried by the online miniature catalogues costs around $30, more than what I really want to spend, so I decided to build one. Join me while I work. The shower in the catalogue measures 4 1/2 W x 6 1/4 x H 3 1/8 deep. Instead of measuring fractions, I made mine 4x6.

I began by making mock-up out of heavy card stock to get the dimensions and the pattern correct then cutting out the base using balsa wood and craft sticks.


I had two options, back the tile sheet with wood or glue it directly to the dollhouse wall; I chose to make a free standing shower. I actually dug through my stash and didn't have to buy anything.

Materials that you will need: 

For the shower:
  • Balsa wood (Hobby Lobby in the wood crafts supply area. You will buy a package that has a variety of sizes. Balsa is easy to work with with and can be cut with scissors.
  • Tile. I buy the vinyl floor tile by the sheet from Hobby Lobby located in the dollhouse supplies  section. (Not to plug Hobby Lobby, but it is the only craft store in our area besides Michaels that does not care much in the way of dollhouse building supplies.
  • Craft sticks cut to size: To build the rim for the shower base to keep the water from spilling put on the floor.
For the plumbing: Use your own creative ingenuity to come up something fabulous, these are the items that I used.

  • Garment snap for the drain
  • Jewelry findings for the shower-head and faucet
    • Head pins
    • glass bead
    • finding for base of handle and the shower curtain bar (still in the "thinking it over" stage)
    • earring back for shower head (Either dig through your jewelry box for a lone back or buy a package of them. They come in quite handy for building miniatures.

I  chose an antique gold finish. Our last home where we lived had gold finished faucets and handles. Not real gold, of course) but I loved them just because they looked elegant and no one else had gold in their home.

Here is the finished shower base:


I used craft sticks to create the edge for the shower base. You will have to decide how you want the edge to look then cut out your pattern from card stock first to get a good fit. I used Elmer's Wood putty--what you would use to fill nail holes-- to fill the gap between the pieces. Once it dried, I sanded it smooth. Next I will paint it white.


I was liking my results, but I wanted a second opinion so I dropped by the Blue Farmhouse to see if the girls over there would like to help out. I love my model's pink hair.  Were I younger--. Anyway.


 The Plumbing


The faucet is simple jewelry findings layered on a head pin and glued together.


I used a small punch to punch through the tile and the balsa wood to attach the shower plumbing.


I left the rounded top on the head pin for the shower (first image) to hold the shower head more securely in place. Next,  you can see the head pin for the the faucet extending out the back, so I clipped it off and placed a dab of glue on each head pin. Now the shower head and faucet are securely held in place on both sides with jewelry glue.


The shower fits. I need to paint the base rim and finish the edges. I am not sure exactly how I will trim them out right now and I need to add a shelf for shampoo, of course.


The ladies from next door were most glad to help out, but were pretty rough with their reviews. I almost got the impression that they were making fun of me. I can't imagine why because their house doesn't even have a shower and besides they are thrift store rescues, so they should be kinder and more grateful. Of course they are tall, skinny models who probably think that they should have a more custom designed shower. However, even if I had purchased the fancy one from Miniatures. Com, it still would not have been tall enough to accommodate them. They barely fit in the bath tub. Actually these girls are the prefect size for the dollhouse, if you want dolls. They measure 5 inches, so to scale they would be about my height--I am 5.2 and not nearly as thin. They are modern looking, not stiff and dated as the commercial dollhouse dolls offered. I need a Ken, though. Most of these were probably Happy Meal toys and ended up in the thrift store grab bags. 

I not necessarily a great crafter, but I do enjoy making my own things for the dollhouse. The shower still needs a shower rod and curtain. I'll use jewelry wire and findings to hang the curtain, but I am pondering the shower curtain. I'll get back to you on that.

Next I am trying to finish up the kitchen. Just for fun before I go, I thought I'd share my workspace with you. I need to do a good cleaning and sorting before I tackle the kitchen.


I hope you enjoyed today's Mosaic. I'll be linking with Maggie at Normandy Life. The HG will go for coffee this morning and I will pick rhubarb and make a rhubarb pie to take to a barbecue later today. Tomorrow it will be back to the garden to plant the new perennials. Check them out at the Garden Spot in a few days.

I know that I do not have to remind anyone to give thanks for our veterans, past, present, and future for serving their country and protecting freedom, not just here in the States, but those brave men and women who serve their countries bravely and with honor. And not just today as we celebrate in the US our military's service, but every day. 

Have a wonderful week and thanks for joining me today at Ann's Dollhouse Dreams.

Happy Memorial Day

God Bless America 


Saturday, April 29, 2017

So Genius

One of my favorite companies that supplies kits for dollhouse miniatures is one that I have mentioned before, HouseWorks LTD. The company makes a variety of furniture kits, windows, doors, and more. Let me show you what I have been working on, but before I begin I will tell you that I didn't like the kit windows that came with the dollhouse as punch out of the wood pieces that I decided would be too hard to assemble and I liked the look of the House Works windows and door so much better.

First a French door: As the photos demonstrate, the top piece is removable so that the window can can be removed so that you don't have to tape it off to paint, making a very tedious chore so easy, neat, and clean.


Windows with their tiny pieces and glass pose a lot of problems when painting them. I have painted a couple that had to be taped and still you get paint smeared on the glass. (actually Plexiglas's). I ordered eight windows for the Duracraft Bellingham farmhouse. As I unpacked the first one, it fell apart when took the rubber band that was around it off. Then the same thing happened when I unpackaged each door.


As the photo on the left demonstrates, the top part of the window was not glued in so that it can be removed. Essentially the window panes can be removed so that the Plexiglas can be removed and the windows can be painted with the glass panes removed. So easy. So Genius. 


Once the window has been painted, including touch-up, the pieces can be reassembled and the header on the window glued in. 

House Works also had kits to make appliances. Somewhat tedious to assemble, they are cheaper than purchasing miniature appliances and fun to make. During this work session I spray painted the range top, the oven door, and the vent hood with acrylic spray paint. Testing the first on a piece of plywood scrap. I liked the look very much. The pieces are shiny metal, but the spray paint give a more natural stainless look, not shiny, but dull.


I can't call these the finished pieces, but this is a nice hint as to what the kitchen will look like when it is finished. 

Don't be fooled. All of this tedious work represents hours of work, but what else does a retired lady have to do?  Oh, cook, clean, do laundry, work in the yard.

Thanks so much for stopping by. I always enjoy your visits. I have a new member to the neighborhood, Welcome Jodi.

The Tale of Two Projects: Trials and Tribulations

  Murphy's Law says if anything can go wrong it will, and so it is in dollhouse building. I set out today to get the wallpaper installed...