Monday, July 27, 2020

The Fairfied offers plenty of potential, especially if the build begins right out of the box. Renovations, however, present certain problems and frustrations, but they can be done. Let's begin with the basics. Remodeling requires removing a lot of things: wallpaper, electrical, wood trim, and old glue. I've been sorting though my tool chest to find what works best and I've come up with these items. What do you have in your tool kit that might make the removal job easier?


From Left to Right:

To dissolve old glue a professional grade heat gun gets the job done; however, it gets very hot even on the low setting. Not only will it scorch the wood, but the user can easily get burned, but it does soften even tight bond glue. The alternative, and probably a safer one, is the blue and white gadget, a heat gun that scrapbookers use to do embossing, using heat activated powders. If you have the embossing gun, it works fine, but I did find that the more powerful paint removing tool works better and I've learned how to use it on the low setting.


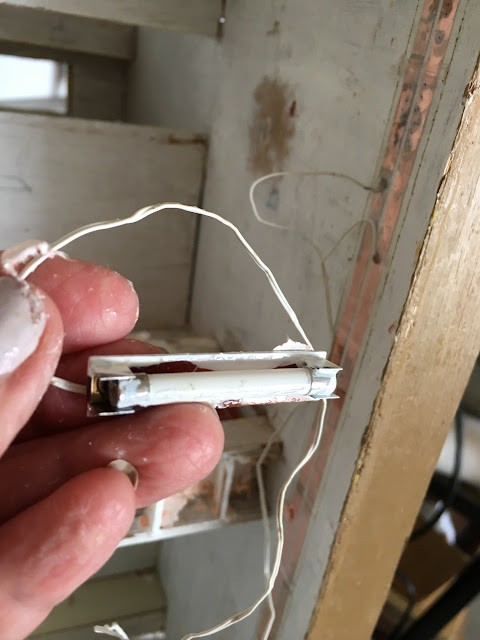
Electrical wiring can be another challenge to work around. At first I didn't want to redo the electrical system. While it is probably 30+ years old, it works, but with wires running all over the place, I had to disconnect a few. The builder ran one tape line across the back edge of the house then ran all wires across the floors to connect the lights. Lights for the ceiling were on the above floor, covered with carpeting glued in to last a lifetime. 

She wound wires here and there, taping them in place with scotch tape. She use a dozen of these simple lights tucked away to provide a general soft lighting. I like it and it works--um worked.


For other areas of the house, instead of trimming away excess wiring, she wadded up the excess and tucked it away in the attic.


The floors with carpeting stripped away are grossly ugly and required a lot of scraping and fabric softener to remove the glue. Then I rediscovered my heat gun--the big one. It instantly softened the glue so that I could more easily scrape it away.


This spot in the middle of the floor has a harden glob of glue around the electrical wires. I hate to heat it because as I heat the glue glob, I fear that I will melt the wiring insulation. I'm holding off on that one. If it's not removed, it will cause an uneven floor.


Here's the really big prize (she writes sarcastically)

The house sits on a platform with a turntable on the bottom. To hide the electrical and to allow the house to rotate on its base, the wire is fed through from the bottom then connects in a very hidden place on the house foundation. The wires to the transformer were spiced with masking tape--I think. The wires on the switch had broken off, so I mulled over trying to solder them back in place, but I realized that my soldering blob would be too big to put the cover back in place. So I gave into the reality that this system would have to be replaced. I've been working on the house with the huge transformer connected and now it's not. 


I have resigned myself to the fact that I will have re-wire the house to some extent. Oh how I dread that.


More scraping. The fireplaces have been particularly difficult requiring lots of fabric softener and picking. They were covered with two layers of heavy paper. It is apparent that the original builder used a brick print, didn't like it, and covered it over. It has been a challenge removing it. Persistence pays


 Turing the house on its top reveals an entire new view with more work to be done; however, since some of the surfaces don't show when the house is right side up, I will leave them Obviously these surfaces were papered before assembly.


False wall: The entire attic has slopped ceilings, so in visiting various bloggers, I found that some created false walls to make for better furniture arrangement. One, Emily at Den of Slack, created new wall assembly that included a door. I'm still trying to figure that out. This house came with the bedroom furniture for the attic, but it just does not fit up again that slanted wall.


So I began playing.


I'm liking this simple fix. I'll keep working on this. The attic will be the last space I work on.


A false wall narrows up the room, but accommodates for better furniture placement, so really the wasted space is hidden. It's wasted with or without fake walls.


 Door replacement presents another challenge. Originally the house does not have any interior doors and I wanted to upgrade the exterior doors, forgetting that Houseworks doors are slightly larger than the current door openings. Once the original door frames are removed then the task of widening the door begins.


I finally realized that with the interior doors I could use the box-cutter blade, but I did a lot of sanding on the first door. The box-cutter had to be used cautiously so as not to remove too much at once. 

For the exterior front door, I used the Dremel sanding drum before I realized that the a box-cutter might have been more efficient. I actually sanded away too much, now I have gaps to fill. 


 The overlap isn't much on the kitchen door. The top required the most to be removed. Of course I forgot to take photos, but I drilled a series of holes just below my cut line then used the pliers to pry away the compromised wood and finished the cut with the box-cutter and sanded the cut smooth. The door fits. 

 Many Fairfield builders are closing off the door to allow for a better kitchen arrangement because the room designated as the kitchen has little wall space. I decided to leave the door for two reasons. First, this house does not have siding, so how would I cover or conceal the the patched wall on the outside? I'm not up to solving that problem. Second, most turn of the century (20th) kitchens had exterior doors--a backdoor. While this door is located in the front just around the corner of the front door, it is still a kitchen door that the lady of the house would have open in the summer to help cool the kitchen while she baked or cleaned. And most of those kitchen doors had a screen door too, so I'll add a screen door.


Inside view. I wanted a dutch door or a farmhouse door with the upper half a window, but I couldn't find one in half scale. This one will do and will be enhanced with a screen door.


I couldn't wait any longer to apply the primer coat of paint. I'm using latex house paint as my base coat. I even put some in the kitchen just see what a clean interior looks like. I may go ahead and prime all of the interior walls later, but first I'm going to continue working on the exterior. I have some exciting things planned.


 This little house is so cute. There are not many examples out there to learn from, so if you have built the Fairfield send me photo or find me on Instagram (click here) or Facebook or direct me to your website, blog or social media. 


Busy week ahead. We've having a picnic here Wednesday for our dinner group, so I've got lots to do. And this is county fair week. The granddaughters are showing their horses this week in the 4-H fair, but I can't go. Parts of the fairgrounds were converted to a hospital for COVID-19 patients and will remain that way until January. In addition, horse events are being held virtually, live-streamed on Facebook, so while the girls get to compete in only two events today, no grandmas allowed--actually no spectators, so little Lily and I will hang out today. We'll go to Hobby Lobby and shop for the picnic. 

Update: Had a lovely day with Lily. Bought more 1/16 basswood for the stash and 3/32 plank for the attic false walls. 

Wishing you a great and productive week. 

Thanks so much for visiting. 


Wednesday, July 15, 2020

Learning the Maker and More.

If this post seems to be all over the place,  that's exactly the way things have been going with three projects that I'm bouncing back and forth between. 

To begin, I've been learning how to navigate Design Space for the Cricut. Here's what I have learned so far:
  • I'm only able to purchase 1/16 basswood at Hobby Lobby that is 8 inches wide and 24 inches long, so I have to cut down to 11 inches in length. Cricut's 11x11 sheets of basswood are out of stock. Who knows when of if the product will return. 
  • While the program says that it takes 14 passes to cut through this thickness, it actually take  9 passes before the knife blade cuts the mat. I've ruined two mats so far.


My first go at cutting basswood.


I am very impressed with the Maker. My friend has an Expressions II, which she has run for years, sometimes for days on end when she is in scrapbooking frenzy. She has yet to wear it out. The Maker is an impressive tool the home hobbies. One thing does frustrate me: I can't use my Cricut cartridges for my Expression 11 because the cartridge adapter is also out of stock. 


  • I discovered that Basswood does have a right and a wrong side. I need to pay better attention to how I store my wood. I accidentally cut pieces for a cabinet out of 3/32 basswood. The machine handled it in fine style; it's just that the cabinet will now be an odd piece. 
  • I'm becoming more comfortable with metrics. I am following Julie Warren's tutorial and her one book to create kitchen cabinets for the Blue Farmhouse Now Pink and she while she gives measurements in both metrics and Imperial, I am finding that it is much easier to measure in metrics than to find 16/64 on my ruler. Design Space does not give millimeters; instead, it measures in centimeters, so I found a conversion chart and soon learned to move the decimal point. I'm not a woman of numbers. I understand words, but I am learning.
  • Finally, I have to pay attention as to how I want the grain of the wood run when I design pieces in Design Space and adjust my measurements to cut the wood in the right direction. The lesson here is to check the first cut to make sure that the machine is cutting properly and to continue to check it through out the cutting session.
I'm burning through a lot of wood. 


Julie's cabinets are so nicely designed; her directions are excellent, but her projects have so many pieces, I've found that it helps me to cut out pieces in card first, label them and attach them to one of the mats that I ruined to help me organize the pieces.


So these are some of the pieces that I have made so far for the farmhouse, except I made the small cabinet three times. Twice I've glued it together wrong. 😖 I've also been trying to design and make a refrigerator. The blue piece is an attempt at a counter-top stove that I made years ago before I knew what I was doing. It is coming in handy as I plan my new kitchen. There fridge project is a rogue one, too, making it up as I go along. The green and blue piece is test run at a cabinet design. 


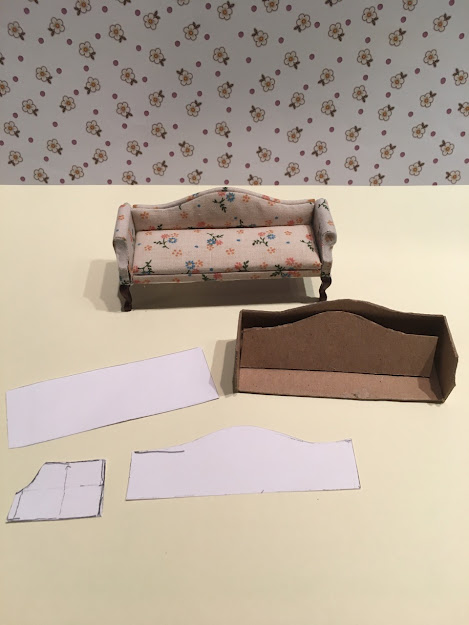
And I've been working on the Fairfield, too, my thought that I might make new furniture for it. I traced out a pattern for the living room sofa, wanting to preserve the original.


I knew how to make sofa arms  full scale, but I wasn't sure how to make that round arm, so I tugged a bit to get a peak at the arm itself. And that's when I decided that I if was was renovating the house, I could freshen up the furniture, too. Because the furniture is probably close to 40 years old, the glue has dried out, so the the sofa began to nearly fall apart. It will be easy to reupholster.


My mother would absolutely love the red velvet Victorian furniture. 

Dad was pretty tight with money, so mom had to be creative. They had a little house in a little mountain village near Steamboat Springs, CO. One great pass time was to go dump picking. You'd be amazed at what people throw away. One day she came home with an old sofa. They hauled it over the mountain passes back to Denver. She took an upholstery night class through Adult Education (back in the '60s) then she recovered that old sofa and a chair in garish crushed red velvet. While I never shared her love of crushed red velvet Victorian furniture, I always admired her ability to adjust a Simplicity pattern to her liking. She could adjust patterns and had the ability to look at a piece of fabric and cut out what she wanted and it was always perfect. Sometimes she'd make a newspaper pattern as a guide. I don't that gene.


I gingerly began to lift an edge of the back of the chair and the edge lifted easily, so I continued,


with good results. Now I have patterns to re-upholster chairs. I didn't stop with the dining chairs. I moved on the easy chairs, taking one totally apart. I got this. These pieces have their original price stickers, which are marked 'Aztec' and they were pricey little pieces. 


I am now comfortable with taking the tiny furniture apart and reassembling it with new fabric. I don't know yet if I will paint it or leave it as it is. 

I also made some canned foods. I watched Julie Warren's video on how to create canned goods. She uses Adobe Photoshop 6 to create very accurate labels. Her instructions for Photoshop are the best that I have seen. 

When I upgraded my Mac OS to Mojave, I lost two key programs: Quicken, which had 20 years of banking and my Photoshop Element 11 because the new update took the OS system from 32 bytes to 64, making old software incompatible. I had already upgraded my Microsoft Office to the new platform on the desktop, but not my laptop.

If you us a Mac and have not yet updated to Mojave, do some research first to see what changes will be made and if you can live them. 

So, without Photoshop, I have learned to do some very simple editing in Microsoft Word. To make can food labels here's how I do it:

  • Carefully remove the label. Then scan it. On a Mac, it opens up in "Preview" where I crop and copy it, then insert it into a Word Document.
  • Double click on the image to access the tool to adjust the size. The image here shows the size of the label, 6.5 inches tall and 2. 78 wide


You may have to experiment with size. You can see what I decided to try first.


I dug in my stash to to find a cola can to test my size.


The first label was little short, so I reprinted the same size and left a tab to clue the other end to. Eventually, I scaled the label down to .8" long to get the right size, still cutting it a little longer to have tap to anchor the end of label as I glued it in place. 


And I have a nice fit. Of course I didn't want to cover up my cola can, so I followed Julie's instructions and purchased a 3 mm dowel, or 1/8" diameter.  (I forgot to take my ruler with me, so I took the dowel over to the art supplies aisle and measured on one the rulers there.)


I measured the length of the label on the dowel, cut a dozen of them on my old scroll saw then painted them with platinum acrylic craft paint.


To give the label some strength and body I sprayed them with Krylon clean sealer then glossed them lightly with Modge Podge, hoping that the ink would run smudge, but it did a little.


Read to make burritos.


Finally the big project. I decided to reredo the kitchen in the Blue Farmhouse Now Pink. This was my first big project. You can see the beginning of the project and how the house looked when I brought it home by clicking on the photo. 


Because I was so new at this hobby when began this project,  I purchased pre-made sink, stove, and refrigerator. Pretty generic and uninteresting. So now that I have learned so much, I have decided to do the kitchen.


I love this house but the, I've never liked the kitchen. Right now the house is a mess because I'm trying to figure out to build the cabinets. 

Here is part of my journey in the kitchen renovation.

I want to build Julie Warren's cabinets. I've measured the space and drawn a floor plan then began making cabinets, the double base cabinet on the left and the farm sink on the right, but her cabinets don't exactly  fit the space.


I'm trying different floor plans. I even built a prototype stove out of scrapbook paper, which I if go with it, it will have to scaled down.


 Hoosier, which I adore, will have to fit in the new floor plan.


So, I played with pieces various piece to figure out he floor plan. This on includes a corner cabinet. Wont' that be fun to build? Not. I borrowed the refrigerator from the Bellingham. I'm using it as a guide to make my own.


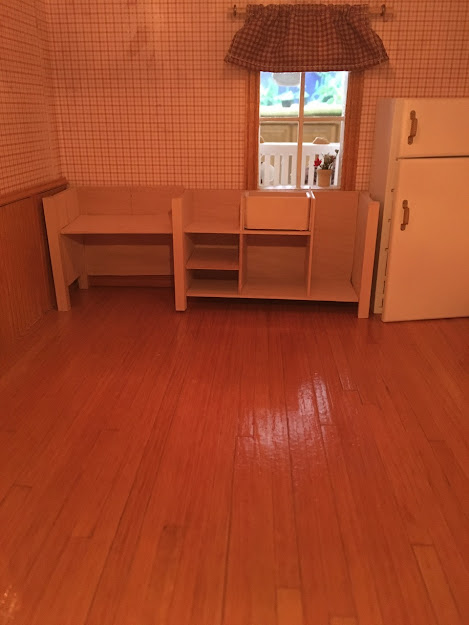
After much trial and error with pieces that I previously made, I tested my pattern in chipboard, cutting it out on the Cricut. I have some adjustments to make, but most importantly if fits in the space. 

There is nice view from this kitchen window: the kids on the porch swing and view of the lake beyond (the freshwater aquarium)😁


I really like the center island bake center, but it seems very crowded. And the second sink, a dry sink that I really like, too, but it may have to find a new home.


I realized that I didn't have have the cabinets underneath the window. I had wanted to center the sink in the window.


Then I tried this:


And I like it this way.


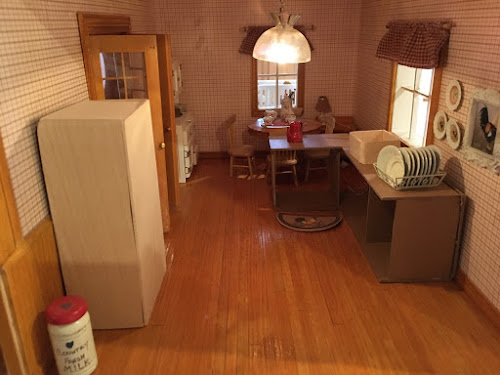
But I think I like this the best. I like the table by the window. 


And that's what I have been doing.

I do welcome any Maker suggestions, hints, and tips.

What have you been up to?

Thanks so much for dropping by; I hope you learned something new. Join me on Facebook where I belong to several mini groups, including Dollhouse Miniature Tutorials and DYI where I'll share parts of this post. 

Have a wonderful week. 


Houseworks, LTD Garage Kit, a Perfect Fit

It's late April and we are supposed to be doing spring garden clean up, cutting back last year's canes on the roses, hacking away at...