It's the day after the eclipse. Were you in the path of the Great Shadow? We had a 96% eclipse. I didn't have glasses for eye protection, so the eclipse passed by without much fanfare. Here, the weather was perfect for viewing with a bright sun. As the shadow grew, the sun light dimmed, but not as it would with cloud cover. It was a bright light, yet softened. The house did grow darker and the parakeets stopped chattering. The temperature dropped and a slight breeze came up. The world was odd for a few minutes. I was otherwise occupied downstairs working on the Bellingham Farmhouse. Would you like to see my progress?
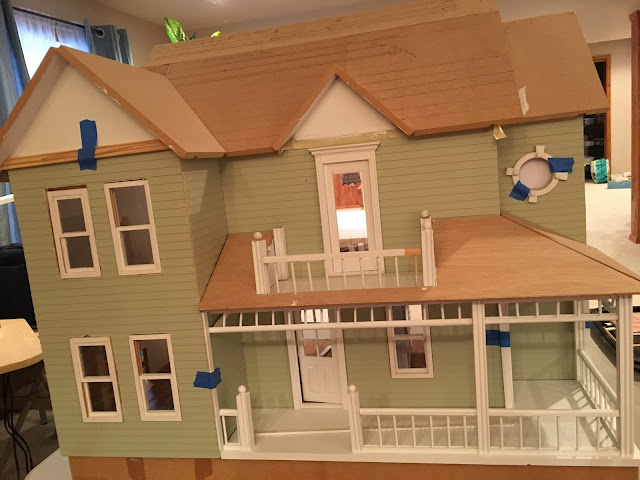
I have spent most of the week working on the front porch, which has been quite a challenge. This photo shows how the finished porch and balcony should look, but it wasn't it an easy task getting everything in place.
First I fit all of the pieces before painting and gluing. Looks good. Ready to glue. Most house builders will glue to bare wood to make a more permanent bond by bonding wood to wood rather than painted surface to painted surface.

The balcony has a roof that comes in two pieces, supported triangles that have to be positioned perfectly in order for the pieces to fit seamlessly. I glued them in place following the directions in the institution booklet. Wrong. I thought that I had them positioned perfectly, not so. In fact I had to remove them more than once. I used a heat gun that I had purchased when I was trying to remove pieces from the Blue Farmhouse restoration to soften the glue. A heat gun is a valuable tool. I know that other dollhouse bloggers have microwaved pieces to loosen glue, but the roof pieces would not fit in the microwave. Finally after a couple of repositionings, I got the triangles in place. The roof fits nicely in place now.
The floor does not fit as tightly up against the outer wall as I would like. I had to trim the smaller section of roof to get it fit, but I am not worried about the pieces not fitting so tightly on the larger piece because the shingles will cover up the small gap.
I am deviating from the kit's balcony design by creating my own. These old kit pieces are sometimes very hard to work with, such as the design pieces for the balcony railing. When I was building railing for the lower porch, I made a mistake, so I decided to use the mistake piece for the balcony, but it was too short, so added more railing.

I have spent most of the week working on the front porch, which has been quite a challenge. This photo shows how the finished porch and balcony should look, but it wasn't it an easy task getting everything in place.
First I fit all of the pieces before painting and gluing. Looks good. Ready to glue. Most house builders will glue to bare wood to make a more permanent bond by bonding wood to wood rather than painted surface to painted surface.
The balcony has a roof that comes in two pieces, supported triangles that have to be positioned perfectly in order for the pieces to fit seamlessly. I glued them in place following the directions in the institution booklet. Wrong. I thought that I had them positioned perfectly, not so. In fact I had to remove them more than once. I used a heat gun that I had purchased when I was trying to remove pieces from the Blue Farmhouse restoration to soften the glue. A heat gun is a valuable tool. I know that other dollhouse bloggers have microwaved pieces to loosen glue, but the roof pieces would not fit in the microwave. Finally after a couple of repositionings, I got the triangles in place. The roof fits nicely in place now.
The floor does not fit as tightly up against the outer wall as I would like. I had to trim the smaller section of roof to get it fit, but I am not worried about the pieces not fitting so tightly on the larger piece because the shingles will cover up the small gap.
Gluing the bottom porch floor in place was a major commitment to making progress.
I am by profession a retired English professor, having studied English (and American literature) for five decades, now my treasured books make very good weights to keep the porch floor in place.
Great reading, by the way.
I introduced this wood filler in another post. It is a handy product to fill gaps and holes, to patch and piece wood pieces together. It cures quickly, sands nicely, and makes oops, boo-boos, and mistakes more easily repaired. I am learning more as I go along out of necessity because I do make a few mistakes and it is nice to have a product that will cover up my mistakes.
I 'll have more photos soon as I finish up the trim on the outer surface. I also need to share the final steps in assembling the third floor--and other tedious and challenging adventure.
See you soon. Thanks so much for visiting.


That dollhouse is so awesome. It's such a classic design. I love the sink you did in the previous post. Hope you are finding time for building.
ReplyDeletebig hugs,
Caroline
The Bellingham Farmhouse has some beautiful lines and the construction is Solid! And the meticulousness of your work is of a meticulousness which I Always Admire
ReplyDeleteMost Impressive! :D
elizabeth