Saturday, April 6, 2024

The Tale of Two Projects: Trials and Tribulations

 Murphy's Law says if anything can go wrong it will, and so it is in dollhouse building. I set out today to get the wallpaper installed in the Manchester Country Home attic, the last step before the floor goes in. As life goes, I was plagued with phone calls and text messages all morning: A friend just wanting to chat as she started her day, a daughter with some minor catastrophe, and a museum committee member working our museum web site. Finally, all the chatter and clatter stopped and I was able to get on with. my goal for the day.

Last week, I had a light meltdown--just minor mental issue when lights that worked the day before suddenly didn't. 


The only light that worked was the lamp plugged on the addition first floor living room.That room has only 3 lights: the lamp and two wall sconces. There are 2 other lights on this line, the front porch lights.  I narrowed the problem down to that line and short, possibly somewhere--but where? I was not about to start tearing out wallpaper to inspect all the connections.

Then ALL the lights failed. 😧


I began by bypassing the original connection, using 3 plug-in extension that will connect to a new place.  Nothing.


Next I began bypassing the tape wiring by using round wire and plug-ins on my little test board. Pretty messy and pretty ugly. 


But I was able to add back on-line the hanging light in the addition second floor and got the lamp in that room to work again. That line runs across the roof to the power source on the attic floor. 


But I did tear out wallpaper on this wall. Really, we should take lots of photos so that we can back and see what's behind the wallpaper BEFORE we cover it
.
Take a look at the light in the adjoining bedroom. It Never worked, so I took it down and replaced it. It's one that I made. Glue may have corrupted the wiring for it sort of fell apart when I tried to disassemble it. 


So  this long, sad saga it does have a happy ending. I just need to figure out how to hide my adjustments. 


The house looks pretty at night. I like the way the light comes through the skylight.
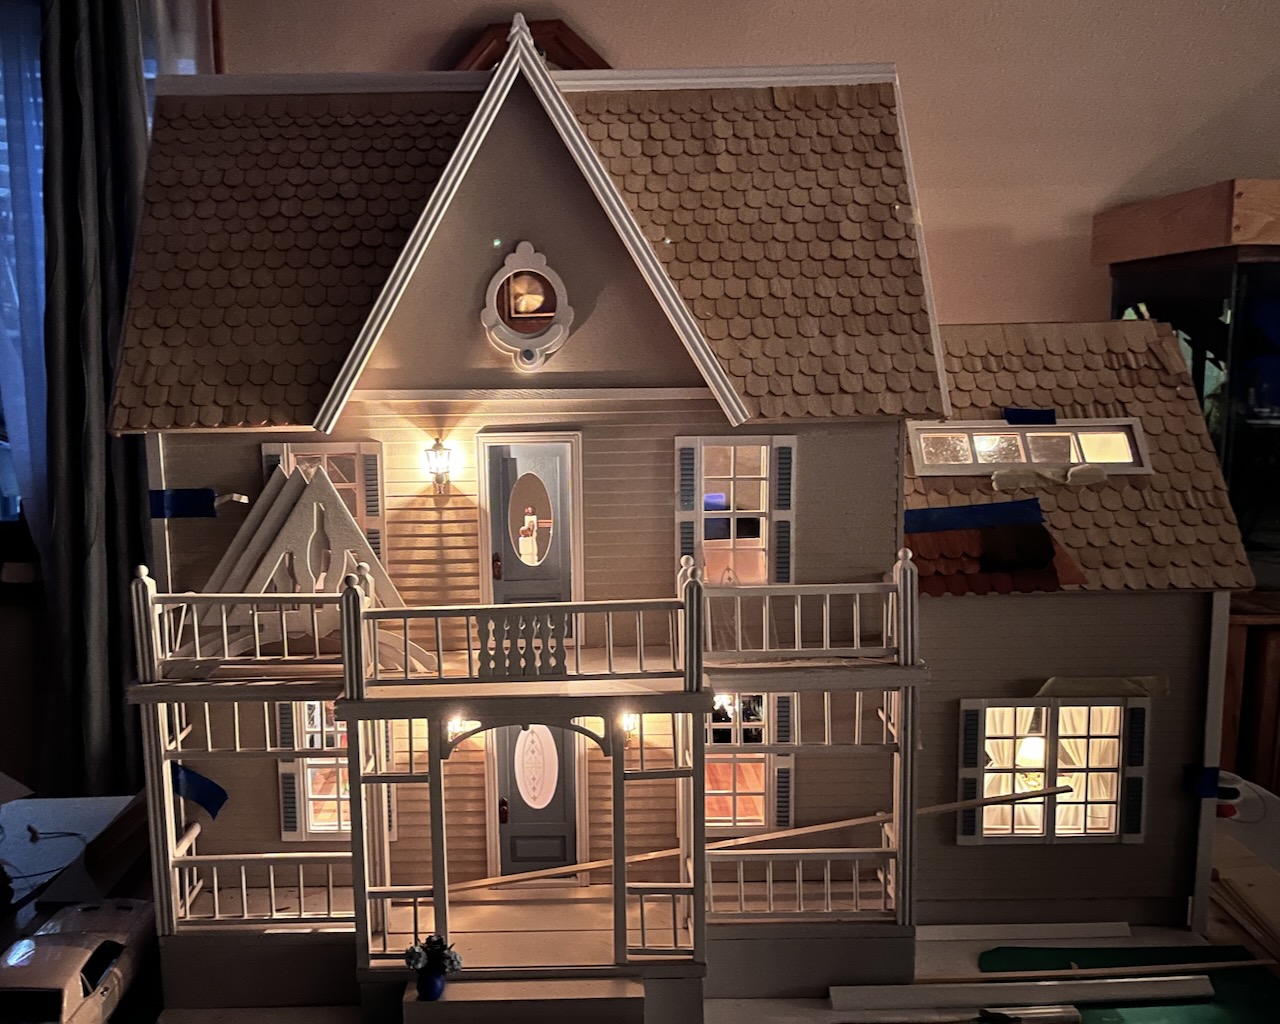

I replaced the bedroom light that failed with a little sconce that I made from a Bindel's Ornaments kit. I'm not very good at shaping the rounds on the end of the wires, but I decided to use it anyway because I like the bling.


BUT my lighting issues weren't over--this time, a not so mini meltdown.😖😣😩

What mess. I did conclude that because the house is made of MFD and not hard plywood, the brads are not held securely in place, especially on these exposed edge cuts because MFD is so porous.
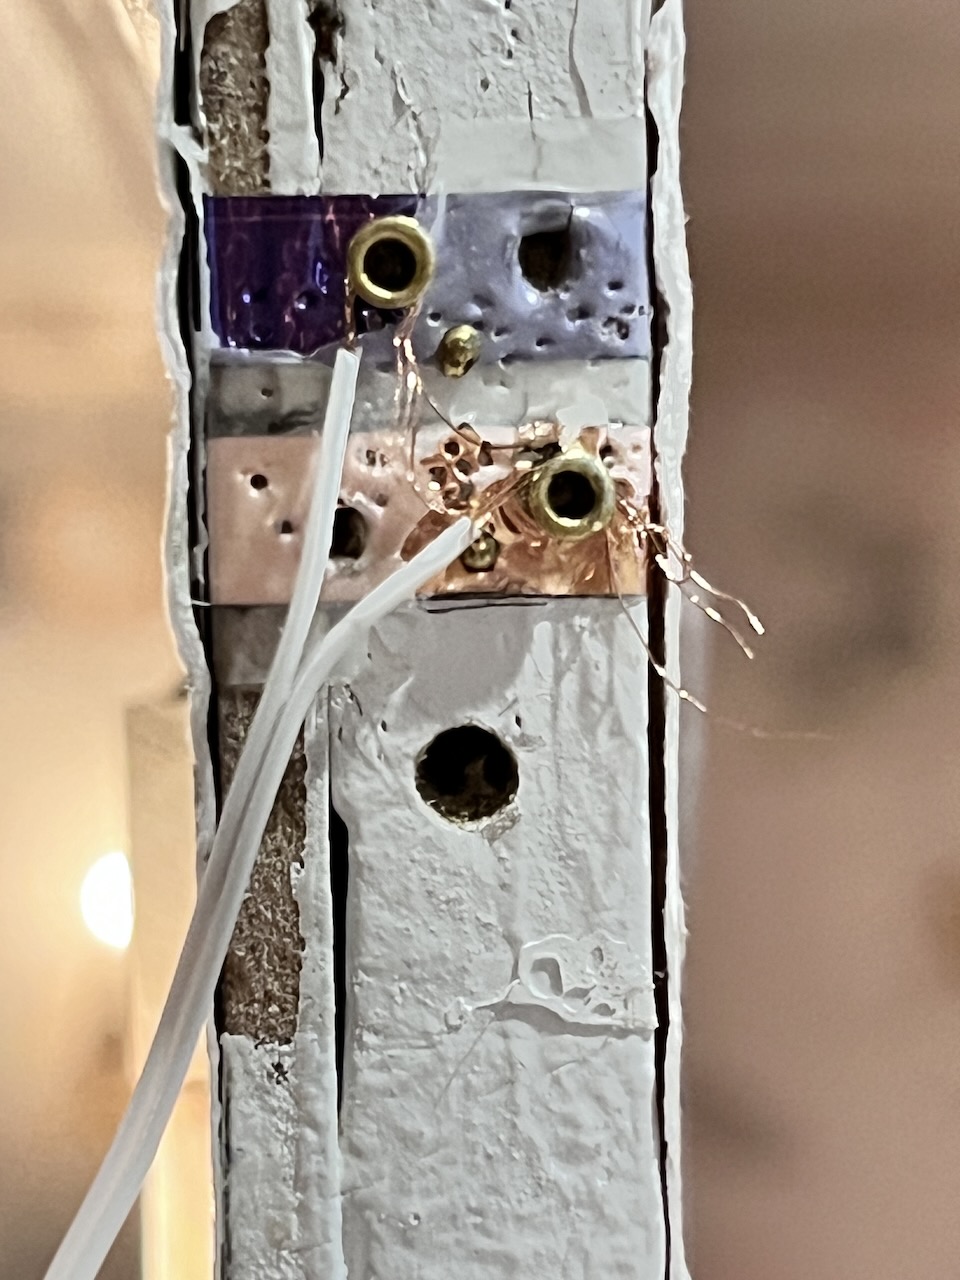

Just by pushing on the pink connection, I was able to isolate the weak spot in this line. It wasn't a short, just a weak connection. To secure the connection, I cut a small pink square--copper--and pressed over the eyelet and wiring. Now the lights are no fail--fingers crossed, but who really knows?

Now, we move on to wallpapering.


We all agree that best time to  paper wall is before wood trim is installed. I generally wallpaper then add the doors and windows, so cutting a wall template of this odd shaped wall was a challenge.


But I eventually got a good fit.

Old wallpaper had to be cleaned off, so I used a mixture of about a cup of warm water with about a tablespoon of liquid fabric softer. Generally I spray it on, but given the small area, I dabbed it on with a foam paint brush and let it soak a bit and the glue dissolved nicely and released the scraps of paper. I secured the copper tape with Scotch tape to keep it from getting soaked.


I printed the sunflower paper in mat photo paper, making it a very thick paper, but it stands up well to the moisture from the glue, but it's not real pliable. 

For the attic wallpaper, I used scrapbook paper that is lignin and acid free. Generally I use a clear acrylic spray to protect the paper, but another disaster! The can of spay had sat for a long while in garage and when it sprayed out it spoiled the paper, so I had to reprint the sunflower paper and one of the odd triangles for the peak. 

It's a difficult cut and I was down the leftover scraps; fortunately, I had just enough to cut a new piece. The inset roof section was really had to access and Grandmother's wallpaper glue was really dense and didn't want to slip very well. On the larger flat surfaces, I used a wet foam brush to apply the dampened glue directly to the wall so that the wallpaper piece would slide into place. I didn't moisten the glue that went on the paper because I didn't trust it to hold up to the extra moisture.


The power strip on this floor supplies power to the bedroom lights (2) and the new ceiling light that I added to the bathroom. I cut the corner of the left wall so as not to paper over it. This junction, messy as it is will be hidden behind a roof piece and I'll build some sort of faux closet or storage to hid the mess. 


The attic is now ready for the floor.


As I prepare to stain the flooring, I use my test pieces to see which I like. Because the downstairs floors are stained with the one on the left, Puritan Pecan, I much prefer Golden Pecan, but to be consist with the other floors, I shopped for the Puritan Pecan and couldn't find it, so I had to use the Golden Pecan, which was my original choice but I used the wrong one on the first floors. UGH!

As well, this walnut wood is naturally darker than the first floors that were with an older kit.


There really isn't a lot of difference. Wood has such character that few other materials have. That's why I prefer it to all other types of flooring that are really are much easier to use than the real thing, but for me wood just makes the house feel warm and homey. 


Before applying the stain, I sanded the already thin planks with 120 course grit to take down any roughness in the grain then smoothed the planks with 320 fine grit sandpaper. 
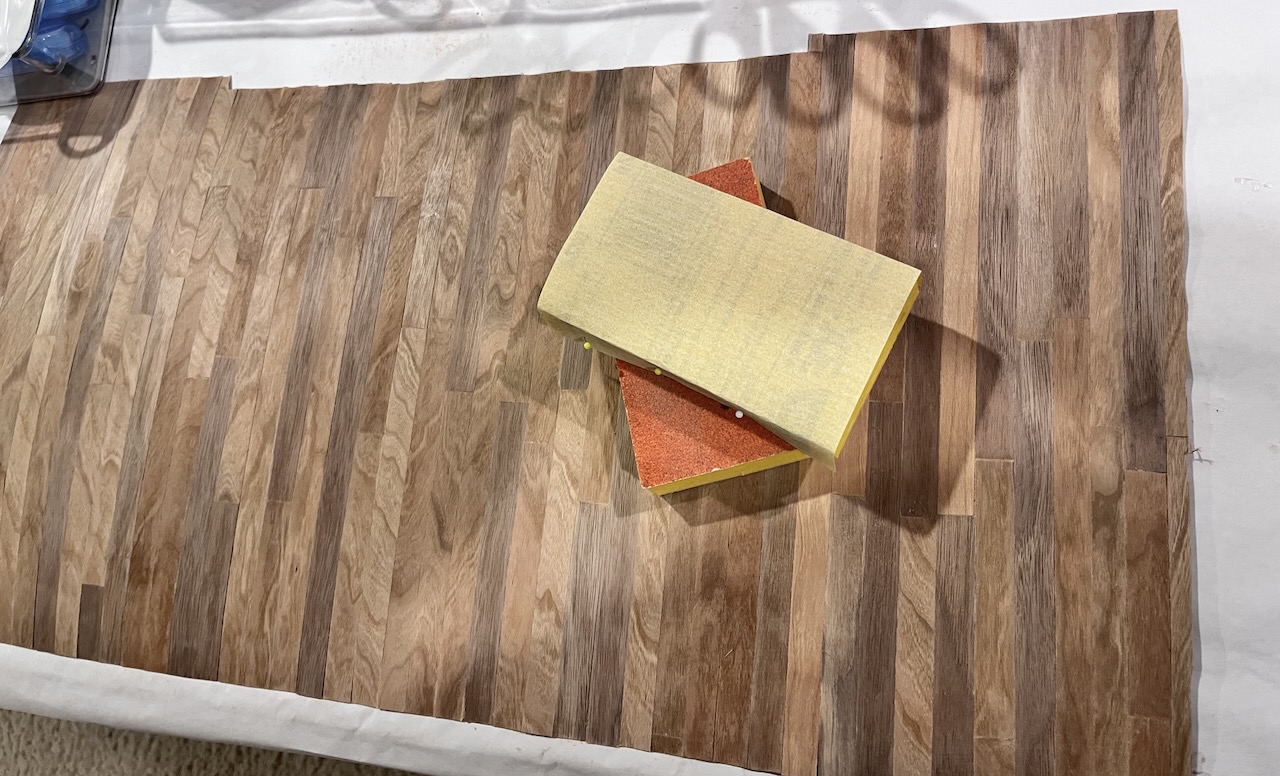

After sanding, I wiped the floor down with rubbing alcohol to lift up the dust left from sanding, which revealed the character of the wood.


I applied the stain with a foam brush then wiped away the excess.


Look at that deep, rich color. Unfortunately as the stain dries, the glow will fade, but still the floor will be gorgeous--I think--especially I lay down a layer of Johnsons Wax.


The floor is now ready to attach to the 1.5 mm Circut brand chipboard. I still have to wax the floor, but will later. I am nervous about gluing it to the chipboard because in the paste the floors have buckled. Still I didn't trust double sticky tape because once something touches it, it is there. So tacky glue it is. I'll use the brayer to help encourage to two layers to adhere. 


There is plenty of tape to hold the chipboard pieces together. These are the 12x12 sheets that will make a sound backing for the floor that, as you remember, laid on scrapbook paper. 


In the moment of adding glue to the chipboard, I didn't want to stop to take photos. I drizzled plenty of glue on the chipboard, making sure to spread it well to the edges then I put the wood in place, and now it rests underneath some heavy reading.


A few hours later:


The floor meets all expectations. I had plans of using double stick tape to hold it in place, but at the moment it seem to lay flat and solid. I still need to stain the edge trim and will hold the edge trim pieces in place with sticky tape. 


So it took the the better part of the week to finish this project, so aside from some minor finishing touches, I declare the interior of the Manchester Country Home completed. 

To finish the house, the exterior trim needs to be glued in place, the electrical mess has to be concealed, and the roof in the back needs to be shingles then the entire roof needs paint or stain and then I can declare this house finished. 

I hope you have enjoyed this journey and learned a few things along the way. I will finish up posting on this house with a review of What Went Well and What Didn't, but I'll save that review for another time.

Enjoy Sunday and have a great week. Thanks for dropping by.

Cheers,  Ann


Friday, March 22, 2024

Ordinary Women

 In March we celebrate Women, their accomplishments and place in American History. The Media and other institutions tend to immortalize the same well known women for their historical landmark accomplishments. Still there are ordinary women who every day make a difference. 

As a member of Daughters of the American Revolution, a nonpolitical, service organization focused on education, historical preservation, and patriotism, I see women from all backgrounds making a difference in their own, ordinary way at home, in their community, and even nationally. Many of our members are military or former military. I write our chapter's newsletter and this one article I wrote for the Women's History Month issue. 

You will see the crossover with my REAL life and my miniature life. As I explain, my first car was a '67 mustang coupe, so naturally I recently purchased a 1:18 scale mustang for the Manchester, feeling that the little red mustang was out of scale and would fit nicely in a half scale setting. While this not the replica of my mustang, it still stirs nostalgia for the good old days and those fabulous muscle cars of the '60s. After unboxing the mustang, I read the box and discovered a fascinating story about an ordinary woman ahead of her time, helping women move ahead of their time.

The National Women's History Alliance designates a yearly theme for Women's History Month. The 2024 theme celebrates “Women Who Advocate for Equity, Diversity and Inclusion,” recognizing women who understand the need to eliminate bias and discrimination from individuals' lives and institutions.

Anne Goodro

She was ahead of her time. Thrust into running a car dealership after her husband died, she brought a new approach to selling automobiles, which just might qualify her to be recognized as one of this year’s Women’s History Month Theme: “women who understand the need to eliminate bias and discrimination from individuals’ lives and institutions.” She transformed a predominately male landscape into one that accepted women, not because it was a politically correct and socially acceptable thing to do, but out of necessity because she saw a need and took advantage of the opportunity to grow her business while giving women the opportunity of be more self-reliant.


In 1972 I purchased my first car, a used Ford, but not any Ford— a ’67 Ford mustang GT coupe with a 4-on the floor shift and a 4-barrel carburetor. I loved that car—so much so that it’s stored in our barn. So much so that I purchased another one on eBay to park in my dollhouse garage.  After I unboxed the car, I read the box to see exactly what I had purchased, for this one was labeled “The She Country Mustang.” and I was very curious about what made this car so special. This ’67 mustang has quite a legacy.


Growing up, I remember well the commercials for Goodro Ford in Denver. According to the box, when Ann Goodro took over the dealership after her husband died in 1967, she became one of the first women in the 1960s to own and operate a car dealership. Ford was making the special edition mustang—the Ski Country Special and High-Country models—, so she talked Ford into making the She Country Mustang edition which she marketed specifically to women in 5 attractive colors: Limelight Green, Autumn Smoke, Bermuda Sand, and Evening Orchid. Each car came with an orchid corsage and a personalized license plate. 


Women are well aware of the gender pay gap, but in years past that financial gap was more restrictive than just pay equity. In 1967 a woman didn’t just walk into a dealership and open up the hood of a car to check out the engine and then sign the papers. 


In 1848 married women gained the right to own property when New York passed the first Women’s Property Act. By 1900 most states had passed the same law. Interestingly, single women had been able to own their own property, but husbands controlled their wives’ property.

As property owners, women began to gain wealth and start businesses, but they still could not borrow money. By the 1960s they were finally able to open their own checking accounts and use other banking services, but they still couldn’t get credit cards or loans without a male co-signer; worse, lenders tended to discriminate against women who applied for loans.


Financial status began to improve with the 1963 Equal Pay Act. The law leveled out the pay discrepancy somewhat, but we know that women still in 2024 don’t always receive equal pay, but that law did improve the ability for women to build, manage, and maintain their own wealth. (https://www.bankrate.com/loans/personal-loans/history-of-women-and-loans/) 


In 1967 while women were fighting for their equality in a male dominated business world, Ann Goodro opened the door for them to own that classic mustang coupe. She defied auto sales by not only maintaining her husband’s sales but surpassing them. Ann was certainly a pioneer, “who paved the way for women to buy, own, and sell cars.”  And to be fair, with the popularity of the She Country Mustang, she later released the He Country Special in Stealth Black. 


Today woman commonly hold CEO positions, own their homes, buy cars, and borrow money from banks to accomplish their dreams. Ann Goodro had little choice but to carry on her husband’s business; she opened her doors to women to take yet another step toward independence and buy their own car. Women don’t have to be famous or wealthy or extraordinary to blaze a trail; they just need to follow their dreams and take control of their destiny. Ann Goodro deserves to be recognized for what she did in her own small way to “eliminate bias and discrimination from individuals' lives and institutions” when she offered women an opportunity to own that special She Country Mustang. 


Next week, part III of the attic flooring project and an "Oh woe is me" electrical fiasco. Stay tuned.

Thanks for joining me.
Ann

Saturday, March 16, 2024

What Could Go Wrong

 My last post showed how to cut your own floor planks with Cricut's wood veneer 12x12 wood sheets using Design Space (DS). Happily, I am able to report that the floor is finished and awaiting staining, which may happen tomorrow after I buy some stain. In the meantime here's how I created the floor.

I began by making a paper template of the floor because the flooring need to be notched to go around the the center peak wall that protrudes out beyond each side panel


Making templates of difficult spaces that will be covered seems to work best for me to get an accurate template to work with instead of messing with rulers and fractions be it wallpaper or flooring. This attic requires some fancy templates for  triangle peaked front, the triangular side walls, and the trapezoids on the front of the house on each side of the center peak.

I debated on whether to use heavier cardboard or scrapbooking paper. I really wanted to glue the flooring to Cricut's 1.5 mm chipboard as I did for the addition second floor which made a very nice, solid floor, but I didn't have any on hand, so I used thin craft paper. Since two 12x12 sheets were too wide, I overlapped the pieces instead of cutting on side down to fit, with the hopes of strengthening the joint between the two sheets and secured it with masking tape. 

I will order 1.5mm chipboard next week and glue the flooring to it so have that nice, solid flooring.


What Could Possibly Go Wrong?

1. GLUE:  I first tried Gorilla Wood glue, thinking that because it is not water based, the planks wouldn't curl, but the glue didn't seem to like the paper template or something. I just didn't like it, so I switched to the tacky glue, which worked much better. I even pondered later using double sticky tape since some manufactured flooring peal and use. I'm sure that tape would be as forgiving a glue in that you need to be able to slide the pieces around to get a tight, accurate fit and tape doesn't not allow that flexibility. 


2. NOT ENOUGH PLANKS:About 3/4 of the way through the job, I realized that I was running short of planks. I thought I had had plenty just by laying out the pre-cut sheets and then placing the individual planks in a test run. (Better photo of the trapezoid walls.)


12x12 sheets on the floor, forgetting the waste when cutting them out in Design Space because the cutting area was 10.5x11.5 inches, a loss of half an inch at the bottom and the 1/8 inch margin that DS allows to cut around the background and the 1.5 inches with the 10.5 inch width. 

And to complicate matters, the remaining sheets that I had were the really dark walnut and I would run out of the lighter shade. I decided to cut at least another half sheet of the darker walnut.


FIX: Now that you read about my failure to calculate accurately, you will be now be able to have a better estimate of how many 12x12 sheets you need for your project and it certainly does not hurt to have extras. For these really large spaces, I'd cut 2 1/2 12x12 sheets all at the same time to assure consistency in the color blends for each piece of wood does have its own character. You want flexibility to mix and match shades. Even each veneer sheet will its own color variations--that's what we love about natural wood--its unique character.


 If you have such a wide variation of shades as I did, cutting extras will make it easier to have a consistent variation in patterns and shades. I was prepared to cut an entire 3rd sheet or at least half a sheet, but I didn’t have to. I dug in my flooring stash and found some very light strips left over from the first floors that I made for the downstairs.


I also extended the planks beyond the edges of the template then trimmed them to fit from the back with scissors. They cut easily.

I cut the strips in with an X-acto blade, placing that edge at the end of the template so that I had straight edges lined up in the main flooring.


Once the glue had cured--a couple of hours--I sanded the floor using first 120 coarse grit sanding block then 220 softer grit. I let the fine sawdust fill any gaps.


I am very pleased with the final results. While it is work intensive to cut your own wood flooring, you have a unique, pretty floor--one of a kind. 


With the sanding finished, I I'll wipe the floor clean with mineral spirits, let it dry then apply the stain. I created a new test strip using Golden Pecan which is the bottom sample--the one that I originally wanted for all the flooring, but when I stained the first floor, I grabbed the wrong stain--Puritan Pecan, a lighter finish and not as rich as the Golden Pecan (top sample), so I'll use that lighter one to match all the floors--to some extent.  


Before the flooring can be installed, I need to do some electrical work. So check back next week to see my progress.


PS: Did you notice my new Mustang Coupe?  I am so exited to share it with you in the near future for this model has quite a legacy that makes it a perfect story to share during Women's History Month.

And Yes we survived the Colorado snow storm this week. In fact, our wet snow melted as it hit the ground and, so we didn't get the massive amounts that Denver and the mountain towns suffered as shown in national news. I liked one guy's advice when he battled nearly 3 ft. of snow--stay inside and let it snow. 

Have a great weekend. Thanks for stopping by.

Cheers, Ann

Friday, March 8, 2024

Using a Circuit Maker to create a Hardwood Floor


 Two main tasks remain to finish the Manchester Country Home Interior: Wallpaper and flooring. There are several ways to install dollhouse flooring ranging from nicely printed paper flooring--either purchased or home printed-- that looks beautiful and is easy to install and less expensive than wood flooring. Miniature building suppliers offer a plethora of flooring options specifically for miniatures building, sometimes costly and even tricky to install,  or DIY craft sticks (popsicle sticks and coffee stir sticks)


To remind you, as I wrote in back on December 6, 2022, I had 3 rules when I began this build, “Use from my stash before purchasing new; make as much as my talents and knowledge would allow (somewhat limited there); and purchase items that are handmade or come from what I perceive as a small business or a cottage business--a home based business." My self imposed rules have turned this house project In to a very long one.  


The 3rd floor will require at least 2 12x12 Cricut wood veneer sheets, since the Design Space cut will be 10.5 wide, just sort of the full 12 inches.


The first floor planks are the from the old San Franciscan kit. I ran short for the second floor bedroom, so I used the light colored wood to fill in, creating quite a unique floor.


For the first floor and the second floor addition,  I used the ¼ inch wide flooring that came with an old dollhouse kit, The San Franciscan that was actually a disaster. The wood planks came in 12-inch-long strips in a variety of shades to make an interesting floor. When It came time to make the flooring for the second floor, I didn’t have enough of the San Franciscan kit flooring for the bedroom, so I cut some strips to fill in using Cricut’s oak veneer wood, which was much lighter. See the results here: “When Progress Isn’t”


Now I have created a complete tutorial to make an entire floor with the Design Place work sheet available in Cricut's Design Space. 


Supplies:

Circuit Machine that will cut wood (the Maker)

Circuit Deep Cut Blade (black)

Circuit Wood Veneer because it is specifically designed for their cutting system. Sometimes JoAnns, Michaels, and Hobby Lobby carry the product. (recommended). If you have Never cut wood, check out Jennifer Maker's tutorial on cutting Cricut's wood veneer. Click here

Purple Cutting Mat Strongest grip

Painter’s Tape

Heavy Card stock 100 lbs. (Michaels works best for me)

Tacky Glue or similar adhesive


Disclaimer: This tutorial is requires that you know some basic Cricut skills. If you do not know how to use the certain tools used here, then search YouTube for a quick lesson on how to accomplish the task that you want. We especially enjoy Jennifer Maker's Tutorials. 


Design Space Tools:

Align: Center

                           Arrange: Bring Forward or Send Back
                           Shapes: Score Line and Square

                           Attach

                           Group and Hide


To Increase size of screen images to easily read the image, on a Mac command +.


Follower these steps to cut planks for a  beautiful wood floor on your Cricut Maker:


1. Decide how wide you want to make your wood planks and how big a space you will cover with flooring. I am covering a  3rd story floor that requires two 12x12 inch sheets of Cricut wood veneer. Each package comes with two sheets. 


Before we begin, note that Cricut Design Space has pre-determined cut margins which means that it will not cut a 12.x2 wood sheet edge to edge on all 4 edges, so I will make my cutting area 10.5 wide which will require 20 lines created using the score line in Shapes. The lines will be 11.5 long from the top cutting line to the bottom cutting line. See the Make photo. 


2. In Shapes select the score line. The score lines will become solid once they are attached. For this project you need to Duplicate 20 lines. Size the first line: For this project it should be 1l.5 inches. You can select it and drag to length or select it and enter the length in the Size H tool. Now Duplicate 19 more. They will be staggered on the on the screen, so next you must line them up and position them.


3. The Tedious step: position the lines next to each other one at a time spaced  two work space squares apart to get a 1/4 inch wide plank, as demonstrated below the photo 1. Next select all the lines; use the Align tool at the top of the screen and select Align Top which will even the the top and lower margins. 


4. Select the lines and Attach them so that don't move around. 


5.  Photo 2: Create the cutting background. I colored mine brown to simulate the wood sheet. In Shapes select the Square and size it to 10.x 11. 5 inches.  You will drag it over the lines and will have to Send it Back to position it behind the plank lines. Last, select the image and use the Attach tool to join the two layers. Now you are ready to cut your planks


This photo shows that the tutorial as you will see it in DS. The instructions are grouped so the you click in the right panel the layer (green selection)  to hid it and just have flooring image to print. OR you can now copy an image and paste it into a new Design Space, which you can practice with tutorial.


Note: Before you click MAKE, hide all the images that you don't want to show up in the MAKE screen. I have grouped all those images together, so before you cut the image, hide the group by clicking on the hide button. 


Photo 2 shows the finished imaged ready to make, with the instructions grouped and hidden, using the layers panel.


This is the cutting screen. As you can see, I forgot to hide an image on the white screen. 

 You will note that the cutting image does not fill the 12x12 mat and there will be some waste  because of the way Cricut is designed. I found that attaching the planks to a background allows for a cut from top to bottom because the machine will first cut the square then the lines; otherwise it will not cut clear to the bottom of the wood, only to the bottom of the line. If you want a longer cut to full a 12 inches then use 24" mat. The machine will first cut the  brown background border around the lines then it will cut the planks.

Ready to Cut


I always cut my new patterns out on card stock first to make sure my design works, which I recommend you do the same. You don't have cut the entire page; just enough to make sure that your design is what you want.


Adhere wood veneer to the strong grip purple mat; use the brayer to create a tight fit; and secure in place with painter's tape around the edges. While the tape will hold the wood securely in place, since the planks will be cut from top to bottom, the tape will no longer secure the wood in place. You'll see. 


When you are creating a project for the first time, you make mistakes. For me, I misjudged the direction I want the grain to run. This image shows the cut going across the grain, but I needed it go with the grain, so I stopped the cut and realized that my cuts were not going to the bottom of the border, so I stopped the machine half way through the cut and started over with a new sheet of veneer. I always buy extra--just incase. 


A craft knife easily cuts through the veneer should you have this problem. To avoid this miscalculation, you will see that that lines won't go clear to the bottom in the Make It screen so that is the time to cancel the cut and make the adjustment by simply decreasing decreasing the size of the background layer. (In this tutorial, the brown layer.)

And here they are. Nicely cute wood planks for a lovely floor. 


I laid out the first bundle, as you can see the lighter colored ones and then cut another sheet of veneer which is darker--and that is okay because when I glue them to the floor template they will be mixed, giving the floor a natural look. 


The final step will be to glue the planks to a thin cardboard template. 

You will find this tutorial along with the Design Space image that you will be able to use. I do suggest that you Duplicate the actually cutting image and hid it in the layers panel if you want to modify it so that you don't destroy the original.  


You will find this tutorial in my Design Space public library. Making Miniatures with Cricuts, Laser Cutters, and 3D Printers and Dollhouse Miniatures and DIY
Thanks for stopping by. I hope find this tutorial useful. 

Have a great weekend, Ann

Bargains Galore and So Much More: It's nice to back Hello friends. Yes, I have been MIA for quite a long while. I first took a hiatus fr...