Showing posts sorted by relevance for query circut floor. Sort by date Show all posts

Saturday, April 6, 2024

The Tale of Two Projects: Trials and Tribulations

 Murphy's Law says if anything can go wrong it will, and so it is in dollhouse building. I set out today to get the wallpaper installed in the Manchester Country Home attic, the last step before the floor goes in. As life goes, I was plagued with phone calls and text messages all morning: A friend just wanting to chat as she started her day, a daughter with some minor catastrophe, and a museum committee member working our museum web site. Finally, all the chatter and clatter stopped and I was able to get on with. my goal for the day.

Last week, I had a light meltdown--just minor mental issue when lights that worked the day before suddenly didn't. 


The only light that worked was the lamp plugged on the addition first floor living room.That room has only 3 lights: the lamp and two wall sconces. There are 2 other lights on this line, the front porch lights.  I narrowed the problem down to that line and short, possibly somewhere--but where? I was not about to start tearing out wallpaper to inspect all the connections.

Then ALL the lights failed. 😧


I began by bypassing the original connection, using 3 plug-in extension that will connect to a new place.  Nothing.


Next I began bypassing the tape wiring by using round wire and plug-ins on my little test board. Pretty messy and pretty ugly. 


But I was able to add back on-line the hanging light in the addition second floor and got the lamp in that room to work again. That line runs across the roof to the power source on the attic floor. 


But I did tear out wallpaper on this wall. Really, we should take lots of photos so that we can back and see what's behind the wallpaper BEFORE we cover it
.
Take a look at the light in the adjoining bedroom. It Never worked, so I took it down and replaced it. It's one that I made. Glue may have corrupted the wiring for it sort of fell apart when I tried to disassemble it. 


So  this long, sad saga it does have a happy ending. I just need to figure out how to hide my adjustments. 


The house looks pretty at night. I like the way the light comes through the skylight.
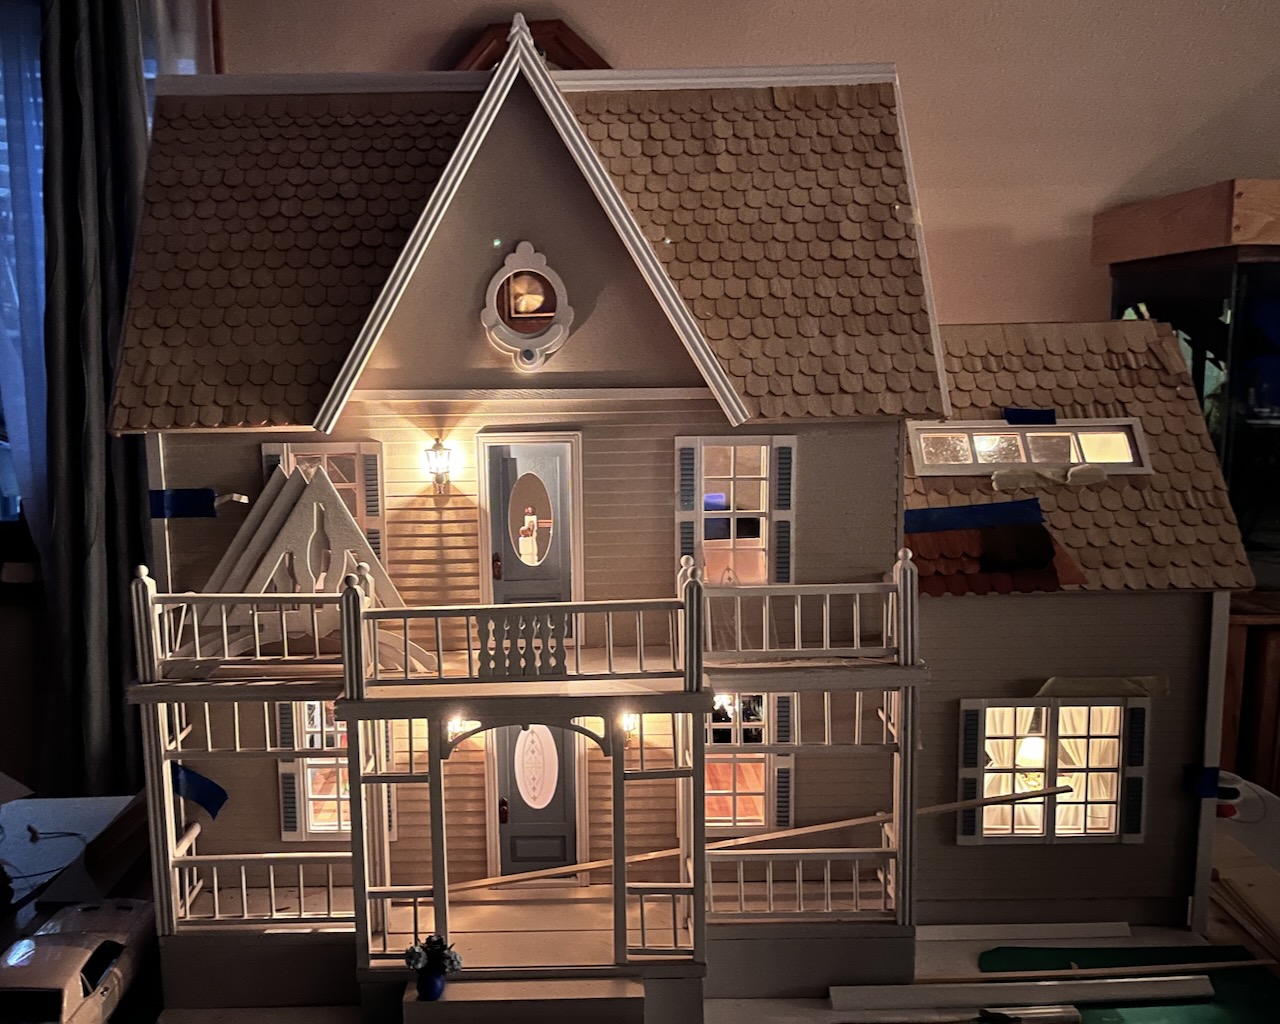

I replaced the bedroom light that failed with a little sconce that I made from a Bindel's Ornaments kit. I'm not very good at shaping the rounds on the end of the wires, but I decided to use it anyway because I like the bling.


BUT my lighting issues weren't over--this time, a not so mini meltdown.😖😣😩

What mess. I did conclude that because the house is made of MFD and not hard plywood, the brads are not held securely in place, especially on these exposed edge cuts because MFD is so porous.
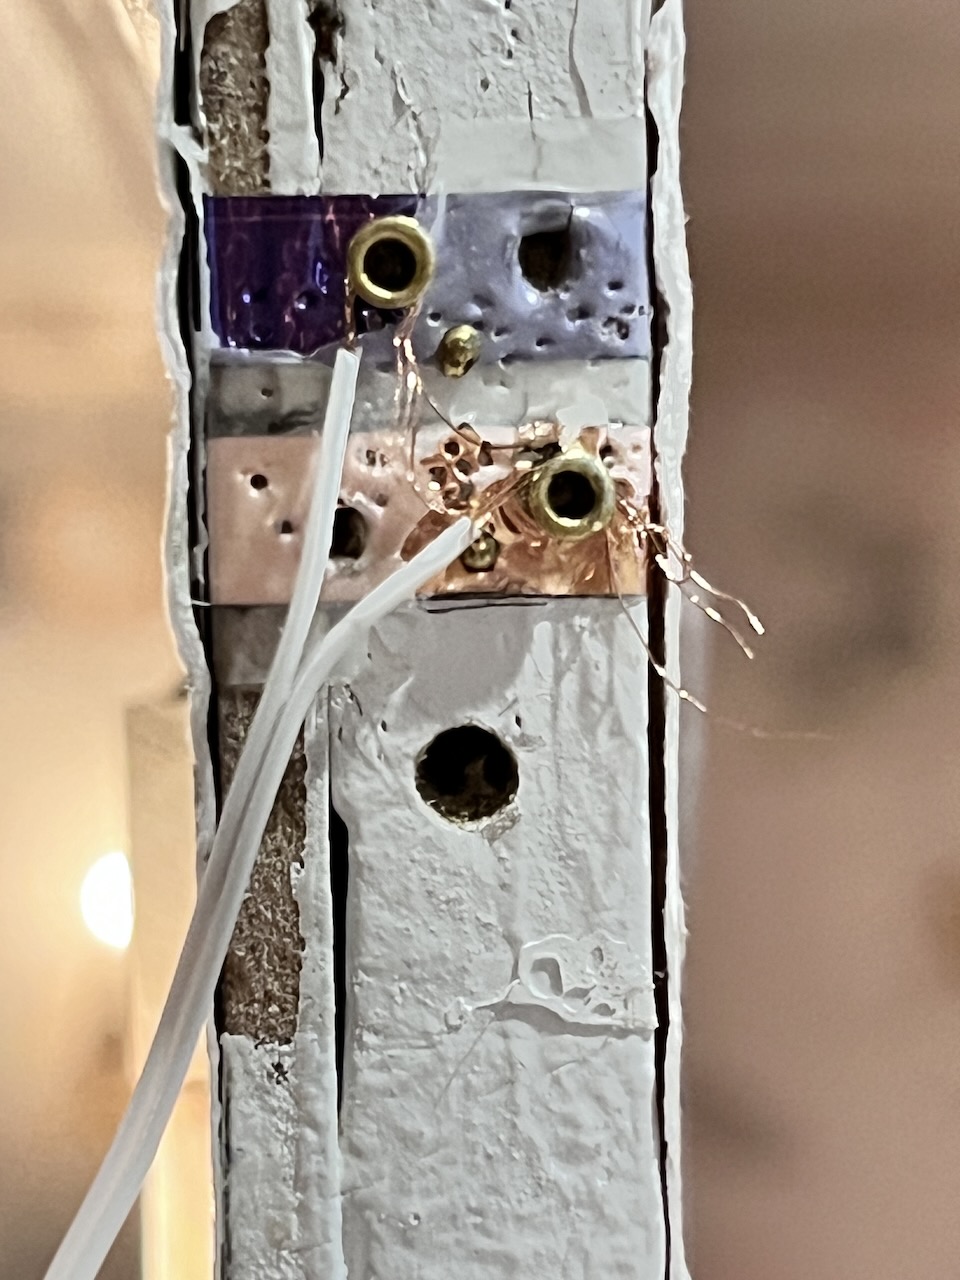

Just by pushing on the pink connection, I was able to isolate the weak spot in this line. It wasn't a short, just a weak connection. To secure the connection, I cut a small pink square--copper--and pressed over the eyelet and wiring. Now the lights are no fail--fingers crossed, but who really knows?

Now, we move on to wallpapering.


We all agree that best time to  paper wall is before wood trim is installed. I generally wallpaper then add the doors and windows, so cutting a wall template of this odd shaped wall was a challenge.


But I eventually got a good fit.

Old wallpaper had to be cleaned off, so I used a mixture of about a cup of warm water with about a tablespoon of liquid fabric softer. Generally I spray it on, but given the small area, I dabbed it on with a foam paint brush and let it soak a bit and the glue dissolved nicely and released the scraps of paper. I secured the copper tape with Scotch tape to keep it from getting soaked.


I printed the sunflower paper in mat photo paper, making it a very thick paper, but it stands up well to the moisture from the glue, but it's not real pliable. 

For the attic wallpaper, I used scrapbook paper that is lignin and acid free. Generally I use a clear acrylic spray to protect the paper, but another disaster! The can of spay had sat for a long while in garage and when it sprayed out it spoiled the paper, so I had to reprint the sunflower paper and one of the odd triangles for the peak. 

It's a difficult cut and I was down the leftover scraps; fortunately, I had just enough to cut a new piece. The inset roof section was really had to access and Grandmother's wallpaper glue was really dense and didn't want to slip very well. On the larger flat surfaces, I used a wet foam brush to apply the dampened glue directly to the wall so that the wallpaper piece would slide into place. I didn't moisten the glue that went on the paper because I didn't trust it to hold up to the extra moisture.


The power strip on this floor supplies power to the bedroom lights (2) and the new ceiling light that I added to the bathroom. I cut the corner of the left wall so as not to paper over it. This junction, messy as it is will be hidden behind a roof piece and I'll build some sort of faux closet or storage to hid the mess. 


The attic is now ready for the floor.


As I prepare to stain the flooring, I use my test pieces to see which I like. Because the downstairs floors are stained with the one on the left, Puritan Pecan, I much prefer Golden Pecan, but to be consist with the other floors, I shopped for the Puritan Pecan and couldn't find it, so I had to use the Golden Pecan, which was my original choice but I used the wrong one on the first floors. UGH!

As well, this walnut wood is naturally darker than the first floors that were with an older kit.


There really isn't a lot of difference. Wood has such character that few other materials have. That's why I prefer it to all other types of flooring that are really are much easier to use than the real thing, but for me wood just makes the house feel warm and homey. 


Before applying the stain, I sanded the already thin planks with 120 course grit to take down any roughness in the grain then smoothed the planks with 320 fine grit sandpaper. 
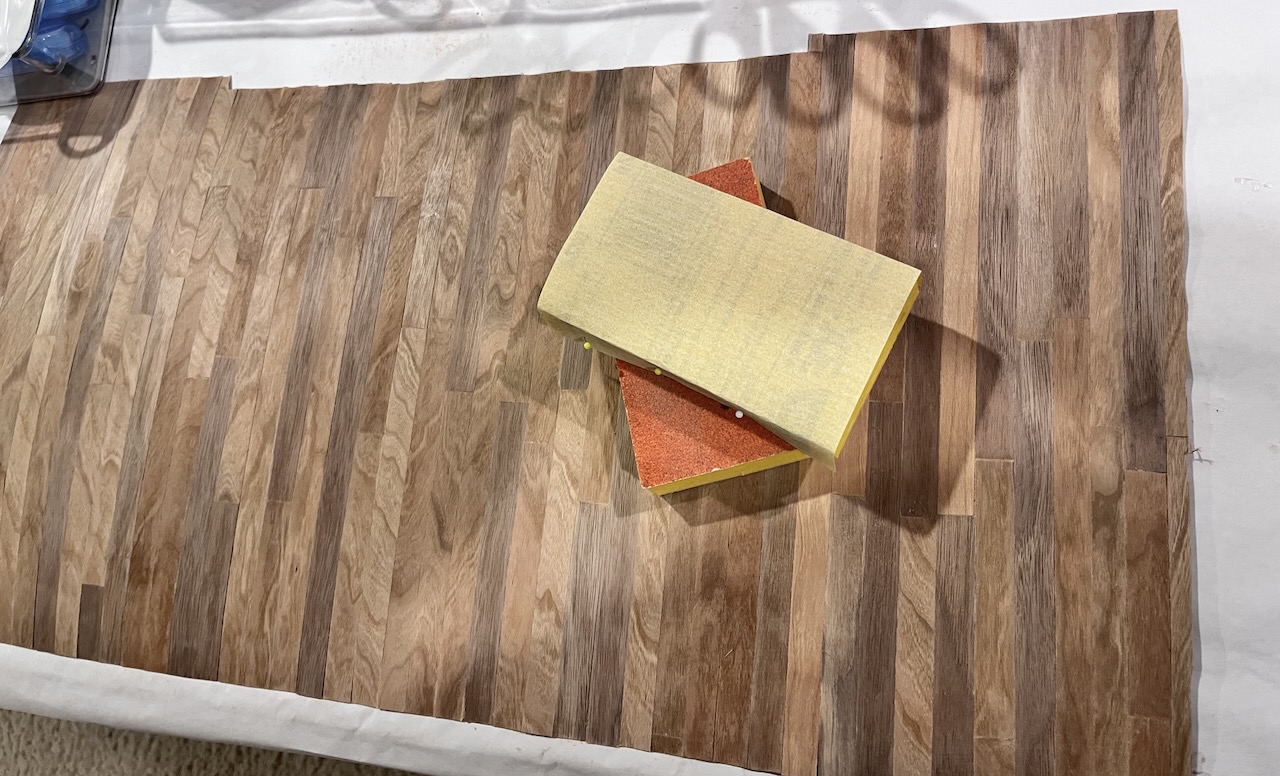

After sanding, I wiped the floor down with rubbing alcohol to lift up the dust left from sanding, which revealed the character of the wood.


I applied the stain with a foam brush then wiped away the excess.


Look at that deep, rich color. Unfortunately as the stain dries, the glow will fade, but still the floor will be gorgeous--I think--especially I lay down a layer of Johnsons Wax.


The floor is now ready to attach to the 1.5 mm Circut brand chipboard. I still have to wax the floor, but will later. I am nervous about gluing it to the chipboard because in the paste the floors have buckled. Still I didn't trust double sticky tape because once something touches it, it is there. So tacky glue it is. I'll use the brayer to help encourage to two layers to adhere. 


There is plenty of tape to hold the chipboard pieces together. These are the 12x12 sheets that will make a sound backing for the floor that, as you remember, laid on scrapbook paper. 


In the moment of adding glue to the chipboard, I didn't want to stop to take photos. I drizzled plenty of glue on the chipboard, making sure to spread it well to the edges then I put the wood in place, and now it rests underneath some heavy reading.


A few hours later:


The floor meets all expectations. I had plans of using double stick tape to hold it in place, but at the moment it seem to lay flat and solid. I still need to stain the edge trim and will hold the edge trim pieces in place with sticky tape. 


So it took the the better part of the week to finish this project, so aside from some minor finishing touches, I declare the interior of the Manchester Country Home completed. 

To finish the house, the exterior trim needs to be glued in place, the electrical mess has to be concealed, and the roof in the back needs to be shingles then the entire roof needs paint or stain and then I can declare this house finished. 

I hope you have enjoyed this journey and learned a few things along the way. I will finish up posting on this house with a review of What Went Well and What Didn't, but I'll save that review for another time.

Enjoy Sunday and have a great week. Thanks for dropping by.

Cheers,  Ann


Monday, November 11, 2019

Keeping in Touch

I don't have much to share this morning since I have been busy doing other things. I have finished up gluing the furniture back together for the San Franciscan that I hope to deliver to Jennifer this week. The dining table has a broken leg, so I set about making a replacement.

 Simple enough. I outlined a pattern on a piece of thin basswood, probably 3/32" and cut out two for thickness that I'll glue together. Sanded the rough edges and tried to shape it like the original.


 And this is what I have. It might work, but I am thinking that a Circut would cut a more perfect leg. No. I am going to rush out and buy one--yet. My daughter's cousin-in-law has one, so we will ask her to cut a leg. I need more convincing.


Betsy Ross Project

From 1/4 inch foam board I cut the mock-up walls with the front wall 16 inches wide since the museum house is 16 feet across the front.  Now the larger window that I returned would fit, but it would not represent the original 1776 window. I am actually more concerned with a more historically accurate representation on the inside. My thinking is that the window would have been smaller because windows in the 18th century were a luxury since they were taxed, along with closets.


I like the way things are fitting together here, except I will not use this fireplace. The side walls should be 25' long, but I'm not going to extend the walls that far.


But there is a problem. As I read more about when Betsy Ross lived there from 1777-86 and took two virtual tours of the rooms, I am torn between how to approach this project. So the 360 panoramic video shows the shop sparsely furnished, but I imagine it cluttered with furniture in various stages of repair along with bolts and scraps of fabric and tools. 

The second video, has a narrator who describes each room and makes the point the Betsy may well have made the flag in the upstairs bedroom because if British soldiers happened to stop by the shop to see what she was up to or even to commission their own flag of some sort or have a chair reupholstered and discovered the colonial flag, she would have been arrested for treason, as was her second husband for transporting goods to the colonies across the ocean. He died in a British prison, so she knew the risks.

I am really trying to figure out how she would have handled making such a massive flag in her bedroom? It was a 10 foot flag, bigger than a bed cover or bed quilt.  The windows on the second floor are different, too. There are two windows on the second floor. Easy fix. It makes sense that she would have worked only during the daylight hours and probably sat by the window to do her hand stitching where the light was better which she certainly could not do downstairs in the shop.

Or is the narrator's assessment of where she might have worked on the flag just speculation? All of the art work--which is the only record that history provides along with her grandson's anecdotal accounts of his grandmother's life--depicts her sitting by a window or by a fireplace stitching the stars in place.

Maybe I am over thinking it, but I like the idea of her working in the bedroom. Quite possibly she did the cutting of fabric on the work table in the  shop and pieced it together upstairs in the bedroom, so I have to decide which room I will make.

 Make both you say? Then I may as well build the entire house, but that's complicated, too. I'm going to share my source so that you can learn first hand about the Betsy House as it may have been in colonial times and as it is today. Perhaps you will have some suggestions on how you might approach this project.

The Betsy Ross House Fact, Myths, and Pictures

Thanks for visiting.  Have a great day and remember our veterans.

Thank you to our veterans for their service to our country and their sacrifices.
God Bless American


Monday, November 4, 2019

Salvage

Sometimes perhaps it just isn't worth trying to salvage old dollhouse pieces. These pieces came from the Junk Man, and they are destined for the San Franciscan. We've seen this bedroom set and the fireplace in houses on Pinterest where they look nicely finished and authentic.

These kit pieces, though, were so poorly assembled and badly finished that I am wondering if it really  is worth the effort trying salvage them; however, that they are going in an abandoned row house seems to justify the efforts put them back together. The photos don't actually do justice showing the terrible stain and what must have been an attempt to give a fine, shiny finish. Instead the transparent coating is too thick and badly applied and cannot be sanded away.

The bed is worst; so bad that I am wondering why I spent the better part of last evening trying to put it back together.


The foot board is just leaning against the bed for show. I struggled to get it glued back on, but I couldn't clamp it, so I tried rubber bands, still the glue wouldn't hold--or I grew too impatient.


This photo show the excessive amount of glue used which in some joints I tried to scrape off. I decided to leave this clump on as a for my own glue, Alene's Tacky glue, but I couldn't get a tight enough bond. I'm now considering my options.

Next the dining set is in relative good shape, except it is missing a leg. I have this kit in my stash, so I'm going to carve a new leg, now realizing that with a new Circut I could cut a new leg.


The vanity is is fine shape, even with its smoky blurred mirror. 


Next, the fireplace. At first I was going to try to remove the Christmas wreath that is so solidly attached, but I'm leaving it.


The mantle precariously sits in place, but you can see the rest of the pieces below it.


Laying it flat, I pieced it together.


Then began to glue it together. I'm missing pieces, but that's okay.


One tiny post had broken off in place, so I dug in my stash to see if I had a bit of lumber that would replace the broken part.


Almost a perfect fit. I glued it in place and sanded it down. You can see where it is supposed to go at the end of the post, but I put it in place and glued the post to it.


Not perfect, but I'll add some brown paint and it will be okay.


And here it is. The fireplace has been reassembled, minus 3 pieces. The very top of the mantle should have 3 posts across the top, but two look okay.


One post is crooked on the right, but that's okay too.

Betsy Ross Project

 And I did a bit of work on the Betsy Ross room-box. I'll do a test-run out of foam board since I've never made anything from scratch.

I had put the project on hold because I didn't know the dimensions of the original house until I found a wonderful website yesterday that told the story of the house. A lot of mythology surrounds Betsy Ross and questions about the authenticity of the story that she made the colonial flag, but it seems, based on what her children wrote about her, she did make that flag for General Washington.

The house is another story, too. She did live there, maybe, and she did carry on her husband's upholstery business after he died. The question has always been where was the original house was actually located and is the museum house that claims to be her house really that house? Today, it seems to at least represent the house that she probably lived in.

In the beginning it was a simple three story colonial or Georgian band house. Each floor was one room, with the kitchen located in the basement. With such a simple design, I will could build build a four story house, eventually. The Real Good Toys house that I build for Lily might have been perfect.

The website that I found had all the details that I needed to help me decide how to build my room that will demonstrate the making of that flag, include a 360 panoramic video of the room. At one point an addition was built on the back of the house, enlarging it with as many as 8 families living there.

My first question was how big was the room? The exterior of the house was 16 feet wide and the the side walls were 25 feet long, so I measured 16 inches across; now my door, shelf, and window fit.

The house was renovated along the way, with one photo in 1907 showing the door on the opposite side with a very large shop window that spanned the entire front of the store,  while an 18th century sketch show the door on the other side with colonial pediments across the top of the door and a small multi-paned window. I returned the larger window that I had and bought this this smaller one that opens. I imaged that the window might have been able to be open to get fresh air, especially during the summer heat. Windows were also taxed then, so working houses had fewer, smaller windows.

The 360 view gave me a better sense of how the house is laid out. With so many unanswered questions about the house, I feel that I have more freedom to offer my interpretation of Betsy's work room, following what we hope is historically accurate.


Thanks for visiting. I always enjoy and appreciate your comments. Speaking of which, I am finding it increasingly harder to leave comments on Blogger blogs, including my own as I try to reply to the comments left here. In doing my research, I have realized that it is a Blogger issue. I found an article that I'll share with you, but honestly, I don't think it fixes the problem. Perhaps you have better answers. So, those of you who post on Instagram and Facebook, you will find my comments there.

I have also changed my comments to a pop-up window, hoping that will solve my problem on my site. Let me know what you think.


Bargains Galore and So Much More: It's nice to back Hello friends. Yes, I have been MIA for quite a long while. I first took a hiatus fr...