

 I've had a little companion in the craft room for the last two weeks, my 11 year-old grandson Nathan whom I hadn't seen since the first week of January when we celebrated his brother's birthday. There were days during the Stay-at-Home order that the little guy worried that he would never see his grandparents again. So we made up for lost time. Aside from hanging with the neighbor boys, trying to keep up with his three girl cousins, and shooting his compound bow with his grandfather, he enjoys crafting with granny, so while I made flowers and pasta, he made a little green alien and boomerangs out of my wide craft sticks.
Needless to say, I really didn't get much done while he was here; I had more fun keeping up with him. Now the house is quiet and my routine is returning to normal. Here's what I have been working on.
Part I: Geraniums
These 3 artists taught me how to make my geraniums. I use scrapbook paper to punch out my shapes, but I know that there are better papers that will hold the shape better and these ladies will teach you all about papers. I'm still learning and experimenting.
- Jodi at My Miniature Madness has a great tutorial on making geraniums and inspired my idea to make my own beads.
- Elizabeth at Studio Miniatures creates a beautiful basked of geraniums, showing each step.
- Dollhouse Miniature Furniture Tutorials 1 inch minis has another wonderful tutorial, too.
I began by making my own flower bases out of polymer oven bake clay simply because I didn't have any beads the correct size.


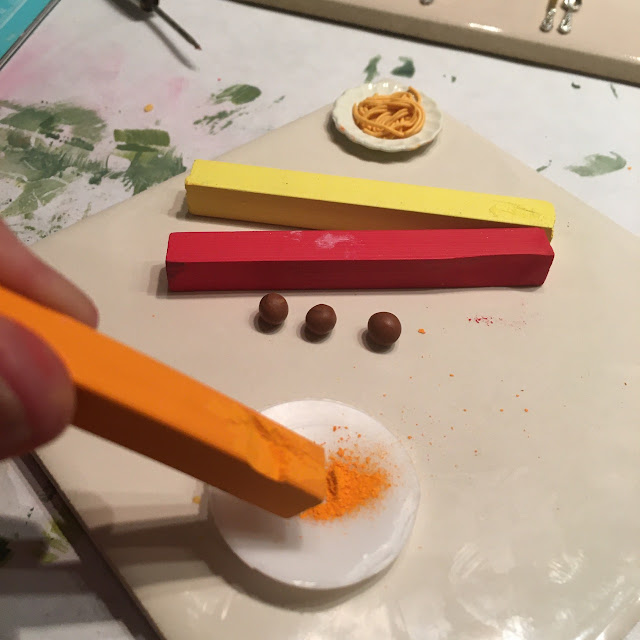
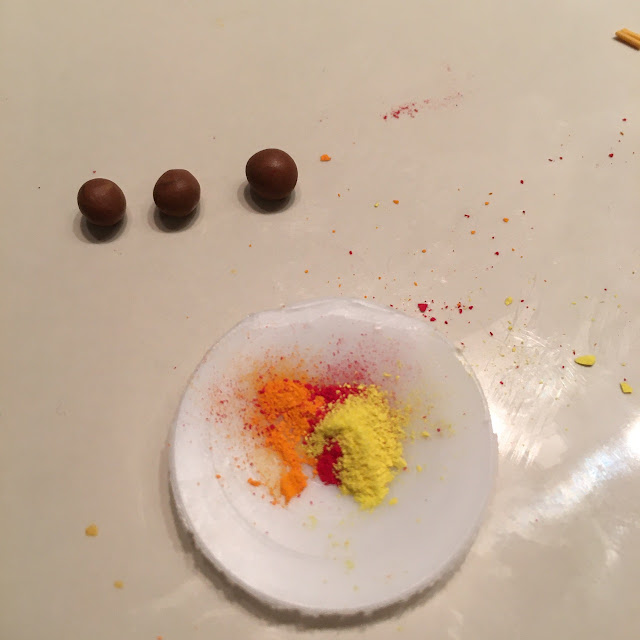
For meatballs, I simply rolled three balls of brown FIMO and textured them using a toothpick to rough them up, making them look more meaty. A toothbrush would work great, too.


And I punched out a lot flowers and quite a few leaves using the Punch Bunch punches


I glued the clay beads to the flimsy wires.


Then painted the clay beads with red paint.
I fussed with how to keep the flowers in the basket, deciding finally on polymer clay. I didn't bake it to keep it soft so that the flower stems would penetrate it. When it came time to add the flowers, I poked a hole, put tacky glue on the end of the flower stem then stuffed it into the hole.


I covered the clay with tacky glue then with used tea leaves.

I couldn't believe how many flowers and leaves the basket required. To some flower stems, I added leaves, but also create several stems with single leaves so that I fill in the basket to make it full. I still may make another one hanging basket. As it temporarily hangs, it adds character and color to the porch. I did fill in with some moss to give the arrangement a little more definition.


I loved the red flowers so much that I created a companion planter.

Using punches to create the flowers and leaves, I built vining white accent flowers.


Part II: Pasta Making
Since the Stay-at-Home order was issued in early March, I 've only been in the supermarket twice to get groceries, choosing instead to do curb-side pick-up. The one item that I really needed the last time I ventured inside the grocery store was not in stock: pasta. The pasta shelves were nearly empty. Makes a lot of sense. Pasta is inexpensive, easy to fix, and the family likes it, so I decided to make my own--mini, of course.
I watched three videos to learn how to make my pastas:
- Spaghetti: Fatal Potato (https://www.youtube.com/watch?v=ioiszPimnms&t=36s)
- Garlic bread: This Charming Stuff (https://www.youtube.com/watch?v=quaCPrQ4fUE&t=13s)
- Julie Warren's Video (https://www.youtube.com/watch?v=4CYWcxXo2Pk&t=1273s
If you are going to make these little projects, watch the videos because these fine artists are amazing and have created great tutorials that most beginners can easily follow. I tend to go rogue and do my own thing, generally based on what I have in my supplies and my own skill level. Julie's video is very long, but she shares several projects to fill kitchen cupboards.
A plate full of spaghetti is quite simple to create. The artist will use translucent white and pale yellow to create her spaghetti, but I didn't have those colors, so I blended these two colors to create a darker pasta, more like whole wheat pasta, maybe? I also used a bit of corn starch to keep the pasta from sticking to my fingers and my work surface.

Begin by making a log then rolling it as thin as possible. Since I work on small ceramic tile, as my logs grow in length, I have cut them and keep rolling until I have several fine lines of pasta.

Once you have your pasta rolled out, roll into small circular stacks and place them on a plate. The video will have you use liquid polymer clay to "glue" the pasta to the plate. I skipped this step. I just have removable spaghetti.


Keep stacking pasta until you have nice full plate spaghetti.

Once you have a full plate of pasta rounds, cut more pasta lengths, pinch about three strands together at one end then place it on top of the pasta rounds, blending the ends inside the circles to create a nice mound of spaghetti.


I used pastel chalk to make the sauce, mixing it with liquid polymer clay. After baking, I finish the foods by using glaze to give them a sheen.


This Charming Stuff has an easy tutorial for making Italian bread and garlic bread. I tried to follow her directions that required using a bit of water and baking soda added to the clay to make the bread crack when it bakes so that it looks more authentic. I must not have used enough baking soda because my bread didn't crack.

While she used acrylic paints to color the bread, I used my pastels.

I did end up with fairly authentic looking garlic bread. I followed her instructions to scratch the surface of the loaves when they are fresh out of the oven to create that beautiful, cracked crust.

One problem that you really can't see is that I used a bit of green pastel to create the parsley that might be in the garlic butter. When I added the glaze the chalk dissolved, even after baking. The artist used baked green clay that she grated finely on top of the slices.

Please, take a seat and enjoy. I can proudly say that I made the entire meal--except for the fresh lemonade.

This entire pasta project began with watching Julie's long video that shows how to make foods for the kitchen. If you follower her, she is remaking her childhood dollhouse, now working on the kitchen. She shows how to size food containers to the correct 1:12 ratio then how to make food packages, including a great tutorial on using Photoshop to size and meld scanned package containers. Next she shows how to make different shapes of pasta.

I began with the spaghetti. She mixes ochre and translucent white to get the perfect pasta color. As I said earlier, I didn't have the ochre. After making the spaghetti, I made the bow ties by rolling out a thin layer of clay, cutting away the rough edges to make a rectangle then cut the little pieces and squeezed each one together to make a bow.

I found that the wider blade tweezer did a better job of squeezing the bows together.


Mac'n Cheese is a family favorite, so, naturally I cut up some elbow macaroni. The photo is pretty self explanatory. I held a toothpick to each end to squeeze the roll into a "U" shape. They are not quite exactly uniform, but once placed in the jar, one won't notice.

Lasagna noodles, too, are easy to create. Once again I could have rolled mine thinner. After working with FIMO oven bake clay for a while, it tends to start sticking to fingers and work surfaces, so before I roll it out, I shape it in a ball, pat just a tad bit of corn starch on the work surface, press the ball flat and dab a bit of corn starch on the top of the clay to prevent it from sticking to my lucite rolling pin. I used the large end of my stylus to give the edges the curled effect that lasagna noodles have.


The jars can be found in so many different places. Mine come from Hobby Lobby located in the jewelry making supplies and in the Tim Holtz section. All different shapes can be purchased from various online stores, one my favorite is Factory Direct Crafts (FDC) which carries all kinds of miniatures, not always the cheapest, but they run good sales.
I used earring backs for the lids. For this tall, skinny jar I pressed the top on an ink pad then placed the earring back on the inked top to get a pattern to cut down the back so that it didn't lap over and fit. Eventually I will glue the backs in place.

I may also paint the gold tops so that they don't look so much like earring backs. The little bowl, by the way, came for FDC.

I didn't make quite enough elbow roni to fill my jar, so I created more. Still I'm thinking that the jars don't have to filled to the brim. This is pasta salad season and I make a lot of it.
I found labels on Pinterest and printed them out. For the jars, I will print them on waterslide transfer paper when I get full sheet of transfers to print.

If you are new to polymer clay, the Youtube videos that I reference are so good that even beginners can be successful.
Maker or Not?
I'm still riding the fence on whether or not get a Cricut Maker. I have some questions that perhaps you can help answer:
- I have very spotty internet and WiFi, so I worry about losing connection in the middle of a cutting session. I've read that a lost connection will spoil a project.
- Does the Maker come with knife blade to cut wood or do you have buy it extra?
- What additional software might I need?
- I see several of you cutting card and chipboard, what about 3/32 bass wood? I know that the machine makes several passes, which is a lengthy process. While some items can be made of chipboard, some may be better with thicker wood. Your thoughts?
I am thinking of renovating my Fairfield 1:24 scale house that I purchased. It just looks old and tired, especially the kitchen so I want to make new cupboards for it. And my Blue Farmhouse Now Pink needs a kitchen remake. It was my first project and I have learned so much since that first project. I want to make the cabinets for it, too, using Julie's plans, but I can't bear the thought of hand cutting all that wood.
Your suggestions will be valuable in helping me decide.
I've gone on quite long enough. I've got to vacuum the family room downstairs--wishing I had riding vacuum since it is a large room. The Carpet cleaner is coming tomorrow, so I won't be playing for the next couple of days. I have to move the village, too, so that he clean.
I hope you have a fabulous week.
Thanks so much joining me.


I’m so jealous! I have only been able to see my grandchildren through FaceTime. How fun to have your grandson with you for two weeks! Thank you for all the information on how you made your flowers and food. They turned out really good. It makes me want to drop everything and make my own.
ReplyDeleteAbout the Maker: 1. The computer interface is now by cable or Bluetooth so I think it should be fine while you are cutting. Other users are smarter than I am on this. 2. You have to purchase the knife blade separately, they do go on sale from time to time. 3. If you are importing an svg file from another artist or miniaturist, no additional software is needed. You can create cabinets with the built in shapes. If you want to create your own designs, like my Charles Rennie Mackintosh rose, you will need Inkscape, which is a free drawing app. It is fun to use Inkscape but there is a learning curve. 4. Most users cut up to 2mm chipboard and 1/16” basswood, and then layer it for thickness. I was thinking about backing some basswood with Kraft board, that way I have wood on the outside and Kraft board for strength and easier cutting (you will see how this goes in a couple weeks). I think you are up to using a maker, and would really enjoy it once you get the hang of it.
Thank you, Sherrill. Now I have to decide if I should order from the company or just got Hobby Lobby or Michalel's to purchase it. I am up to accepting the challenge since I now have some projects to make the purchase worthwhile. I can also buy and attachment to use the cartridges that I have with my old machine. It was great having Nathan here. He lives in the city and doesn't have much to do this summer. My other daughter has a very active life: horses, trips to the lake with paddle boarding and fishing, so he has a great time. It's good for him. I hope you get to see your grandchildren soon. They need us as much as we need them.
ReplyDeleteHow lovey to be able to spend quality time with your grandson - mine is just four and permanently moving and nattering so there are no long stretches of 'making with nanny' yet a while but I am hoping to last long enough for them to arrive. 😊
ReplyDeleteThere isn't a corner in anyone's house or garden that cannot be improved by a plant/flower so, well done on the hanging baskets and, yes, many more around the balcony nd porch.
As for the pasta. I think making 1/12ths of things that are already small in real world is actually a lovely challenge and so satisfying when done. Your pasta is terrific. I definitely wouldn't fill your jar - I have three glass jars of pasta in my kitchen and they are always in different stages of fullness.
My youngest grand just turned 8 today. The kids have been in my craft space for a very long time, maybe even at 4--before I was doing miniatures.
DeleteNathan is precious and what a treat to have him for such a great visit after so long an absence! He's certainly got his grandma's creative genius!
ReplyDeleteThe geranium basket and planter box are really pretty! It is astonishing how many flowers and leaves it takes to fill a nice pot but the work is such a payoff!
Wow! So many amazing pastas and a fantastic looking meal! You make it sound easy though I know it took great care to make them. And the jars look so pretty!
Maker:
1. Cricut has made the Design Space software a program on your PC now so that you won't have a project interrupted by a bad connection.
2. The knife blade and housing are an accessory that you will need to purchase separately. I found mine on Amazon with a better price and faster shipping time than from Cricut's online shop. Amazon is always subject to change at any moment, though.
3.No additional software. If you want to create your own svg files you can do that on Inkscape which is a free download and there are tons of How To videos to teach you. It is NOT necessary, though, because in Design Space you can create your own things from shapes, free Cricut Access files, import from the internet or join Cricut Access for $10/mo and have access to thousands of files and images.
4. You can only cut as thick as 2 mm in chipboard (cardboard) or 1.5 mm in basswood. Source your materials accordingly or just buy the stuff from Cricut that is made by Cricut. Shop sales and stock up when you can. You can also cut illustration art board, mat board and really thick cardstock. Join the many Facebook groups and ask questions to learn.
Lisa who runs the Facebook group Miniatures Made By Cricuters and Spellbound Miniatures has many YouTube videos cutting furniture with the Maker. Watch them and see if the process makes sense to your brain or not. That will be your answer.
Where there is a will there is a way, but as you have shown in this post there are so many skills to harness in miniatures that you won't get board or left behind if you wait on the Maker. Don't succumb to peer pressure if you are not ready to take on a whole new learning curve. But if you are... Awesome!
Jodi, thanks so much for your sound advice. You answered several questions for me, especially the internet connection one and the need for additional software. I think I can pretty easily work with Design Space, but I also downloaded Inkscape, which will required some lessons. I will have convert my thinking from "wood" to "other materials." Between you and Sherrill, I'm in a good place.
ReplyDelete