
Lighting a dollhouse makes all the difference, bringing the house alive by adding that touch of realism to a small world.
If you have never wired a dollhouse, what a chore it can be. There are so many methods for electrifying a dollhouse ranging from the old technology, copper tape that I'll be using, to modern battery operated LEDs, which I will also be using. Even if you have electrified a dollhouse, it's still a daunting task. Do plenty of research to discover products and techniques that will best serve your skills, budget, and project. Here's my electrifying journey.
The Manchester Country Home is the 5th house that I have electrified with the goal--and great hope--of improving my method of installation. After spending most of Friday some of Saturday, and good share of Sunday, here is my progress thus far, mistakes and all.
I've always used Cir-Kit Concepts electrical supplies to wire my houses because they provide a complete system. The company has always provided the best service with outstanding products, sort of a one stop shopping complete with video tutorials for their quick connect products.
Then I rewatched this video to refresh my memory on installing the copper tape: How to Electrify a Dollhouse and decided to use the CRs2 system that this builder has switched to because it seems to be a stronger and more reliable system, especially for a large three story house with an addition. She explains the electrical science behind the power source and the connecter. The system still uses the copper tape wire, but with a more reliable and powerful ability to conduct electrical current.

I've had a lot of problems with the wiring in the Bellingham Farmhouse. I thought I had it adequately wired but then the lights one by one began to fail. I am chalking up to the amount of humidity in the basement with two large aquariums evaporating a lot of water. If the CRs2 system works like I hope it will, I will replace this current power sources. I am hopeful that this stronger system will be an improvement.
For the Manchester, these are the supplies and tools needed to power a dollhouse.
The CRs2 Power Source

- the power unit
- the connector
- positive and negative wires


The plug-in for the CRs2 system is more substantial and stronger than the Cir-Kit Concepts' system, which was one reason why I switched.

Tools
I used these tools to install the the copper wire tape. All of these supplies are available from Cir-Kit Concepts. CRs2 also has it's own line of tools. If you are just starting out, you can compare and see which tools you want to use. CRs2 also has an entire series of Youtube videos from start to finish to guide beginners on using their products. The owner of the company gives great instructions, but he solders all of his connections. I just am not ready to tackle soldering, so I used the Cir-kit method of installing the eyelets.
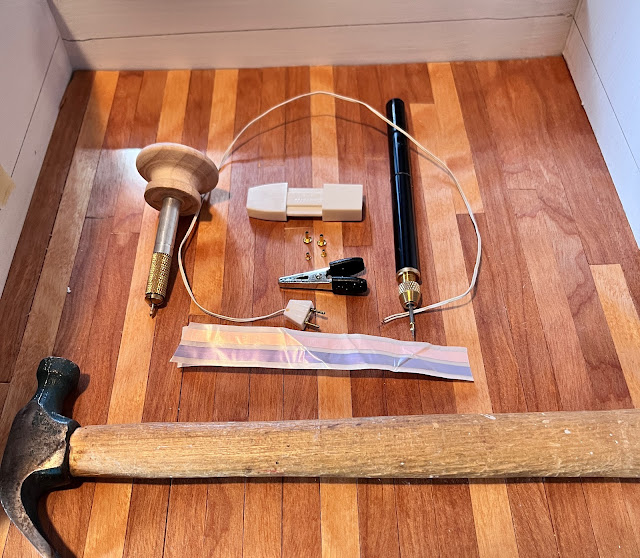
Left to right: the awl used to punch pilot holes for the eyelets; a plug-in that I'll use to create a connection between two floors; a current tester; a pilot punch to help insert the eyelets in the holes; copper tape wire; nippers to strip away the insulation from wiring; a hammer. In the center are two sets of eyelets.


Cir-kit Concepts offers two sizes of eyelets. The top two are the large eyelets that you can use as outlets for the plug-in (#1023-2 (B) ) and the smaller eyelets (@1023-)are used to make the electrical connections. Click here to find these supplies and tools.
I began by drilling a small hole in the addition foundation to install the connector. I really contemplated where I would place the power source because I wanted to hide it, but that option was pretty much impossible, so I just gave in and put it in plain view on the side of the addition. It's not the most aesthetic location, but landscaping might possibly hide it.


Following the video, I punched my holes then poked the the wire in the hole then inserted the small eyelet. . .

...then tested the connection. IT WORKS!

So far so good. Not pretty, but I have power.

I ran the tape wire around the side of the addition to the inside wall checking to make sure I had power, and I was ready to begin installing my electrical system.

I have forgotten to mention that I have another self imposed restriction to my system: not to run the tape a wire across the floors, but that is going to be very difficult.
And so here I am going around the front door, a good place to point out that one small eyelet will be placed in the center of the pink on pink line and one eyelet in the center of the gray on gray line. Make sure to double check that you have placed the eyelets in the correct spot; otherwise, you won't have a current--such as pink over gray.

With the pilot hole punched using the awl, I place a small eyelet on the point of the pilot punch with the top of the eyelet point toward the handle.

I do this because first eyelet will act as a spacer so the one to be inserted fits just on the tip of the point.

First floor is done with power all the way around. I will add more tape wire when I add lights to the ceiling, but the basic line is installed.

With the first floor, electrified, it's time to move onto the second floor, which presents the next problem: how to transition to that next floor.
Real Good Toys newer kits have slots cut in the second floor the run the tape through, which is quite handy. Running tape wire through the stair opening the floor is another way to transition to second floor, but remember my self imposted rule: not tape wire across the second floor because I want to glue the floors in place, but that is going to be nearly impossible. Looking back I should have cut that opening in the second floor before I installed it.
So since this house does not have that little slot between floors and I don't want go through the stair opening, I revisited the Bellingham Farmhouse to see how I connected to the second floor when my tape that ran across the floor failed. I like this method, but it allows me to unplug the upstairs, if I want. I decided, then, that I could do this in the Manchester.
However this day, I am focused on installing the tape wire to the 3rd floor that does not have a stair opening to the 3rd floor, just like the the Bellingham where I used battery powered lamps to light the two rooms there.

There are always complications to good plans. This complication is a yet to be installed roof pieces that I left off on purpose to accommodate the wiring and wallpapering on the 3rd floor, so getting power to that floor is particularly tricky.

Of course deciding where to place tape wire posed a conundrum that I had to contemplate over night.
I has seen this done in the Facebook group "Dollhouse Miniatures Tutorials and DIY." I thought it quite genius to run the tape wire up the edge of the side of the house, which might not be quite wide enough to the this tape wire.

I played around with for a while and decided that it would work since the walls of the addition make that wall a bit wider. By lining up the tape on the left side with the gray line on the edge of the wall the clear plastic cover will wrap around both sides with the adhesive holding it place. Splendid.
I failed to explain that I connected this line to the line that runs around the second floor of the addition.

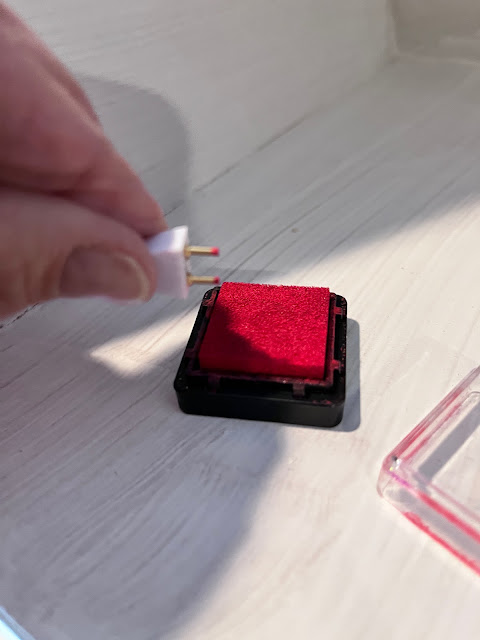
I dipped my plug-in in ink to mark where I wanted to punch my pilot holes for the larger eyelets.
I penciled a straight line to make sure the eyelets were even.

I punched my holes.

I inserted my eyelets. Hey, I thought, I've got this.

Next I had to prepare my plug-in for installation. When you install light fixtures and connect them to tape wire, you will snip off the excess wire, eliminating the plug-in. I never throw them away, because I just might need them.

Next use your Xacto to separate the wire by cutting down the center of the wire.

Leave a long enough "tail" of insulation to pull away, but not all the way. Now you can twist the exposed wired the snip away the excess. Twisting the several little wires that conduct the current keeps them all together, making it easier to push them into the pilot holes; otherwise, the tiny wires tend to separate and won't all go the same direction.
Tape wire is pushed in the hole; now pound in a small eyelet. I used to partially install the eyelets then wind the bare wires around it to create the connection then finish pounding it, but as demonstrated on the video, I think this gives a reliable connection, one that is not as likely to become undone.

Either my eyes don't focus the phone doesn't. Sorry for the blurry photo. I didn't catch it at the time, but the tape wire has been installed, the eyelets in place, and the plug-in in place.

So. What's wrong with this picture?

Exactly. I forgot to install the tape wire on the 3rd floor wall, so back to square 1.

The second attempt didn't go quite as smoothly when I installed the large eyelets. They didn't line up exactly, so I had to do it a 3rd time. You know, 3's a charm. This bogeyed up installation will be covered with wallpaper and hidden behind the roof panel, so only you will know about the mistake.
But I have power to the 3rd floor, but not to the second floor yet. That floor has it's own situation.

I still need to figure out how to power the second floor to avoid going through the stair opening and I will need finish installing tape wire on the third floor, but I don't have a plan for it at all.
The final step in this process is to cover the eyelets with clear tape to seal them and give some protection. I will smear wallpaper glue all over these electrical lines and transparent tape will help keep that moisture away from the electrical connections.

Electrifying a dollhouse can be a daunting, intimidating, and troublesome task, but it can be accomplished successfully. I have 4 vintage houses that I purchased from the local antique store that were all built I'm guessing in the '80s and they are all powered by this tape wire electrical system and they all still work, so I trust this system, but it is not the only system. Do your research to find what will work for you.
Thanks for visiting. Have a great week.


I agree, wiring is complex, but adds so much. Yours looks great and the tutorial is really helpful. I especially like your tip on marking where the eyelets go. Now on to the pretty part!
ReplyDeleteI've made a lot the progress. Thanks for stopping by. How's the 3D printing going?
ReplyDelete