
 The planters for the Manchester front porch show off geraniums, caladium, and generic cascading flowers. Kits are available in any of the online shops for caladiums, but you can also find generic leaf files online.
But first a gentle reminder about using borrowed material from any published copyrighted material: my residual English Teacher persona offers this reminder about using ideas from the Web: make sure that you do not "borrow" other artists' images, designs, and ideas and claim them as your own work. It's called plagiarism.
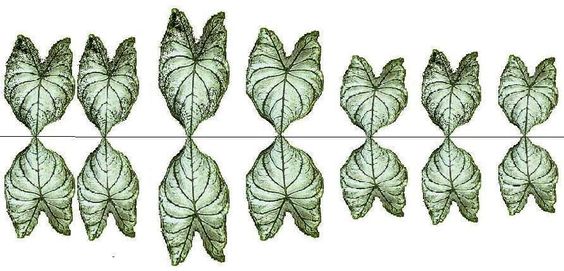
The real problem with taking others' work comes when you claim that borrowed or stolen work as your own and especially use it for profit. You are probably okay to use such images in your dollhouse just for you, but if you post anything anywhere, please give credit where credit is due by citing your sources. The leaves that I'm showing today come from Pinterest without a specific source.
I have purchased a similar kit to make caladium plants from Dragonfly International. The kit is an easy but tedious project. It requires cutting each pair of leaves individually. So when I found this image on Pinterest, I decided to see if my Cricut Maker would cut out the leaves.
You can decide if it is worth the work to get your leaves into Cricut's Design Space or if you'd just rather cut out dozens of leaves one by one.
The advantage to going to the work to import the images into Design Space is that it allows you print and cut as many leaves as you want for multiple plants.
Here's how to do it:
Download the image to your computer. I use a MacBook Pro, but the instructions will be the same for Windows.
You would think that you could just import this file as is into Design Space and it would cut out each leaf, but that is not the case. Instead this is what Design Space does when it is told to Print and Cut this image. It prints the image as is and cuts it as is around the black outline.

You need to separate each leave into its own individual .jpg file before you import it into Design Space.
After you download the file to your desktop:
1. Open the file in Preview by simply clicking on it 2. Select each leaf 1 by 1 and export each on to a new desktop folder.

3. In Preview To create each separate leaf .jpg, select a leaf: Edit>copy; File> New From ClipBoard; File> Export as a JPG to new folder.
Now you have seven separate JPGS leaves that you can import into Design Space.
Note: If a design requires multiples of the same leaf, only copy one and make the duplicates in Design Space (DS).
Before you upload into DS, you will import into DS and go through the editing process. You want to remove the folding guideline.
In Preview, to save time only copy 1 leaf of each size. I saved the first leaf as 12, to indicate that I need two that size. The next leaf will be 3; the next 4; the last copied leaf will named 567 to indicate that I need 3 duplicates of that size. Make sense? While there are 7 leaves that make up the plant, I only copy and upload 1 of each leave and Duplicate the number that I need in Design Space. Your individual .jpgs will look like this. Now you are ready to import each .jpg into Design Space.


Open Design Space.
Open a New Project; Click on Upload at the bottom of the left hand menu. Import the first leaf.
To remove that line and any other unwanted background, click Accept and Continue button at bottom right. That's all you have to do in this screen. You will see that it removes the vertical guide line. You can stop editing here.

This tool allows you to erase anything from an image that you don't want. You can erase the color outside the leaf that you see in the V of this leaf, lines, but Cricut will add it back when it prints. I'll explain the reason for this soon.
As you edit each leave, next your will the type of image : Cut Only or Print and Cut, chose Print and Cut.
Next download the leave .jpg to DS by clicking the the Download button below the image
Then click on Add to Canvas
Once you have uploaded your individual leaves, edited them, and added them to DS, you can now duplicate as many as you need. There are seven leaves in this set.
You can also make some extras incase you mess up the leaf or two.
Click Make It which will take you to the print window, Send to Printer. Click on Add Bleed. Some projects don't need that option. It will add a slim color margin around the image other wise it will leave a white margin when it cuts, so that's why its not necessary to edit out the bleed line added to this leaf image. I went to all the work to edit it out, only to have it added back. This keeps Maker from cutting into the image or cutting too close to it--as someone on a Youtube tutorial explained.
So back to the editing step; you don't have to remove the bleed line; instead you will hand trim each leaf.
You can see that even though I cleaned up the the bleed line in the editing window, Maker didn't cut it away, so I still have to hand trim. The color is off on my leaves because the lighting for the picture, not my printer.
With "Add Bleed" in print window

Without "Add Bleed" in print window

Either way, you have to trim the leaves. I think it's better to Add Bleed that adds the color of the image; otherwise, trimming away white can be a pain.
Assemble the leaves
The white has been trimmed away--almost. Because there is such a slim attachment for the back and front, I'll trim the leaves again once the glue has set to avoid tearing the fine point.

Apply tacky glue to one side of the leaf and place the stem on the leaf.

Fold the other leave into place, press, let dry.
Finish leaves by trimming away the white. Sometimes the backs of the leaves don't line up perfectly, so you can use a bit of a marker to cover up the white. If the bottom doesn't show in the arrangement, I don't worry about it.
I finish the leaves with a coat of glossy Modge Podge to give added strength to the leave and to add a shine. When that has dried, I bend the leaf to shape it.


Still once you get the process down, it goes quickly and you I feel that you can produce more plant material a bit faster. You can create a reserve of leaves to use as fillers when need extra plant material for planters, so go ahead and print or print and cut extras to add to your hand made flower inventory.

I have decided that using punches to make most of my miniature paper flowers work best. While the cutting machine will cut perfect the little circles for this next project, punching is just easier. I did do a test cut of the 3/8" circle that use for the morning glories on the painted coffee filter. I use the score wheel to score the tiny circles, and while the machine performed as it was supposed to, the score lines weren't as defined as I wanted. If' my just cutting circles the Maker will cut a lot more, but punching seems just as efficient. I do like to cut the leaves out on the Maker because I can create so many and not so much hand cutting. You decide how you want to spend your time and money. You do have have an inventory of punches. I just ordered 3 more this morning so that I can lilacs.
So, let's make some morning glories to climb up a birdhouse post.
These are supplies and tools to make morning glories

- Tacky Glue
- Soft foam or some even use an eraser
- 3/8" circle punch
- Leaf punch
- Paper covered wire 2
- Paper--computer paper, scrapbook paper, painted coffee filter
- Stylus
- White gel permanent pen or white acrylic paint
- Tweezers
- 3/16" dowel or what you may have on hand
I began by painting my coffee filters. For the leaves I mixed my old nearly dried up water color pastes, but acrylic craft paint works well. I mixed two shades of green, yellow, and black to get my own custom color. Drawback: I didn't really have enough custom paint to make as many leaves as I wanted.


I hung my filters on my desk lamp for lack of better place to dry them, only to discover that the heat from the bulbs dried the paint more quickly.

Once the paint dried on the coffee filters, I cut my leaves and used the small end of the stylus to vein and shape the leaf.

Coloring the tiny circles is tricky, so I secured this circle gage and placed the flower in the appropriate size circle and held it in place it a sharp stylus.

I've used both acrylic paint on a very small brush and this gel pen. It works best for me.

I let gel ink on the the flowers dry then use the stylus to gently shape the flower, giving it a slight curve since morning glory blooms are only gently curved, but not totally flat.
Next I wound a length of wire up the post of the birdhouse, but found once I had it in place it was too hard to add the vining stems, so I had a basic shape of the spiral vine and removed it form the post to add the vines, leaves, and flowers.


I used the end of paint brush to twist the spiraling vine ends.
It's a good idea to look up morning glories online to see how they grow then try to reproduce that look.

Now, I begin adding the flowers and leaves.

A little blue bird has already found her new home.

We don't have cardinals here in Colorado, but in my mini world anything is possible.

Design Space Bonus
I designed my birdhouse in design space. So can you.

Sides: 1.943x1.972 cm (You can round off the numbers--DS does it's auto calculation, changing your dimensions slightly--annoying, yes!
Front and Back: 2x3.03 cm
Roof: 2.2x2.
Floor :1.7x1.9 cm can serve as platform, but the house looks finished sitting on a platform. Make it slightly larger than the floor and slice a hole the size of the pole that you will use a separate piece. I like to add the platform to give the bottom extra strength.
Platform: 2.1x2.4 cm
Circle for door opening: .5 cm
Measure your post size to make a circle in DS, use slice tool and align to center the hole
Cut a paper test of the pieces first incase you want to adjust the pieces and size of the house.
Materials: I used 1/16" bass wood; alternatively 1.5 mm chipboard or craft board (Cricut brand) or heavy card stock.
Tools in Design Space: Shapes; (square and circle); Align Center to place the door opening and the hole to install the post; and the slice tool.
To drill the hole for the tooth pick perch, use 1/16" drill bit (I used my Dremel)
You actually don't need a cutting machine to make these little houses: use your cutting blade.
Thanks for visiting and Welcome to new members.


Hi Ann! Your mixed planters came out beautifully! And the birdhouses and vines are just adorable! I am so happy to see how splendidly you and your Maker are getting along!
ReplyDeleteI have not yet used Print Then Cut for leaves or petals, but what a fun activity to imagine for the future! We would need eternity to explore all the ideas and possibilities we have at our fingertips with our cutting machines, but it's awesome to know that we can explore any new idea that excites us!
I have many mini punches, but must admit I have not fully utilized their possibilities yet, either. It's so much fun for me to crack open a new kit, make progress as I follow directions and end up with something beautiful that I go back to them instead of pioneering my way with the punches. At lease they are getting used at your house!!! Great and beautiful work! Keep having fun!
You are becoming the mini community’s flower resource. You give such detailed instructions and sources. But where your expertise really shines is in the flower arranging. I just love the simple, but effective combination in the geranium pots, and to make extra “filler” leaves is a great idea. The morning glories are also effective. Thanks so much.
ReplyDelete