Monday, January 23, 2023

Today

"Today's the day," I said to myself. I have put off gluing in this cupboard and then put it off again and again. First, though, I had to add the wallpaper: gray scrapbook paper and printed tile from Jessica Cloe, printed on glossy photo paper. Then the moment of truth. But wait. I had a thought of redoing the cupboard doors to match the ones on the other wall. I took another look at the unit and realized that the doors weren't that bad and what a chore another re-do would be. What if the new doors didn't fit the best or the hinge pins give trouble. So I got rid of that cray idea and moved forward with the installation. 

I had installed a light on the wall to light the stove, but it was awkwardly installed and not very reliable, so, no light in the stove hood.


I smeared Gorilla wood glue on the top of the hood and on the backs of each cupboard, placed the unit, and taped it in place best I could.


While the glue set, I went about finishing the kitchen side of the stair wall. Wallpaper printed from some obscure website on mat photo paper. I added the wood trim.


Then I added the cupboard and glued all the wood pieces in place. The cupboard ended up being a smidge longer than I wanted it, but the long edge will be on the back side, so it won't be that noticeable. I was not going to remake it.


I wanted install this cupboard before I installed the wall because of its weight. I wondered if it would have been better to glue it directly to the wall rather than on the wallpaper because of its weight. On advantage to gluing items to the wallpaper comes when it's time to renovate--which I cannot even imagine doing. 


And here it is. I am really pleased with the results. 


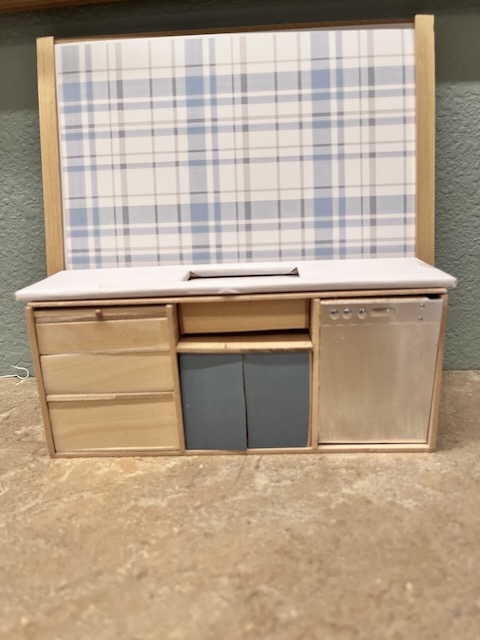
I wonder why I procrastinated so long putting the cupboard in place? I love how it looks. And the restyled cabinet with the gas cooktop that Jodi Hippler 3-D printed. Perfect. The oven was pried from its previous spot as a built-in oven kit came from Elf Miniatures in the UK. The drawer below it is a fake as the only non-opening drawer in the kitchen. I still need to glue the counter top into place and do some touch-up painting.


The kitchen really is coming together. I borrowed the door shelf from the top balcony the Pink Farmhouse where it really served little purpose. I created this vintage stand from door that I had removed from the old farmhouse during it's renovation--well, I take that back. I think I used the original doors, but bought new ones and decided not to use them, choosing the originals instead.  I think. That was a while back. Anyway. The shelf fits here. I added the hooks. Still playing around with how I'll decorate it. For now a key ring full of random keys seems to fit.


The cupboards have been filled. Too bad you can't see the variety of food. 
The coffee maker with the coffee pots comes from Genies Mini House Shop on Etsy. 

More of Jodi's 3-D printed items on the sink counter that still has to be glued in place.


While final touches such as spraying the sink top with Triple Thick and gluing in the dishwasher and touching up the paint are not complete, the kitchen really has come together nicely and I am enjoying the results. Last night I filled my little handmade basket with a philodendron that I threw together.


How about a cup of coffee? The cream and sugar are ready.


I decided to remove the pods from the large holder and put them in a little glass canister. I like that better.


With the kitchen nearly finished, I played around in the dining room. I decided to reposition the table to make room for a mini bar at the window. The chandelier is a Bindles kit. It was challenging, but I love it. The candles don't always want to stand straight though. And guess what the center piece is? Porcelain flower that are actually a pin. It's an antique piece; perhaps my grandmother's or at least that's the story. The rug is printed on paper. I hope I can find the file on my computer so that I reprint on fabric. And the clock needs a face. I may just leave the furniture natural. What do you think?


I am so ready to be done this house. With the kitchen nearly finished, I will be able to move on to the second floor which requires only finishing touches and no rebuilding. I am re-thinking the 3rd floor. I had thought a craft room, but I am rethinking. Maybe another bedroom.

The many hours that I've spend the last couple of weeks working on the details have paid off. We've had snow on the ground for days, so I have kept myself well entertained. 

We did get out for a walk last week and I have to share 
 my little owl--well--he's not mine. We heard that there was a Northern Screech Owl along a walking path on the north end of Ft. Collins, so we went for a walk and there he was. He was not hard to find because there were half a dozen bird watchers with their 3 ft long lenses taking his photo as he slept. I used my Nikon 50-300mm telephoto to get some decent shots. He slept through the entire ordeal, even as a small crowd gathered to watch him nap. 

We've heard, too, that there is young male Northern Cardinal on the other side of Ft. Collins so we will go see if we can find him. Cardinals are not native to Colorado, so he is indeed rare. And there's a pair of migrating swans wintering on a pond just down the road from here, so I'll be checking them out too. 


I'd like to welcome Judy, my 50th follower--a milestone. 

I'm so glad you dropped by. See you next time.

Have a great week.

Monday, January 16, 2023

Mission Accomplished

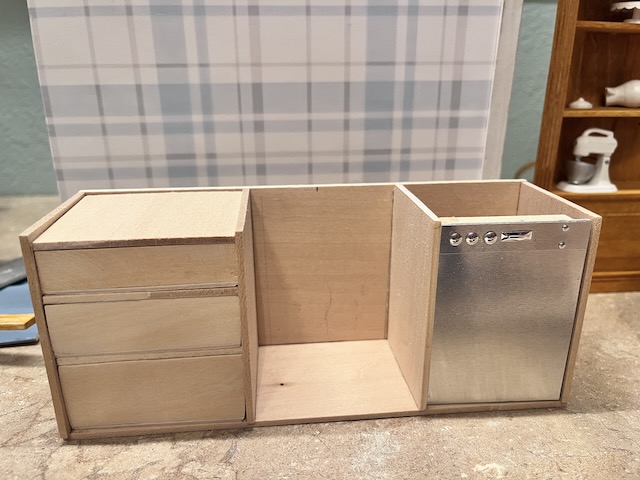
 This is about where I left off last week, redesigning the sink base counter. I had made the drawers for another unit that I was going to use, but they fit nicely here. Now I work on installing the inside dividers that did require some sanding to get them to fit.

Originally I wanted the sink and dishwasher switched with the sink at the end of the counter, but try as I could I couldn't get it laid out in Design Space, so I opted for a center placed sink, which works fine. I was able to release the Elf kit dishwasher from its old counter so I didn't have to order a new kit.


Before I wasted wood, I cut by hand my test piece for the sink insert from a template that I laid out in DS and printed on computer paper. Actually I did such a good job cutting, I did not cut one on the Cricut. While the rest of the cabinet is cut from 3/32" basswood, I cut the counter top from 1/16 so that I could get the sink centered and a nice cut from the machine. I cut 2 countertop pieces as smidge larger than the sink insert on the Maker from 1/16" basswood.


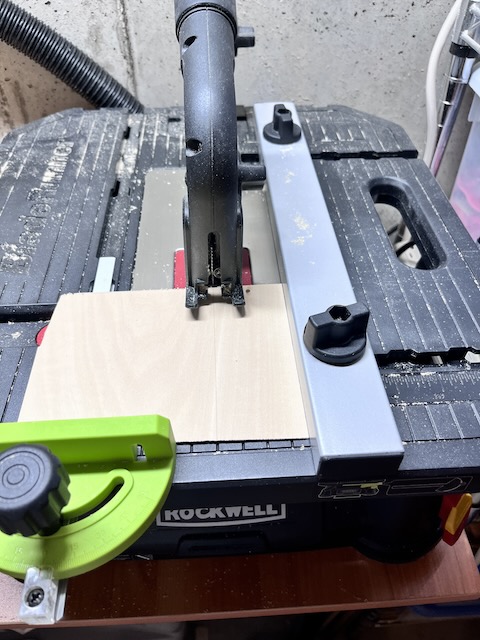
While the Maker cuts the thin basswood, it doesn't cut 3/32, so I'm used my Rockwell table saw to cut the thicker wood, but because I wanted the sink centered and didn't want to hand cut the thicker wood, I cut two on the Cricut and glued them together for a thicker counter top.


I love the saw especially when I make multiple cuts the same size because I can set the guide at just the right distance.


Sometimes--well a lot of the time for me--I have to sand pieces to get a good fit. This Rikon is just the handiest machine to sand away a lot of wood for clean straight edges.


My little machines are in the storage closet in the basement beneath beneath the stairs. My husband bought the tools and set them up in the basement storage closet. I had never consider the sander, but it is certainly handy. The saw replaced the old Craig's List scroll saw that I used with less than good results often.


The cabinet begins to take shape and I'm enjoying the results.


The inside dividers turned out a bit oversized, so I sanded them down to size for a better fit. I do find that hand sanding often leads either over sanding or altering the shape, so I try to take care to go easy.


The two layers of the counter top are glued together to make 2/32" countertop. Some would drill holes in the corners of the insert for the sink to cut it out on the saw by placing the saw blade inside a pilot hole to make that interior cut, but I'm not brave yet.


I taped computer paper as the counter top cover to see how it all the pieces fit together. Then I see it: the divider support underneath the sink is glued in crocked. Darn it! The shelf had to come out. So I used my trusty embossing heat gun to softer the Gorilla wood glue so that I could remove and reposition the divider.


I recycled the cabinet doors from the previous sink cabinet and while they fit, I really wan't happy with them because one didn't have a straight edge and once I moved the divider support piece into place they weren't tall enough.


I laid awake a good share of the night trying to redesign the doors so that they looked great, opened and closed, and were sized properly. 


I began using scraps to practice cut doors. I added a middle support to solve one problem I consistently have: the center door edges never meet up nicely. I decided, too, that the center edge would not be a cut edge, but the outer edge of the raw wood to get matching edges that were perfectly even and smooth.


I added top door-top to match the bottom one so that the doors wouldn't swing inside the cabinet and the center post to give some space between the doors then inserted my hinge pins to create very nice doors. So now the cabinet is ready to paint. I will leave the doors in as I paint then glue in the dishwasher the permanently place the sink and counter top. Whew. What a project--3 days, I think.


Here are the old pieces and the new pieces. I'm finally satisfied with the kitchen cabinetry. I managed to reuse some old pieces and use scrap wood to create new pieces. I'll save the old pieces because who knows, I might need them one day. The new pieces will soon be installed and the kitchen will finally be finished. 


I'm so thankful that you took time to stop by today. I hope you learned a new trick or just enjoyed the post. Real life is catching with me again--tax prep time. 👎😝 I've got some work to do in the office--the other side of the miniature studio. At least it's a short commute.

Wishing you a fine week of mini making. 


Monday, January 9, 2023

Three's a Charm?


Happy New Year, friends. While the celebrations have ended (finally and thankfully) the New Year is hopefully off to a successful start. After a long break from the Manchester, I'm back to work. I looked back in in my photo library to see when this project started--January 2021. In my mind, it really should not have taken this long, but I seem to have a time making permanent  commitments, especially to the kitchen. You will remember the work that I put into building all the cabinets, but once I finished all the pieces and them in place l was so disappointed the results. I realized that I had too much in the kitchen, especially with the sink in the center island, so I'm redesigning and rebuilding the kitchen. 

I decided to take the existing cabinets and remodel them. I also decided to eliminate the large cabinet that had the built in oven and microwave, so save money, I removed the ELF kit pieces that were in the built-in cabinet that took up too much room and competed with the same size refrigerator. 

Then I took the second stove cabinet base that I built and removed the double cabinet doors that I never could get to fit.


I inserted a new front for the oven.


The ELF kit Eazy build oven is a perfect fit and goes nicely with Jodi Hippler's custom cook top.


I will create a faux drawer underneath the oven.


So, on the right wall, I've removed the built-in oven and microwave wall unit and will place the refrigerator there in place of the tall cabinet, creating a much cleaner look.

Next I decided to rebuilt the short wall where I planned on the cute coffee bar, but decided that I needed to eliminate the center island all together where the sink was because it was just too crowded. I would replace the coffee bar cabinet with a long counter with sink, with newly constructed upper cabinets. 

Inspired by Julie Warren's method of building upper wall units, I set about designing cabinets that would fit on that short wall. I used lumber from my wood stash and avoided using the Cricut to cut the doors, basically for one reason: The Make cuts only 1/16 inch basswood and I'm finding that the bass wood does not hold up after painting as it tends to swell and warp. In addition, 1/16" is just too narrow to insert hinge pins without splitting the wood, so instead I used 1/8" lumber.  Works great.


I used the cabinet in my work area as more inspiration.


The cabinet doors went together very nicely.


I used 3/32 basswood that I hand cut for the cabinet itself and I'll use pin hinges for working doors. 


So far so good. I measured and cut pieces as I went for a good fit, unlike my Cricut Design Space method of remeasuring and cutting everything and then not have accurate measurements and good fits.


Next I inserted the shelves then painted the entire unit. The doors have not yet been hinged, but they look good and fit nicely--at this point.


And now the hinges have been installed, not without a bit of drama. To finish the doors, I cut acrylic for glass fronts to the doors.

Next I installed the tiny wood door knobs. I cut a paper template to locate the holes for the knobs and for even placement, eliminating tedious measuring.


For me, paper templates work well to for drawer pull and door knob placement. I use a small drill to make the hole then glue the knob in place.

The doors did require sanding around the edges get a good fit so that they would open without sticking. I use a fingernail  emory board to gently sand the unpainted edges.


Play time. Digging in my stash of dishes that I've been collecting for the Manchester, including Jodi's test pieces (the mixing bowls) that will add great color to fill the tiny shelves

I have glassware, too, for the tiny cabinets, but ran into problems getting the glasses to stand up on shelves, so I used museum wax to fix the glasses to a piece of clear acrylic to keep them in place. It will slide right in place in the cabinet, but the clear glassware does not show up in the cabinet, so I may not use them.


The next project on the kitchen remake was to build a new center island in the shape of simple work table. You will see my inspiration piece soon. I dug in my lumber stash looking for bits and pieces that I could use.


I measured out my pieces and cut them on my little table saw. I'm really beginning to learn how to use this little saw instead of relying on the Cricut that takes so long to design and cut. The bar to the left allows me to adjust to just the right length so that multiple pieces can be cut same length. Fast and accurate.


I had wanted to use spindles for legs and ordered 4 but they weren't tall enough so I'm using 3mmx3mm lumber for legs.


I wanted working drawers, but build one and then decided that it would not be a working drawer.


On the left is my newly created work table inspired by the one I purchased for the Blue Farmhouse.


And here it is in the kitchen. I like the work table much better than the sink cabinet that took up so much room.


When I rebuild the final base cabinet for the sink, I will have to order a new dishwasher kit unless I get the old one removed without destroying it. 


After 3 rebuilds in this kitchen, I may get right soon. 

I think I like the newly designed kitchen pieces. I started out with a great idea, but once I located all of these pieces in the kitchen it was just too crowded, so I think I have a better design going. All built from my stash, all built by hand.

Thanks for stopping by. I alway appreciate your kind comments. 


Stairway to Heaven

Staircases are always challenging. In the past, unhappy with how the kit stairs looked or turned out, I purchased Hobby Lobby stair kits tha...