After the first of the year, I committed to finishing the Manchester. There was so much work to do, especially in the kitchen mostly because I just was not happy with the cabinets--you know that that story. With the that project mostly in the rear view mirror, I turned my attention to the second floor which really just needed finishing touches, except the beautiful wood floor installed using double stick carpet tape warped and can't be reshaped and in the second floor addition room--yet to be designated--I had a huge dilemma trying to figure out how to install the hand crafted pendant light.
Recreating the floor for the second story bedroom posed a particular problem because I had only a handful of the 1/2 wide veneer flooring strips that were original to the old 1990's Duracraft San Franciscan house the I had used on the other floors. Not able to rescue the original floor, I researched where I could purchase such planking. Ebay had offerings that were about $18. a pack and I probably need two packs, nor were the wood colors what I wanted.
Somewhere in all of my searching and random reading, I saw a brief post on a crafter who cut her wood planks on her Cricut, so I set about doing the same with excellent results. I ordered the maple veneer from Cricut, cut it on the green mat with the deep cut blade (black). Fearing that I'd run out, I designed planks for half a 12x12 sheet, but one plank that wasn't square, so I had some planks that I couldn't use. Still the results were acceptable and I was able to build my floor. It is lighter in color than I wanted, but the other Cricut option, the Walnut veneer was too dark or cherry--which was not available. I've stained the floor with a very light stain to match the rest of the flooring with good results. I may just use the method to make my wood floors in the future. The veneer cuts nicely and you can design your own floors.
Originally, I cut half scale planks for the Fairfield, is I knew that I could cut the larger ones, I just knew how to lay them out in Design Space so that I didn't waste woot


Installing the flooring does pose a particular problem because I need to maintain access to the wiring, so I'll use tape to stick it in place so that I can life it up if I have to access the electrical connections.
.jpeg)
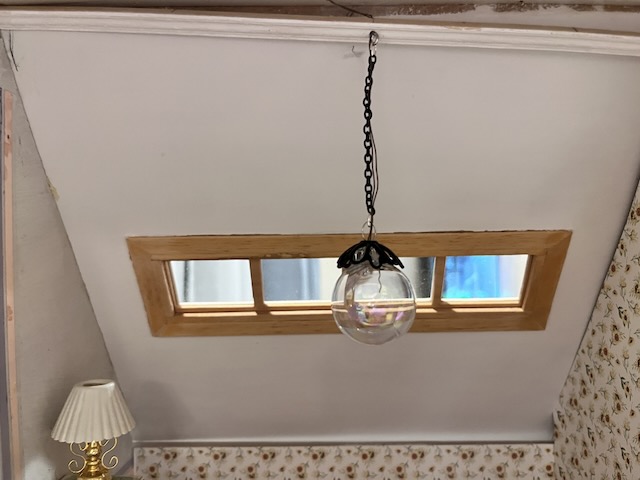
Next project:The second story of the addition really is a simple room--just wallpaper and lighting. I'm not quite sure of what purpose it will server--probably an office or study off the the bedroom. I had a plan: two large glass pendants made from the small clear Christmas balls hanging from the peak--which probed nearly impossible to install.
First I wired a smaller version of the pendant light to the tape wire on the left angled wall underneath the wallpaper, but when the roof went on I needed to conceal the joint at the peak using crown molding, but I couldn't get the wiring concealed. SO
I stripped the wallpaper and uninstalled the wiring for the light.
I went back to my original large pendant, drilled a hole in the crown moulding and through the ceiling, and installed the light in the center of the room with the wiring to be connected on the roof.
I centered one light realizing that two large globes would be too much. Once I had the hole drilled in the crown moulding, I placed on the roof to drill the hole for the light's wire.
I used a needle with a large eye to draw the tiny wire through the hole. I probably will not shingle this roof; instead, I want to simulate what we call in these parts a tin roof made of wood, naturally. I'll make the panel for this section removable--just incase.
It ain't pretty, but this awful sight will be covered by roofing.
Next I needed to reinstall the wallpaper--never did like the original color--using scrapbook paper. Now I am ready to glue everything in place.
WHAT?
I'M OUT OF GRANDMA STOVER'S WALLPAPER PASTE? 😡😞😐
Sub-Zero temperatures. Icy Roads. Hobby Lobby 13 miles away. Progress on hold.
In the meantime I remade the floor and rebuilt Julie Warren's file cabinet yesterday. Today it may reach 32 degrees, which is tolerable, so I'm headed to town.
And I cut the wrong color in a recut.
3 sheets of scrapbook paper later. . .
 \
\
While the second story room has been designated as a bedroom, it is barely large enough to accommodate a bed along, so I am toying with putting the bedroom on the 3rd floor. I have the closet built, but what will I do with lower room? I'll work it out later--and maybe even change my mind.
At any rate, the Manchester is closed to being finished, except for the roof.
So, this is where I left off Monday. Happily I can report Progress. Other than installing the door, the room is structurally finished.
Lighting is always tedious. This plug-in has given trouble from the beginning--they always do when the lamps are not directly wired in. I'm not too sure how I will fix it. Wait until the wallpaper adhesive is totally dry. Then what?
Expectations for this room have been totally realized. Instead of this bench, I'll build some sort of plant stand that will hold a collection of plants.
There is one disappointment: the globe pendant light does not produce as much light as I thought it would, but still I like the pendant.
Installing it didn't go as planned. When I went to strip the tiny wires, I pulled one apart, shortening it considerably, so I had to reroute the tape, but it all be covered with roofing that won't be glued fast.
So now each room I consider each room essentially finished except for the final touches. The bathroom pieces need to permanently placed, but the structural work is done and the stairs have to installed after new floor in the bedroom is waxed and installed.
So what's next? Well, I have to finish the 3rd floor, but I have not decided what the room will be, so I'll wait until it tells me what it wants. I have cut all the trim pieces to finish the exterior, so that's probably my next move once I finishing all the touch-up work for each room.
I am really loving this house. My other houses are filled full of do-dads and things, but this one I intend to keep very simple.
I hope you have enjoyed this build. It's a cool house, so if you find a Duracraft Manchester Country Home still in the box, it is well worth the journey. I purchased this one, if you remember, on Craig's List for $40. and my daughter picked it up for me.
I'm not sure if I'll build another big house--oh if I find a deal like this one perhaps. I do have two projects on the back burner: Betsy Ross making the first flag and replicating Shangri-La, my grandmother's log cabin.
Thanks for visiting. It's always nice to know that you're visited.


.jpeg)


 \
\


I have enjoyed seeing the progress of your Manchester house over the last few months and you have given me plenty to think about. I really will try and do a little on my own house but so far circumstances have not allowed. I live in hope :-)
ReplyDeleteLooks like progress to me! What I like about watching you build is your perseverance. You work at it until the finished project matches the picture in your head. Sure the picture in your head may change, but you chase it until you are satisfied. Nice work!
ReplyDeleteThe room came out so prettily, Ann! I love the airy feel of the entire house and the wood floors are just gorgeous! Hope you have found all the time you need to make more progress this week. I am looking forward to seeing how the rest of the upstairs room are coming along!
ReplyDelete