Monday, November 15, 2021

All Over the Place


I seem to be all over the place these days, going from one project to another. I've ordered over a hundred photos for five 8x8 photo albums for the grandkids--such drama came from deciding which of thousands of photos to chose from. lost photos at the drugstore print shop, and the complications using discontinued Creative Memories products that fortunately I can order on eBay. Still! I doubt that I'll have them done by Christmas.

Three years ago I got the brilliant idea to make greeting cards for the veterans at the Cheyenne, WY VA nursing home, and I've grown our Daughters of the Revolution project from sending 22 two cards the veterans to sending hand made greeting cards to Cards for Soldiers, so we make a lot of cards here in my basement. I fix lunch for my DAR friends and we work for a few hours creating pretty cards for our service men and women. It's such a small gesture, but a worthy one. We will gather here Friday, so I have plenty to do to get ready.

This time of year with the holidays approaching, I won't get much done on the Manchester, and there is so much to do. I am having a very hard time committing to anything permanent, such as flooring, which I've been working on. I've made decent progress, but returning from my hiatus caused by health issues I had lost track of what the original plan was, made a of mess of things. Instead of finishing floors, last week I made furniture for the living room and curtain rod hangers--now that project came out of nowhere since I'm no where near ready for curtain rods, but I have the hangers!

So let's begin with the Mid Center Modern chair created by Dilly Dally Dollhouse. I downloaded the .svg files from Etsy and went to work. I won't go through the entire tutorial because she does a much better video. While she used a double layer of 1/16 basswood, I used 1.5 mm chipboard, which is the same thickness. 

Here's the irony of this choice for the Manchester living room: 

I never have been a fan of Mid-Century Modern. When I set out on this build, I knew that it had to be different from the other two farm houses that I've created.

 My grandmother's house, a two story red brick Tutor, was the typical 1940s home. Perfect in every detail, clean and neat. Never anything out place.  I can remember every nook, cranny, and corner. Every detail. I was 12 when my grandmother died suddenly. We were great companions and she taught me so much and missed her, but when my grandfather sold their house, dispersed her belongings, and remarried, I was happy for him. He moved just down the road from us, which a great, too.  His new wife had a nice home to decorate. In the early '60 the Swedish style was 'in' and she chose, including the aluminum foil Christmas tree with the color wheel. I hated it. Google the look and you will see that it is still made.

 I remember the turquoise cushions on chairs just like these little ones Rita at Dilly Dally Dollhouse has created. For me, the furnishings didn't look inviting, warm, or comfortable. How ironic that I am now jumping out of my comfort zone for this house.

As my photo shows, I also cut out a sofa by tripling the the back and seat pieces in the Maker Design Space by simply attaching 3 pieces. Worked out for me. It is a good idea to label pieces since the front and back have a slight difference in dimensions. 


Rita at Dilly Dally has created such easy projects that lend good results. So here's how I assembled my chair and sofa. I used double stick carpet tape and it is sticky to adhere the fabric to the card that I used for the cushions.. Rita just uses the glue stick, which I used for the corners and realized it does adhere fabric nicely.                                         

I glued the poly fiber to heave card using the glue stick. Poly fiber cut to fit.


For the sofa, I used double stick--really sticky--carpet tape and then the glue stick to adhere the fabric on the ends, which dries clear, by the way and doesn't saturate the fabric as tacky glue or even fabric glue do. As it turned out, I probably didn't need the sticky tape for the glue held nicely.                     


Since these were my practice pieces, I just folded the fabric around card instead of making boxes cushions using the foam core board, which didn't require the last step to finished the edges or the sides of the cushions. A finished box cushion will have a band around the edges. 


With the chipboard board pieces finished--I didn't paint them--, I cut the wood ones from 3/32" bass wood. Cricut does not say that the Maker will cut that thickness, so I'd say: at your own risk. Mine seems to handle it nicely and while it says 24 rounds, 11 or 12 passes seem to work fine. 


I am a bit disappointed that the wood grain on the chair doesn't match, but who will notice once the cushion is installed. For this set, I will use the 3/8" foam core to make box cushions for more tailored look and use using quilt batting to add softness instead of the poly fiber. Right now I can't decide on fabric or colors and I have to decide on wallpaper for the living room. 


The practice pieces have been moved into the Bellingham Texas Farm House. The chair will be in the little cowboy's room that is influenced by Roy Rogers, King of the Cowboys. I need to get his poster hung.


The sofa is in the second story sitting room. I wanted it to be somewhat southwest, but the rug doesn't really fit.


So I borrowed the cow hide rug from the living room then ordered a new one from Etsy for the upstairs.


Curtain Rods

Sometimes it really is easier to just order things from the miniature venders online, but I've always made my own curtain rods using jewelry findings and wooden skewers, but this time I used WireForm soft metal rods that I purchased from Hobby Lobby. The ones shown here are .06 12" long rods, but actual one that I used is larger. Can't say Houseworks much since I don't have the packaging anymore, but the smaller diameter will work.
Supplies:
  • Rod: either wooden skewer or metal
  • Bead caps--whatever you want. I'm using brad since the tube is hallow. 
  • Findings. Shop the bead section in the craft store
  • Glue: jewelry glue or E6000 works great to adhere metals.
  • jewelry wire: a fine gage. Once again I'm using from my stash so I've thrown away package. This could be 22 gage. Larger gage is harder to twist and work with and you need something that will o through the beads and finding.
  • jewelry cutters and pliers
  • Pipe cutter--the red thing. You can't cut with scissors. This is an inexpensive gadget if you are going to work with wire.


I'll include my photos, but they are not very good and it is very hard to describe how bend the wire to create the hook. Essentially I created a loop at one end of about 22 gage wire using jewelry pliers. I inserted into a bead cap so that the loop is located on the concave side of the cap with 90 degree in it. 
This is what you want the finished under side of the finding to look like (the concave side). Once you have created the loop and cut the wire about 4 mm long, you will make a 90 degree downward bend about 2 mm from the bead cap.


Begin by creating a loop


The loop doesn't have to be closed.


Bend the loop down to create right angle.


Thread the straight end of the wire through the top of the finding


From the front side, bend another right angle down about 2 mm from the finding. On the other side of the right angle wrap the wire around the plier to create half a loop and cut the excess wire off. This very hard to explain and even harder to get good photos.


You should end up with hangers that look something like this. Some hooks are a little long, so I'll trim the excess away when I mount the rod.


Here is the finished curtain rod hanger. I glued the hooks in place then used these clamps to hold the pieces in place and let them set over night.


Next I need to source lights. I'm trying to use out my stash, I don't have all the light that I need I have searched for a bathroom wall fixture, but haven't found exactly what I want yet. In order to more interior work, I need to install the tape wiring, so perhaps that will be next.

Thanks for visiting today. I always enjoy reading your comments. 


Thursday, November 4, 2021

Building a Shower


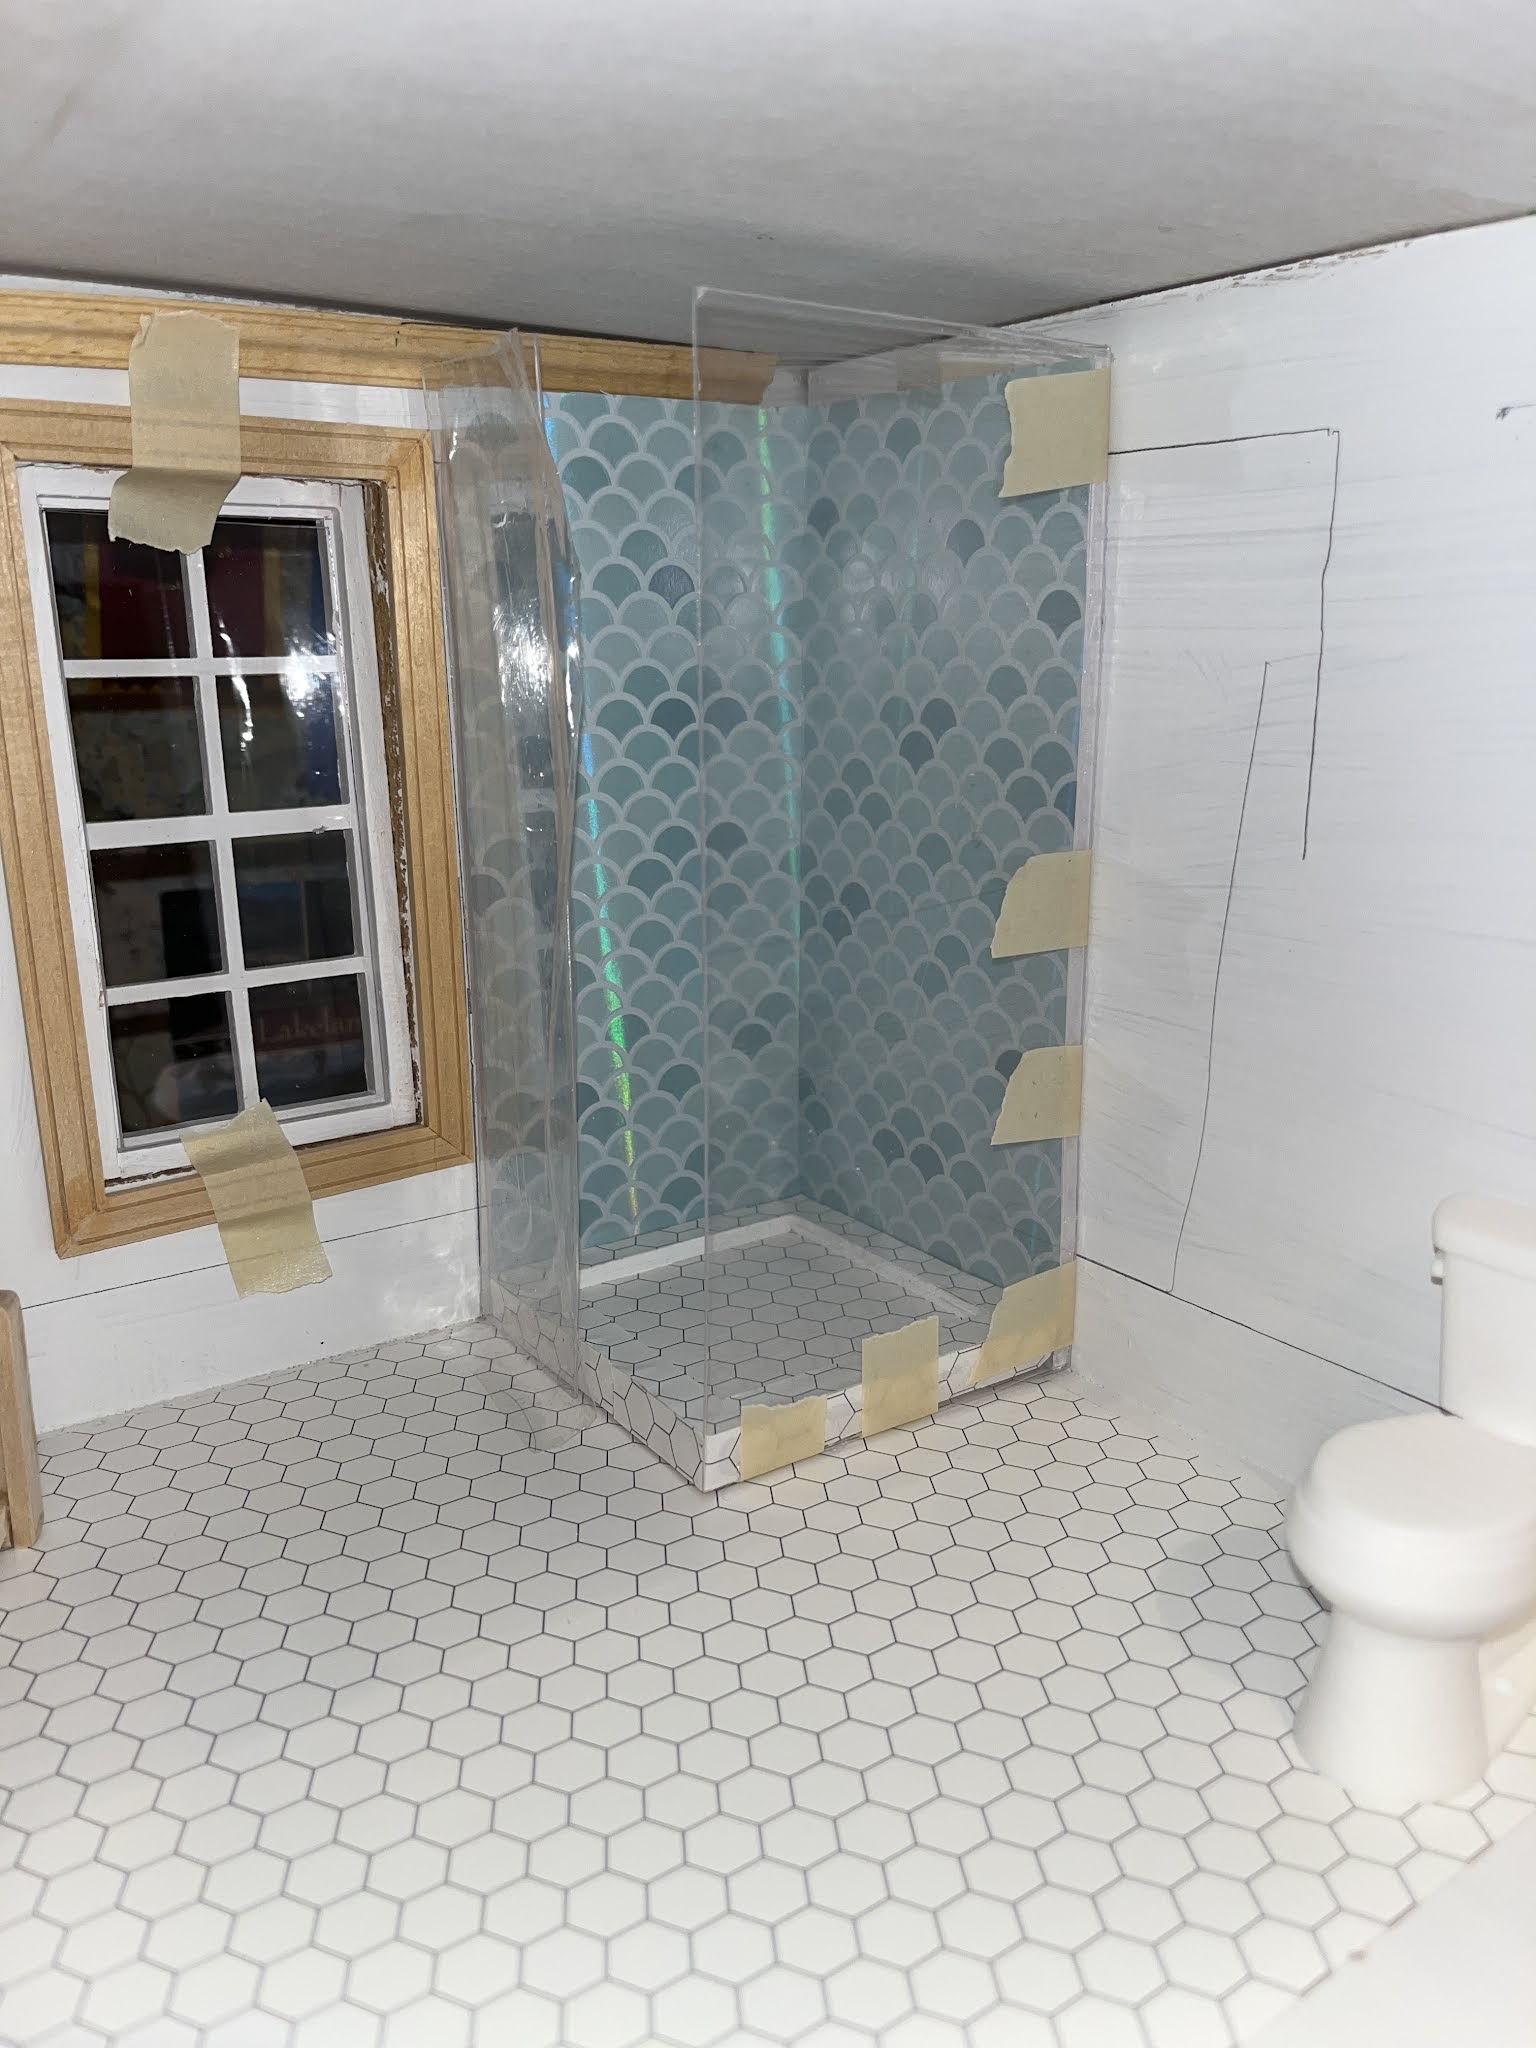
From the beginning, I had in mind a sleek, modern bathroom for the Manchester. Some time ago I ordered this porcelain shower base from Elf Miniatures in the UK, certain to use in my next house. However, it's too big for the space dedicated to the shower unit. Once I add the window casing, this shower won't work.


I started out with these materials: 1/4 inch foam board for the walls, teal foil scrapbook paper for the scale tile, paper octagon flooring that I purchased from Michaels--cool stuff, but no longer in stock, 1mm acetate from Hobby Lobby. As I worked through the design, I used Cricut brand 2mm chipboard to cut the rim for the shower base. I tried cutting the rim for the foam board, but just could not get smooth, even cuts.


My first attempt to cut the walls was a big fail because I used hot glue to adhere the pieces, but hot glue is too hard to dispense and control. I recut the entire shower and glued the walls together Aleene's Tacky glue with much better results. I cut the shoer base, but foam board just didn't give the results that I wanted. I cut tow pieces and glued them together to get the height of the porcelain base


I needed to find a way to cover the base with the octagon tile with rather sad results, so I decided  to create rim that would fit on top of the shower base to give it depth and shape. Foam board is really hard to cut straight. I'm getting better at cutting it, but it still isn't the perfect material.


The shower base looks messy. The paper tile didn't fold neatly when I tried to cover the two base pieces glued together and the base is flat. It needs sides or something to give it depth. Water would just spill out, so I had to create some sort of rim or lip, and I needed a better material to cut the base from. I measured my shower base then cut a piece of scrapbook paper on the Cricut to create a template for the top of shower base and  for a perfect fit. Now I was on a roll.


I wanted to match the thickness of the porcelain shower base, which two layers of foam board created, but base was flat,  so I dug in my wood stash and found this piece of balsa wood and cut it to fit the my rim template to create new shower base, but it still needed a lip or bit of wall to give the base depth and to hold water.


I realized that I could create that rim using chipboard. I didn't need the rim to be very thick because the balsa had the thickness. The great thing about Design Space is that I can create exact measurements to the mm and I can get clean, accurate cuts.

I loaded my scrap of chipboard and cut three rims for a nice, thick shower rim that would fit on top of the wood base, giving it depth and preventing the water from spilling out on the floor. 

It ain't pretty, but the scrap had enough space to cut my 3 pieces.


Three 2mm rims were too thick, so I  glued 2  together.


I cut the tile paper on the Cricut to get perfect fitting pieces to cover the shower base.


I painted the chipboard rim white and glued  it to the balsa wood base then I used wallpaper paste to adhere the paper tile to the shower base. 


And there it is, a new shower base. I would still prefer  the porcelain base, but this one will do just fine. 


While the glue set, I painted my fixtures using Testor's model enamel paint. I ordered the fixtures for Shapeway's Marketplace from a vendor Paper Doll Miniatures. (Her blog) She is very sweet. After I received my order, I messaged her for suggestions on how to paint the 3-D printed bathroom fixtures and received the sweetest reply.


I'm painting them antique gold. One bathroom in our old house, a custom built house, had gold faucets in a bathroom. I loved the elegance of the gold, which seems to be making some what of a return in more modern bathrooms. 


The shower will have one "glass" pane made from acetate. I cut my acetate on the my paper trimmer, making one pass to score the acetate rather than cut it. I do not remove the protective cellophane covering both sides to prevent scratching the acetate and the blade slides over it more easily. The acetate will snap apart easily along the scored line. 


I used bead and glass glue to adhere the acetate to the thin edge of the shower wall for a clean, modern look. Attaching glass shower panels can be quite a challenge and I would have had to order some channel moulding to have working shower doors, but as I searched for shower design I discovered that some showers have minimal surrounds, some only have one glass panel. Good enough for me. I hate cleaning shower glass, anyway. (That's why when we remodeled our own master bath, I opted for a shower curtain rather than a large glass shower door that I knew I'd never be able to keep clean.)


I'm letting the shower rest tonight to give the adhesives time to cure. There is more to do in the bathroom before the final install, but this major project is almost done. Tomorrow I'll install the shower head.  


And that's what I did today. Actually, I started the project yesterday. Making the shower was big project. I wasn't sure that I'd be able to get the materials that I chose to work. I created quite a scrap pile of failure, but once I decided to use the Cricut to make the more difficult cuts, I was home free. 

Thanks for joining me. 


Wednesday, October 20, 2021

To Build a Fire


Hello. A short post tonight to show off two major accomplishments: building a fire and adding video to this post. Actually, I've been all over the place working on the Manchester this week--flooring, figuring out wallpaper, and finishing the center island for the kitchen, but this afternoon I made a fire. I ordered the three 3 volt fire kits from Evans Designs, with 1 3 volt nickel batter pack,  and two  3 volt flashing blue lights to simulate the bit of blue flame in our gas log fireplace to add interest and depth the flames. 
You can find them here: https://evandesigns.com/search?q=Fire. I ordered the smallest LED chips because of the small space, but wonder if I should have gone the next size up?
I baked and painted the "gas logs" that I showed in a previous post so that they would be ready to install when the lights arrived this week.

I wired two LED fire kits and one blue light to the 3 volt nickel batter. The plan was to hide the battery pack in the cabinet, so I drilled a hole in the side of the cabinet and pulled the wires from the battery into the cavity where the fire would be.


These little pico chips are very bright. The red, yellow, and orange fire flicker as does the blue, but they seem to over power the blue flicker here on the table top. I realized right away, though, that the logs I made are stacked too tightly, so the fire doesn't glow as I had envisioned . There should be more space between them for the flickering light to shine through. I may do them over, so it was tricky getting the lights placed to give a nice flickering glow rather than blinking light.


I cut a grate from corrugated scrapbook paper, smeared some black craft paint on it to dull the grayness, hoping for a bit of burned coals effect, but it really won't show. I punched a hole at the end to pull the lights through. It's very hard to see, but the wiring  is hidden underneath the fireplace unit. I am actually happy with the way I was able hide wiring in the bottom of the cabinet. The fire lights have 8 inch long wires, so I cut about 4 inches off to reduce the bulk.


I am not very happy, though, with the fireplace itself. I used 1/16 inch bass wood, which is quite flimsy, especially once painted. After I painted it, the wood also swelled a little, so it fits very tightly in the space. I may remake it using 3/32 basswood. The Maker will cut it and I think it will make a stronger, sturdier fireplace and I can remake the logs to get more glow. I will also add the second blue light and the 3rd Fire Kit, storing the batter pack in the left cabinet. 

Still despite the the faults, I was able to accomplish this task and now I know how to build a better fire--place. And I even learned how to add a video to my posts. I promise not over do. View the video in full screen for a better effect.


I'm glad you stopped by. Thank you. 


Thursday, October 14, 2021

Building an Entertainment Center

It's hard to believe that I have been away for so long. Life just gets in the way when you are having fun, and then Life isn't so much fun. Things have quieted down, allowing me to spend long hours in the basement working on the entertainment center that will go in the addition to the Manchester. I began the project way back in August so I had a lot of work to do to catch up. My first attempt at making the cabinet failed. Pieces didn't fit and I did a sloppy job gluing pieces together, so I started over.


The entertainment center is a massive piece measuring 8 inches across. I used two 4" 1/16" thick basswood cut 7" inches long to accommodate a big screen TV and a modern fireplace.


I have applied the first coat of white paint, designed the fireplace, made more logs for the fireplace, baked them, painted them, and ordered the Fireplace Kits (3) from Evans Designs. (Love that company). I thought today I'd write a lesson on how I used the Cricut Maker to create the cabinet doors for the entertainment center where I'll hide the nickel batteries that will power the fire. 

These are the basic pieces of the cabinet. Because it is the bottom of the entertainment center, I need only a top, one side for each cabinet, the door and the frame to create the shaker look.


I cut the cabinet pieces on my Maker, designing them Design Space.


After gluing the shaker frame on the door, I clamped the pieces together and let the glue set for several hours.

I have always struggled installing dress maker pins for hinges because I waited until after the cabinet was built, making it very difficult to locate the drill hole and then getting the drill bit in place,  but this time I decided to drill the holes BEFORE assembly. So in this photo you see that I taped the top of the cabinet to the door. I will use the very fine drill bit that comes with this tool that used to be sold with the Cir-kit electoral kit, but you can use a thumb drill, too. A Dremel might be too powerful for this tiny job.


I lined up the top of the cabinet with the door and secured it in place with masking tape

Note: Thin 1/16" basswood is very hard to center and drill holes without splitting the wood--one reason I prefer 3/32" basswood. This project was much easier because of the doubled thickness of wood with the shaker frame added.


I drilled through the masking tape that holds the pieces in place made which actually helped to create a more stable drilling. Remember that I have not yet glued the pieces together.


I repeated the process with the bottom pin hinge, by taping the door front in place in the entertainment center.


Once the pin hinges are inserted in the hole using a jewelry plier. . .


. . .I cut the pin off with another jewelry tool. There will a bit of pin above the surface, which I push down or gently hammer flat with surface.


The pin hinges have now been installed in the door front with the hinge holes drilled in the top of the cabinet and the bottom of the entertainment center, ready for installation.

Now you may be asking,"How did you make the cabinet door, you might be asking?" 

Answer #1: I learned my basic cabinet making skills from watching Julie Warren's Youtube videos. She has a great system for DYI 1:12 scale miniature furniture and cabinet making. If you haven't discovered her yet, check out her Youtube channel and you will find her on Instagram and Facebook and a subscription channel Partron, which I don't follow. There are others builders on Youtube who are great, but I find Julie's British voice soothing and interesting as she narrates very well orchestrated tutorials--and she has books and an Etsy store to buy supplies. I hope I don't sound like a commercial for her, but certainly she has created a wonderful support system for beginners. 

Laurie Heisler is also a favorite with so many projects that will help the 1:12 scale builder. 

Be sure to check out my favorite blogs listed that inspire and teach me how to make cool stuff. 

Answer # 2: So I tried my hand at making Julie Warren's kitchen cabinets. I even bought a couple of Julies books to get the cutting lists and step by step instructions. Still I had problems. The biggest one was cutting straight lines. Most all of my cuts were off--some just plain crooked. Already owning an older model Cricut machine, I was intrigued with the new Maker that would cut wood! So I bought one. If you get addicted to building miniatures--as I did--and you intend to do a lot of miniature projects, a Maker will make life easier, especially if you have old, worn out hands as I do. 

Just to be fair, there are other cutting systems, like the Silhouette which might serve your purpose better, so do some research to which machine will fit your needs best.

Caution: There is a learning curve with the Maker (and I assume other machines, too). I decide what I want to make and search YouTube to see if anyone has made it, like how to cut wood on a Maker. You will find great tutorials on learning the basics, for example this link https://www.youtube.com/watch?v=xCtHxwTWhIk

I generally watch more than one.

You need reliable WI FI because the Maker operates using Bluetooth. I use my MacBook Pro laptop and my iMac desktop. I can't speak to iPad or iPhone. I do know that at one time my granddaughter's iPad would not connect to cut the project. Nor can I speak to other computer systems.  

How I Created a simple shaker style 18 inch (or 1 ½ foot) square cabinet


 Let's begin with a Cricut Maker basic: Using the Slice Tool to create shaker style cabinet door fronts and, for this project, how to cut out the face of the modern fireplace. It is a very simple process that may take some practice--as learning all new skills requires. 

First, this tutorial assumes that you are familiar with Circuit Maker and Design Space basics. If you are new to the Maker, you need to familiarize yourself with some of the basics. Here is a great tutorial that helped me understand those tools in the very bottom right-hand corner of Design Space that you will use in this project: Slice, Weld, and Attach

(The layout for this tutorial may be a bit wonky because I created in MS Word and copied and pasted it into Blogger.)


Use the shape tool to create the cabinet door front. Size the door front: 1.5 inches. The shapes are always black; I prefer to work with a white outline. Change in the color tool in the top  menu


To create the Slice for the shaker style door front, Duplicate the front door front then reduce it by .5 inch (or whatever width you want)


Slide the Slice over the door front. It may appear to be behind the door front, so select the image then select Arrange and choose the appropriate  command to either move the slice forward or the door backward. Gray line indicates that the image has been selected.


With the Slice now in place on top of the door, it needs to be centered: Choose Center in the Align menu to center the slice on the door.


Select the piece by dragging the pointer over it


Select the Slice tool in the bottom right-hand corner. 


Drag the slice away from the door front; drag the door front away and you will have spare pieces


Drag the main door away from its position. The final step: Select the newly sliced door then use the Attach tool located in the bottom right hand corner--otherwise the shaker frame won't stay in place should you decide to move the door front to another location in Design Space.


 Now you have two slices and the shaker frame. I delete one slice and hide the other slice so that it will not be cut. When you save this for future use, keep the Slice piece so that you don’t have to remake it. 


End result: you have one shaker style cabinet door. Duplicate as many pieces as you will need for your project. 


Materials: Purple Mat strongest grip; painter's tape to secure wood or chip board to mat; knife blade


I have always used 1/16" basswood, but other builders use 2mm chipboard which I have also used but only for my prototypes, so it is a personal preference. However, I much prefer the 3/32" basswood because it is stronger and while my Maker will cut it, it takes longer and is not recommended. I think it makes my machine work harder. 


While the 1/16' cuts nicely, it tends to warp and get soft with paint. Once the paint dries, it the wood may need some tender care to get back into shape. That does not seem to be a problem with Cricut's chip board. 


Gorilla Wood Glue or a tacky glue: Wood glue doesn't dry clear, so clean up excess glue, but has a stronger bond.


Sandpaper 320 grit to acquire a smooth surface; 120 coarser grit to take off a lot fast--proceed carefully with a light touch. I used this grit to shape the curved hinged edge for cabinet door.


I couldn't resist a sneak peek at my progress so far with one coat of paint.


And inside the house. It will fill up this wall and even the room, but I'm liking it so far.


There will be more to come on the entertainment center once I get it finished.


Please email me or leave a comment if you have questions or suggestions on how I can improve this tutorial. 


Thanks for visiting.


Bargains Galore and So Much More: It's nice to back Hello friends. Yes, I have been MIA for quite a long while. I first took a hiatus fr...