Saturday, July 17, 2021

Oh Look, a Ladybug: Facsimile or a Replica


 It's a question that I have been asking myself for a while, now, as I get more and more obsessed with making my own miniature accessories since moving beyond the "play" dollhouse stage. Encouraged by others miniaturists that I follow--the blog, Instagram, Facebook crowd, and the Youtubers, I am challenging myself to learn more that will help me to pay attention to detail and get better at miniature crafting, but as an amateur trying to get better where do I draw the line between a creating a reasonable facsimile or realistic, detailed representation of an object, be a it chair, a flower, or a bug?

A.A Milne wrote about Winnie the Pooh as a bear of "Very Little Brain: “When you are a Bear of Very Little Brain, and you Think of Things, you find sometimes that a Thing which seemed very Thingish inside you is quite different when it gets out into the open and has other people looking at it.” 

I could easily substitute When you are girl of "Very Little Artistic Talent" and you make tiny things. . ., well you get the idea. 

So here is an example of a current project--completed when I should have been working on other things. While I have that large farmhouse to complete and the half scale Fairfield to put back together along with various projects for each of those houses, I spent the better part of the day making bees and bugs, specifically ladybugs.  I watched two youtube tutorials that helped me figure out how to make those tiny creatures so essential to a garden, even my miniature garden that I'll be making for the Bellingham Farmhouse. I tried to follow this Youtube tutorial Daniela Minis

I began by conditioning my Fimo clay by kneading and rolling in my hands then I ran though my pasta machine at setting 9, the thinnest setting to get two thin sheets.


Since the bees are so tiny, I didn't need a large amount of clay. Once rolled out, I placed the black on top and gently patted it down to work out the air bubbles that you see in the top photo.


Next, I trimmed off the ends then sliced off about a 1/3  of the sheet and laid it on top of the first piece and repeated that again to have 3 layers, lining up the cut edge perfectly. You can begin see the layers that will form the stripped bee body. So far my project looks much like Daniela's. 


I used my old razor blade to cut small slices, making sure to have the striped layers facing the correct direction to ensure horizontal stripes instead of vertical ones, which would look maybe more like a snake.


After cutting thin slices, I gentle rolled each slice my palm to make a dozen bees. But they looked too big, so I dug out my little pot of sunflowers.


Just as I thought, these bees were plenty large for this flower, taking up the entire center of it.


So I cut thinner slices and rolled more.

Once the bees are formed, wings have to be fashioned. Using transparent white Fimo. I tried roll out two evenly sized ropes, as the tutorial directs. 


With the ropes rolled out and pressed side by side, the tutorial directs pressing the rope flat to get the shape of wings. The rope is baked per your clay directions. For me, I baked everything for about 7 minutest at 275 degrees.

When I sliced the ropes for the wings, I did not get nicely rounded shaped wings. They were way too small and square.  As the saying goes: "Back to square one." I think I will cut wings out of vellum. 

Ladybugs have to be most everyone's favorite garden bug --they eat aphids, you know. So  I really want to have them in the mini garden.  Art by Nell has a good tutorial, but most of it is devoted to making a leaf necklace with a ladybug on it. So you have to watch the half the video to get to her bug--or fast forward, so I sort of went out on my own when I fashioned my ladybugs. This first bug begins with rolling tiny balls from black, the rolling out the red in the pasta machine, #9 setting to get a thin piece.


(Pay no attention to round cut.) With this flattened red, I use a needle tool to cut out a round circle large enough to wrap around the black ball. I used the needle tool to create the separate wings. 

The head for this one is too big. I sould have reshaped it. I tried to roll even smaller balls to make the spots; instead, I tried again following this model. It's a good one if you are making a larger bug because you will have more control over larger pieces of clay. I decided, too, that these bugs would be too large. Nor is the head round; its more of a semi circle. 


I took a second approach to get even smaller bugs by rolling very small balls for the body, using white clay and then slightly flattening them with my finger. Since the ladybugs that live on my sunflowers are more orange than red, I shaved two pastels to try to get an not red a color.


Too tiny to really dust with a brush, I just rolled them around in the chalk dust until they were will covered.


Using the needle tool, I fashioned the head using the needle and sort of pushing the heads against the body then baking for about 5 minutes. I didn't want to burn them.


I did the same with the making the spots: digging a tiny bit of black clay with the end of the needle tool and poking it on the bug's wings.


I think these little bugs will do a good job eating aphids on the mini sunflowers in the mini garden. I am quite fine with making facsimiles that are not botanically correct, perfectly scale lady bugs. I pleased with these little ladies. The bees could use some more work. 


I dug through my punch stash and found a shape that could work for wings, which I like much better than the translucent clay.


Next step will be to glaze the little critters and add the bee wings.

I think I have answered my own question: A handmade symbolic facsimile or a replica, a carefully construction reproduction or a realistic life-like representation? For the hobbyists, I think a facsimile works fine.  There is great satisfaction in making my own. Were I to enter competition or offer my tiny things for sale, a facsimile would not do. We can expect and appreciate the imperfections of handmade items, but if we are perfectionists then there are other ways to get perfect pieces for our miniature projects: buy handmade items crafted by skilled, gifted artisans or invest in a 3-D printer.

I have no shame in buying from the skilled artist, but I doubt that I will invest in 3-D printer but one would certainly be a great tool to add to the workshop. 

Finally, while I am still very much an amateurish, I try to  remember the old adage, "Practice makes perfect," because the more you make, the better you will get. I know that if I make more bees and bugs, they will be better. I learn from mistakes. 

Most importantly then,  joy and satisfaction of making our own miniatures come through that satisfied feeling of completing a project that we like. We are, after all, our own worst critic, seeing every flaw and mistae  the we make, while others oooo and awe over our creation. I think I found my comfort level where I am fine with bees wings that merely represent a bee's wing. I'll be glad when someone looking at my miniature garden, squeals in joy, "Oh look, a little lady bug!" 

Thanks for visiting. 

Tuesday, June 29, 2021

Mission Accomplished

 Hello. I am waiting for the tree service company to arrive to begin removing 4 trees that were damaged by the bad snow storm at the end of winter, so now seems to be a good time catch you up on the mini project of the week: The Hen Pen. 

But before I begin, I have to share the best Saturday that I've had in long time: a trip to the Denver Museum of Miniatures, Dolls, and Toys. They were having garage sale. Not the best garage sale, but, none the less, a great reason to spend time with my oldest daughter, see some old friends in the business, take a quick gander at my favorite house in the museum's collection, and find a few tiny things to bring home. Most exciting is the museum's announcement that they will sponsor their big miniature how the second week in September. Can hardly wait! 


After the garage sale shopping, we went inside and shopped more in the museum's very tiny gift shop. I had things in my hands both at the garage sale and inside that I didn't bring home. Now I am kicking myself. Most of the garage sale items were vintage items, including items that are no long available anywhere, and the item that I most regret not buying was a set of nesting--or stacking copper mixing bowls. Darn it! And that little baggie if tiny horse figurines. 

I always do that. I don't suffer from buyer's remorse--just the opposite. 😞

I've taken photos of this house before, so this time I took more of the garden. The detail is amazing. You can visit this post Wish List that shows our first trip to the museum, including photos of the house itself.


The house has an impressive garden that has inspired my next project. I have decided to plant a garden for the Bellingham Farmhouse, using this garden as my guide. I will make the plants from polymer and kits, but there are few kits available for vegetables, so I will be pushed to learn how to make more of my own items.


I don't know if I'll have a roadside vegetable stand or not. Still this one is quite impressive.


My farm won't have these spectacular antique farm implements either, but I might find a more modern tractor.  You can't read the signs. One says, "1887 John Deere plow."


I may even build a green house like this one attached to another house.


Last week I chronicled my misadventures in building a solid hen pen. All attempts ended in disaster. My dear friend Barbara in the UK who follows me here kindly offered to shop for netting that would work as fencing and send it to me. I decided to give the tulle one more go to see if I could get it work. Thank you Barb. 💖

Here is the first attempt at fence. The main problem that I had was stabilizing the fence.


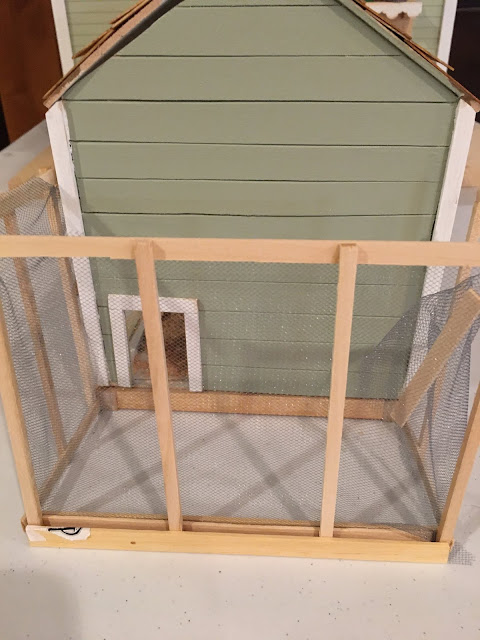
Without going through the entire process, I decided to use a round dowel as fencing. I took a second look at our own pen to get a better idea on how to construct this pen. That hepled.


I am satisfied with this pen for the time being. Right now it is not attached to the coop. Once I glue it in place, nothing in the pen will be assessable since I didn't add a gate. I may leave the roof unattached. 

I had one more project inside to finish: the feed storage cans. They are converted coffee creamer containers that I painted with platinum acrylic paint that has a bit of sparkle to replicate the aluminum. The lids are gum ball machine trinket containers. 


I love my calico kitty. I found her at a local garden center where I seemed to have purchased all of my mini cats. 

Last winter a calico cat moved into our barn. My husband began feeding her. She had come from the back of our property where she lived in the ditch culvert, so we knew that she was feral. When I first met her, I told my husband that she was pregnant. He didn't think so. She had two babies and we found homes for them. I vowed to get her fixed, but didn't and then a litter of 4 were born. I made the same vow and failed to follow up and soon two more babies arrived. They were so sweet. One went to a 5 year old little girl and my oldest daughter took the other one. Callie is sweet and loving and gentle and so are her babies. While I don't believe in indiscriminate breeding of cats and dogs, these six babies went to loving homes where they will have a good life. And, No, Callie will not have anymore babies. She will live her life as queen of the barn. 


Super excited to be getting away for few days on a nice, long road trip. Our house keeper will look after the house and the animals within, while a friend will tend to Callie, Pop the Pony, and the hens. Brody will go to the kennel. After the spring that we have had, driving for a day and half to reach our destination-- through mostly grasslands and farmland, we can escape the duties and responsibilities that keep us busy. I wanted to have the hen pen finished before I left so that when I return I can work on the Manchester and hopefully get it finished before summer's end.

Unless I discover a super, amazing, must have large house, the Manchester is my last big build. The garden project that I want to take on for Bellingham will keep my quite occupied. 

Cricut Maker Update: None. I am resolved to rebuild my library of projects even better than before. I can recreate everything that I lost--or not. Technology is not perfect, thus the lesson to SAVE SAVE SAVE and even PRINT. I was told by tech support that my projects were saved in THE CLOUD, but I have yet to found where they might be hiding. When I set up my Maker, I didn't tell it save projects to The Cloud, so I don't know where they would go. Nor do I know where my new projects are currently being saved. Do you? If so, let me know. 

I am rambling now. Have a great week. I'll be keeping up with everyone while I'm gone. 
Thanks for joining me today.


Tuesday, June 22, 2021

A Cautionary Tale


 Summer seems to be flying by. We are getting a few little projects accomplished here. One time-saver is the drip system that my husband re-installed in the garden beds and around our patio pergola to water the hanging baskets and my planted pots, making the watering chore easy since it is on a timer. We seem to go through this every year and sometimes mid-summer because our sweet dog loves to tear it. More time for minis. So here is a project that has caused immense frustration, and I'm not sure why I just can't do it! I started it months ago, and here it still sits. I'll share this project status with you. 

And while I am not a negative person or complainer, I do have a Circuit Maker problem to share.


But first, the hen pen. My chicken house was crafted following Julie Warren's youtube video and the instructions from one of her books. It is a very simple little structure that can styled for so many different purposes: a garden shed, a craft shed, a sewing room, an artist's studio. For me, it is inspired by our own hen house which I wrote about here: When the Chickens Come Home to Roost. I love the way the little house turned out, but now I want to finish it with the chicken pen. 

I began early on thinking that I would use bridal tulle on a spool as the fencing. Then I thought that screen mesh would make a better fence, but I have so many problems with both. Last week I reassembled the fence using tulle and it works pretty well, but it is flimsy and doesn't hold it's shape.


I was having a very hard time trying to figure out how to attach the fence to foundation that I had created using half inch square dowels then it hit me to use the 1/4 inch channel trim so that the fencing would fit inside and be supported rather than on top of a foundation. Still I hadn't created a fence that measured accurately and haven't figured out how to attach it to the chicken house and I need a gate, or at least a non-opening gate.


So this looks pretty good, but I'm still not happy.


These sticks that are supposed to be fence posts just don't offer enough support for the tulle.


What a mess, so I decide to paint the roof. It will be a rustic tin roof, slopped so that the rain will run off. I am using corrugated or ridged cardboard from a 6x6 paper pack. I use Platinum gray acrylic paint for the metal foundation then I mix brown, red and yellow for the rust. I think the effect turned out just the way I wanted it to. I then ripped the sticks/fenceposts off the tulle and painted them.


 You can barely see the foundation here--I forgot to photograph it, but I painted it dark gray around the edges, then gray, black, and brown. When the paint dries I smeared it with Modge Podge and sprinkled tea grounds to make dirt. I'll add more to the pen floor later. Maybe some spoiled fruit and table scraps and chicken scratch.

So here it is. Back in a heap. I am so frustrated at this point. The tulle is flimsy and the fence is so poorly designed. Back to the drawing board.


I've played around this art metal mesh, but while the tulle is too flimsy, the metal mesh is too stiff, too shiny--where I want a more aged look. 


But I am not giving up. I love the roof, the floor of the pen, and I like the channel to support the fence. I took a second look at how our chainlink fence--actually a dog run we purchased from Craig's List--was assembled then I purchased round dowels for the fence posts. I'll use the tulle because it is earlier to work with. Instead of trying to build one long panel that will bend around the corners, I am going to create separate panels for the sides and the front, just like the real fence. The channel will hold them in place (as so will the glue), and the tulle will won't hide the interior like the mesh does. So I have it figured out.

Maybe next week. Maybe not. We will leave July 2 to visit family in Texas for the 4th. I haven't seen them in 2 years and I am so excited to be getting out of town! I am excited to finish this hen house project, too. I have dreams of creating a vegetable garden--complete with strawberries and cantaloupe on the vine.

The lesson here: Just don't give up. I find sometimes that I have to let a project sit--often for a long time--to figure out how to solve a construction problems. I've got this one conquered--I hope.

A Cautionary Tale

Now for the Cricut Maker. First, I am not a whiner or complainer or a negative person, but I do feel that I need to share this experience to prevent others from having the same issue and perhaps get some suggestions on how to solve my current Cricut problem. 

I hadn't used my Maker in several weeks--since the last post on Design Space. When I launched Design Space, it did its usual upgrade download. This time, however, I was prompted to select a machine with a screen graphic that had "New" in big bold print. You must look for this screen as the app downloads version 6.10.107 and do not proceed until you carefully understand what will happen next.

I selected "Maker." In that menu, the new machines, Explore 3 and Maker 3 are listed. 

Next I opened my Design Space work screen, not paying attention to my library contents of saved projects. We tend to just click on something automatically because we know what we want. For this project I wanted to make a 50th anniversary card. I had created a beautiful swan card so when I went to my projects, the library was empty--gone--blank--nothing. 

I cried. Literally cried. It was obvious that the new upgrade had erased my library. So all of Manchester dollhouse projects are gone. While the cabinets are built, I have not cut the counter tops. Now I will have to start from scratch. All the card templates that I created for my Cards for Soldiers are gone. 

I went to Cricut.com to see my account and this is the strange part, my subscription to Design Space wasn't there. My credit card wasn't on record. My Maker was registered, but my account wasn't there. I checked my credit card statement and I had been billed June 9th for the monthly subscription fee, but I had no account. I checked email to see if I received notification that my subscription would soon expire. No notification.

I called the Cricut Help Line. No answer.

I activated a Chat conversation and got a Chat Bot. Not helpful, so I requested a real person and got one. I explained my problem to him and he really didn't have any answers, but he was prompting me uninstall Design Space. I decided to clean up the windows that I had open and inadvertently closed my Safari window, ending the chat. So I went on ahead and uninstalled and reinstalled Design Space.

I finally figured out that when I was prompted to choose a machine, I wiped out my library of projects. 

Monday morning I called Cricut Help and had a real person, but sweet as she was and sympathetic as she was, she didn't have any answers for me. She did say that the Chat tech gave me the wrong information to uninstall the app. However, she said that my projects are saved to my cloud, but I can't find them.

Currently I am trying to figure out if my projects really in the cloud someplace, but I don't think they are. I've looked. Or I don't know where to look. I'm not sure if my Maker is connected to the Cloud. So perhaps this is where you come in if you have a Maker. Any ideas or suggestions? 

I have resigned myself to the fact that months and hours of work are gone. I can probably recreate it all. I've stopped crying and I'm not even mad anymore, but I am disappointed in Cricut's support. 

So now I'm off for some retail therapy. The grandpa has taken the 12 year old grandson fishing for the day--or at least until it gets too hot. I hope my next post will have some better news, like I found my Cricut Projects. 

Thanks for visiting. 

Tuesday, June 15, 2021

When Life Hands You Lemons: Punt


 It's bloody hot, making yard work feasible only in the very early morning or in the dark of night, which is out of the question, so I've been making minis. I've drifted away from the Manchester for a while because I'm still pondering the electrical layout out for how I will light the house--a gentler way of procrastination. I have one more building project to complete, the entertainment center for the living room and I'm putting that off, too.

With my husband and my grandson off to the mountains camping and participating in an archery  shoot over the weekend, I entertained myself by digging out my polymer clay and began to make mini fruits, inspired by Allie's House on Instagram where she posted her quick--and very easy--tutorials on making strawberries and  mandarin oranges. I also made blue berries, cantaloup, and lemons--which evolved from a debacle.

Strawberries: Not really happy with my first attempt to make strawberries that I shared last week, I took a lesson for Allie's House on Instagram. I used white Fimo instead of the colored clay, shaped small berries in the palm of my hand, used the needle tool to texture them then painted them with pastel dust. I added a dab of water to the chalk dust, painting on the yellow first to create the seeds--sort of worked. Next, I did the the same with the red. The berries look more realistic. I used white clay for the berries 


and a green scrap that I had blended for another project for the leaves and stems. Finally I baked them (with the blueberries) at 275 for 15 minutes. The needle tool was perfect for lifting the tiny leaves and sliding them in the dimple on the top the berry.


After they had cooled, I applied the satin glaze.


Blueberries: When you look at a container of blueberries, some that are not quite ripe have just a touch of reddish purple, but my berries are fully ripe. These are the colors that I used to create my berries. I like to have a sample of the real fruit to copy as I work on own creations from scratch. I did look for Youtube tutorials and found a couple then did my own thing with the blending of colors. I did learn from the tutorials how to sculpt the stem end. You can see how the colors compare with the real berries.


Size fruit is  tricky because you want to make sure that the sizes are relative and realistic for 1:12 scale, so as I made the various fruits I had to carefully consider the sizes and make sure that  the blueberries are smaller than the strawberries. I rolled out a rope and tired to make uniform slices, except a carton of berries doesn't have uniform berries, so when I rolled them out I'd use two or three slices to make one berry.

Here they are ready for the oven. Some artists will dust them lightly with baby powder or corn starch to give them that powdery look when they are fresh, but I skipped that step and will skip the glaze, too. 


Most exciting was Allie's House realistic containers: gum blister wraps--but just try finding the bister packs. I got lucky. The strawberries fit nicely in a Dentyne pack. I trimmed a lid and a bottom for the strawberries, but I like the idea of leaving two blisters attached and folding one blister over the the filled blister over to create a more realistic pack.  The longer, larger pack was Eclipse Solar Ice and smaller blisters were Dentyne. Next I will scan a package labels, but someone keeps putting them the recycle bin.  I will size the labels in a Word document, print, and add to the lids.


Mandrin Orange: Such a simple little project. I use just a two colors: Orange and the same green scrap that I used for the strawberry leaves.

Again I used the real orange to help with the details.


Again size matters. I didn't want to make the orange too large so that it would be confused a naval orange, nor did I want it the size of my strawberry or blueberry. I just guessed. I rolled out a rope then cut 12 slices of equal size to get 12 orange balls.


With the small end of the stylus, I shaped a dimple for the stem end then used the needle tool to shape the wrinkles on both top and bottom, and made s tiny dimple on the bottom and added the wrinkles. I used the needle to add just a dab of green for the bottom of the stem. 


To texture the oranges, I rolled them on the blue scrubby, which I like very much instead of pricking the the texture with the needle tool. The Mandrin is slightly flat, so I gently pushed them to flatten them


Cantaloupe: So much fun to make.
Choose a color that you think represents the outer rind then a green that reflects the inner rind, and an orange.


Roll a bit of green until it is very, very thin. If it sticks to the work surface, dab a bit of corn starch on it. Cover an orange sphere with the green, cutting away excess, and working the green until it is smooth and seamlessly covers the melon ball.


Do the same with the outer rind. Joann of Joann's Minis uses the clay roller (the pasta roller) to get ultra thin rind because she wants the green layer to slightly show through the outer layer. I wasn't successful in getting that to happen, perhaps because I didn't roll the final ball over the same surface as she uses. Finally, I used my blue scrubby. You can see her youtube tutorial if you want that same effect. I cut the melon in half then made the dimples.


Using the stylus I shaped a dimple where the seeds would have been using the larger end of the stylus, trying to shape the hollowed out inside after the seeds have been removed. Next, I cut the halves in half and gently pinched the ends together to get a nice curve and used the stylus again to give a better defined seed dimple.


Rhubarb: Not a particularly popular fruit these days, but on the old farms every garden had at least one clump of rhubarb. Here, I'm the only one in the family who likes rhubarb, so I thought I'd try my had at making rhubarb. Visit the link to see details of the tutorial. This artist has great tutorials.

New Tool: Most call it a "pasta maker" which does describe it aptly but not food quality. It did save some the time and work kneading the clay to get colors blended more quickly. I seem to have some arthritis in my thumb and index finger on my right hand, so this little machine will be quite helpful. I can roll out that very thin clay for layers in the canes and maybe one day I will master that fine art of making nice detailed canes.


I grow one hill of rhubarb in the garden and pick it once a season. Most of it I freeze to make a compote or sauce that no one else in the family eats. I enjoy it on toast or even cottage cheese and I like to make a strawberry rhubarb pie for company, as I did last week. It turned out so perfect. The next pie I baked was a cherry pie and it got too brown, so this was good pie. My next project, then will, will be a mini rhubarb pie. 


I pulled a few small stocks of rhubarb for my models and blended these colors: these shades or red and translucent white.


I already had the green blended for the grapes that made a while back. I do have a problem with the amount of green and the shade used in the tutorial because the younger stalks don't have all that green, but I followed the tutorial anyway. 


The canes are not all the same size, nor are the stalks on the real plant. I deviated from the tutorial again when it shows how to curve the one side that creates a celery shaped stalk, but rhubarb is rounded on top and flat on the bottom is that's how I made mine. 


I used the needle tool to texture each slice.


Lemons: I sort of made up my own meme, combining the "make lemonade" with a saying my brother acquired as a student at Colorado School of Mines. All of the engineering students had to take the summer surveying class, so when something didn't go right, the guys said, "Just punt," borrowing the term from football. That is exactly how I got whole lemons. I punted. Nor did the strawberry cane that I tried to create to make sliced strawberries work. I definitely need more practice making canes. I purchased the "pasta roller" just so that I could roll out thin clay for the canes. More practice.


And that's how I came to have 3 lemons. I have more lemon colored clay, so who knows, I may just bag up  few more.   


And there you have it: a bounty of fresh summer fruit. I'll be making rhubarb pie later this week. 


 I'm posting all the Youtube videos that I used to create my summer fruits. I don't always follow them exactly and sometimes borrow a technique from one and some from another.

Stay cool. 

Thanks for visiting.

Tutorials For this Post

Lemons:

Maive Fernando: https://www.youtube.com/watch?v=oKtnLxeFWS0

Tiny Clay Charm: https://www.youtube.com/watch?v=Z-ANdz4r4BM

*Sweet Mini Dollhouse: https://www.youtube.com/watch?v=vCubDbRRG0A&t=329s


Rhubarb Pie

AkameruKawaii https://www.youtube.com/watch?v=GWdQ2dXjAjA


Rhubarb crumble pie https://www.youtube.com/watch?v=BdrRauzBx-c

https://www.youtube.com/watch?v=GWdQ2dXjAjA

Cantaloupe: 


Joann’s Minis: https://www.youtube.com/watch?v=cOowoarxu2k&t=44s


This Charming Stuff: https://www.youtube.com/user/tCHARMINGgirlCrafts


Strawberries:


https://www.instagram.com/allieshouse/

Maive Frenando: https://www.youtube.com/watch?v=hFLTjzTYmpY


Sugar Charm Shop Gourmet: https://www.youtube.com/watch?v=Enbd24VPlLc&t=433s


Blue Berries

*Lucy’s Workshop: https://www.youtube.com/watch?v=VICGbmqGoMo&t=20s

Mimi’s Creations: https://www.youtube.com/watch?v=7nUEDFHtft8&t=14s


Work intensive, but beautiful


Certainly Caroline: https://www.youtube.com/watch?v=ha-TYPEsoIU


Strawberries, Raspberries, Black Berries

Be Pretty Me https://www.youtube.com/watch?v=AA2Znz2Nopk


Revisit my Thanksgiving Post for more polymer clay food: https://annsdollhousedreams.blogspot.com/2020/05/happy-thanksgiving.html


Mandarin Orange or Clementines


Sugar Charm Shop: 

https://www.youtube.com/watch?v=q2z-kufGsv0


Crafty Frog

https://www.youtube.com/watch?v=5oKIvvkOre4


Bargains Galore and So Much More: It's nice to back Hello friends. Yes, I have been MIA for quite a long while. I first took a hiatus fr...