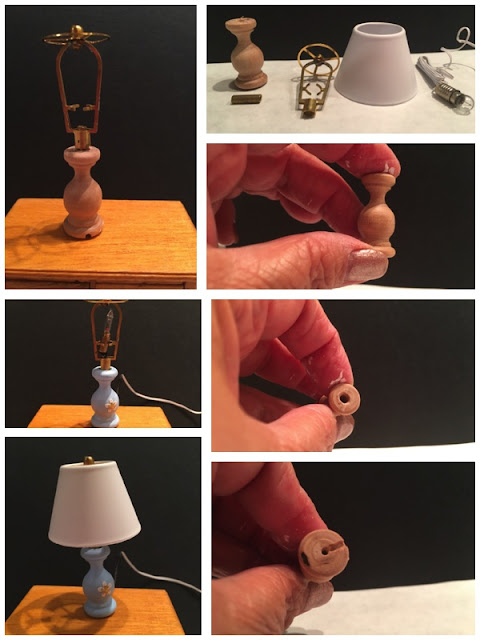
I hope that I am nearing the finish line with the The Bellingham Farmhouse. I am growing weary workin on it. I glued the windows in last week and this week I'll be working on the outside trip work. The inside is looking finished, though I have the attic to do yet. I do get side tracked on making little things to compete a room, like making a lamp. Would you like to know how I made it? I'll share my project with you.

I wrote a lamp tutorial in April 2015, and you can visit that post if you like: Blue House Kitchen and Lamp Tutorial , but I think that you will enjoy my revised method best.
Items that you will need:
Wooden Spindle: Purchased at Hobby Lobby. It will have wooden pegs that will have to be removed. Next drill a hole from the top to the. The bottom also needs a channel cut for the cord to lay in. I used my dremel and placed the spindle in a small vice. You can use a hand drill to drill the hole and a craft knife hone out the top hole to make it large large enough for the crimp. When you have the hole large enough for the crimp to fit, glue it in place, then place the harp or tube over the crimp. Gluing the harp in place is optional. I didn't. PS: It is really hard to center your drilling hole, especial with the dremel.
 Wire Crimp found in the jewelry findings section at Hobby Lobby. No specific size on the label other than "large."
Light: I used a candle style light that you can find at HouseWorks. It is not the one shown in the photo. As it turned out, that one was too large, so I dug in my stash and found a light, but it required splicing to a cord with a plug. Next time I will purchase the candle light--comes two to a package--with the cord attached.
Harp or Tube: JAR/JAF Miniatures is a very interesting online store, but hard to navigate, so follow these steps to find the lamp harp:
Online Catalog: Navigate (Long scroll trip, but you will really cool things) to page p. 41
Retail Price List: The web site says to email the company to place an order or fill out this form and mail it in with a check. I sent an email and received a prompt response.
Select these items for your 1:12 lamp: 1 R-81 Shade; 82 wheel; 83 tube or harp.
Double sticky tape: I use really sticky carpet tape on the bottom to hold the cord in place and to secure it to the dresser top. You might also lightly sand the bottom to make a flatter, smoother surface.
Paint or stain. I used fingernail decals for decoration. Then I sprayed it with an acrylic sealer just to give it a nice sheen.
It works!


Your table lamp looks GREAT and the tutorial was Very nicely done! :D
ReplyDeleteThank you for inviting me to your blog and visiting mine (fabulouslyflawedminiatures). I will make sure to stop by often. Love the lamp tutorial, thank you for sharing.
ReplyDeleteAnita