
The interior of the Manchester is pretty much finished. I've filled cracks and crevices with painter's white caulking, cut most of the trim to finish hiding rough edges, yet to be glued place, and done most of the touch-up painting. Major tasks left to do: glue the balcony back into place; attach the exterior trim, and the roof. I've considered Greenleaf's Speed Shingles that I used on the Bellingham; the faux asphalt strip shingles that could be costly, single shingles in my lumber stash, or a faux metal roof that would require only paint and strips of wood, glued in place.
But I can't make up my mind, so the exterior sits in limbo.
Just when I decided that I would not build another large house, I found a shell of the older Real Good Toys Newport on Facebook Market Place located near daughter Heather in Denver for $100. So tempted. It was missing the tower that sits on the mansard the roof, so I emailed RGT to see if they could provide replacement pieces--and they can, along with all the trim, windows, doors, interior walls, etc. I calculated the cost. Then went to eBay to see what I could see.
Another older Newport kit (now redesigned and renamed the New Haven). The eBay house is $175 with $110 shipping. A bit of calculation reveals that it would be a tad more expensive to get this kit with all the pieces included. I made an offer. It was rejected. So I decided that I just don't need another large house. Do I?
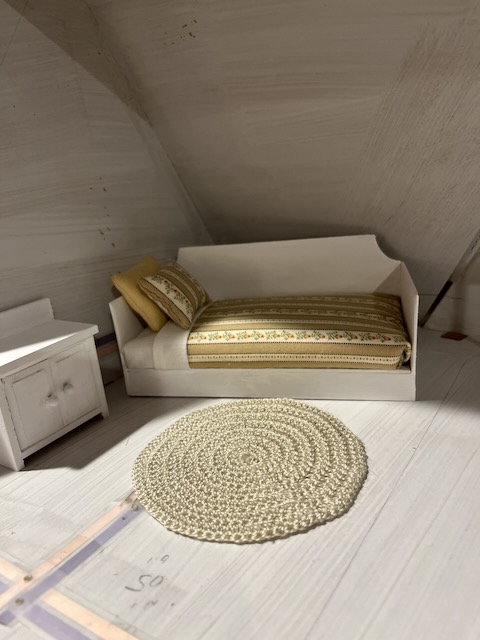
As I mull over the Newport, a Victorian Empire style that would be so much fun to make, I began working on the Manchester attic by making a day bed. Inspired by Carolyn's tutorial on how she makes her little daybeds at Cinderella Moments, I made my first daybed for the Bellingham and loved how easy it was to make and how great it turned out. You can see it here: DayBed, along with the full tutorial.
The bed is cut from 1/16" basswood, an easy hand-cut project; however, this time I used the Cricut Maker.

With new projects, I always cut a prototype out of thin cardboard--like a cereal box or even computer paper. My cardboard cutout is a GO.
First, writing a Cricut tutorial is tricky because, especially if you are brand new to your machine and want to dive in to make mini furniture making, you have learn how to use certain tools, so I suggest that you search for Youtube Tutorials to learn how to use the tools listed at the top of Design Space work space, along both sides, and the ones in the bottom right hand corner.
PLEASE before you attempt this bed and if you are new to your machine, learn how to cut basswood by taking a Youtube tutorial. There are many good ones. In addition, you can use craft board or chipboard instead of wood.
Tools to cut wood: Purple Mat, knife blade, painter's tape
This tutorial will demonstrate how to use the Shapes collection on the left and the Slice tool to create custom shapes, and the Attach tool. For this day bed I used a square sized to 5"x7"; used an oval to create the notched corners. Once I had one corner sliced, I used the Flip tool to flip the newly created triangle to move to the opposite side to make an exactly matched notch. You have to play around and use trial error to get the slices perfect. Use Command Z to quickly undo mistakes.
Next I created the sides: 2"x7, the bed of the bed slightly narrower, and the front brace.
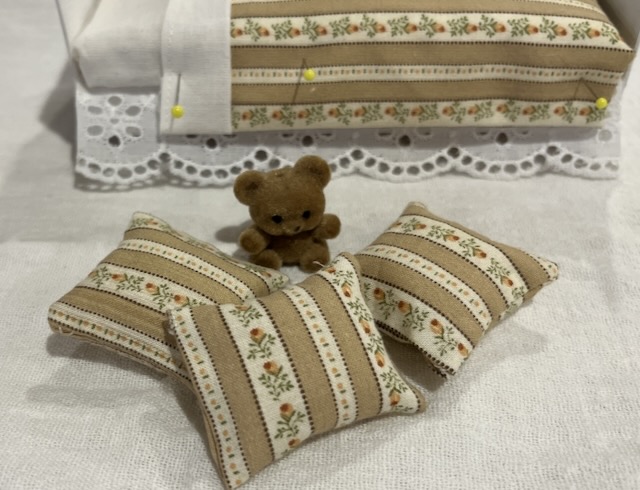
This bed will have a tufted headboard, so I created my template for the tufting, which will be either print and cut or I can use a pen to mark the tufts. Carolyn's tutorial shows how to make a tufted headboard.


Now you can see that all of the pieces are in place and ready to cut. 1/16" basswood takes about 9 of 14 programmed passes, but I am thinking that Cricut has reprogramed the machine to stop cutting at 7 or 8 and I have discovered that the across grain cuts don't go all the way through, so I have to use my X-acto blade to finish the cut.


Una fantástica realización. Esta preciosa.
ReplyDeleteUn saludo
Gracias, Marian. Mi español muy Malo, por que I know un poquito and can read generally understand your comments. I visited your blogs, discovering that you're quite talented. Thank you for your generosity.
DeleteSince I’m one to make “stuff” rather than houses, I’d pass on the bargain Newport and focus on the furnishings. That daybed is perfect. I love the shape of it and the colors are so restful, I’d curl up there any day.
ReplyDeleteI totally agree. I certainly don't need another big house and have plenty of mini projects to keep me busy and I have other things to do, too. The daybed did turn out nicely; thank you.
ReplyDeleteThis bed is absolutely adorable, Ann! Great work and thanks for sharing the tutorial! Your bedding looks just beautiful, and your pillows turned out perfect! You make it look so easy!!!
ReplyDeleteAs for what the new dollhouse project should be... Mine always seem to work out so perfectly that they feel 'meant to be'. I hope you receive the same divine surety!!! I can't wait to see more of your fabulous ideas come to life!
I am getting better. Always learning along the way. I've sort of given up on the Newport--for now. We will see how long this mood lasts. LOL.
ReplyDeleteThe day bed looks lovely Ann and I love the colour you have chosen.
ReplyDeleteThank you. It's a fun project.
ReplyDelete