Showing posts sorted by relevance for query daybed. Sort by date Show all posts

Thursday, March 28, 2019

Lights Out

The Farmhouse is giving me fits. I want to finish it up and move it out of the workshop, but it has  issues with lighting--the lights have always given me problems. I have redone the tape writing more than once on the second floor and I thought I had it all the bugs worked out, including the excess humidity in the basement from the aquariums, but the two lights in the kitchen have remained troublesome, so I did what I didn't want to do, pulled up the flooring the second floor to get to the wiring for the kitchen. I had adhered the flooring with carpet tape, really sticky stuff, so that I could remove them if I had to, and I guess I had to.


Here is the culprit joint. I put in new brads and had a connection then I didn't. Then I fiddled with it more and ended up shorting it out because now the only line that works for the living room. I am bummed to say the least. I did find a live wire on the ceiling of the kitchen that I ended up not using, so I think I can do some rerouting--I hope. Otherwise, it is lights out in the Bellingham Farmhouse because I am NOT ripping of wallpaper in the bedroom.


Has anyone used solder to secure wiring? My husband bought me soldering iron which I have not yet used, but I am about the use it. I've read some tutorials and soldering seems to be a good choice. Is it?

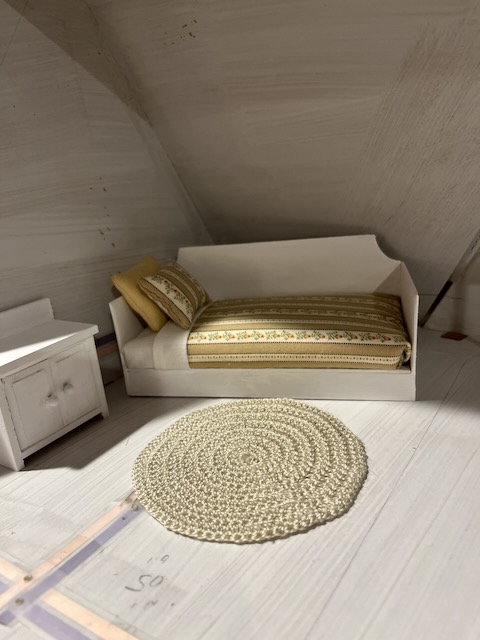
The attic of the farmhouse needs to be finished. I have the boy's bedroom figured out, wallpaper chosen from my scrapbooking stash, and a tongue depressor floor ready to stain. With a Roy Rogers' theme, the room is going to be such fun, but there is the other half of the third floor. I'm not sure now just what inspired me, but I decided to create another room and wanted a daybed, so I searched Pinterest for daybeds and found Caroline's tutorial on her daybed at Cinderella Moments. Her pieces are simple, easy to execute, and use common products. So here is my little daybed.


First I made a prototype out of cardboard just to see if I could manage it. Actually, I wish I had taken more time and done a better job, because it turned out okay. I'm going to clean it up and maybe make a bed for one of the girls. 


I re drew my pattern, making sure that all the measurements were accurate. I used 1/16th" Bass wood that cut easily with a sharp knife. For thicker wood, I would have used the scroll saw.


Caroline's headboard has straight lines, but I wanted curves, so I folded the pattern in half and cut away. The sharp point on one side would eventually splinter off, so i removed the other one, causing the sides not to fit accurately, but a nice fluffy pillow covers up that corner.


I cut a mattress out of foam board just slightly smaller than the daybed and covered it with wool batting. Poly fiberfill would work, but I used what I had on hand. (I made some dolls a while back that required wool batting).


I covered the mattress with cloth cut from an old pillow case that was handy.

Then I dug through my fabric stash, finding bits and pieces of fabric that I could use. The crocheted piece is a coaster that a blog friend sent me from England. There are six, so I try to add one to each house so that there is a touch of Elizabeth in each house.


I already had the pillowcase made up and I save those silicone packets, so I stuffed on in the pillow case, but I will new pillows.


I thought about what sort of embellishments I might add, but then decided that the bedding will cover most of the bed, so I left it plain.


This attic room is an odd space, but I think I have a plan for it.


This afternoon I painted the bed with a chalk paint, giving it a light finish.


When the paint dried, I sanded it smooth and tried to adde some wear and tear.


It will be a cute little space that the teen-aged girl has created for herself, her own hideaway where she has dragged things out of storage to make her little nest.

I made the hall tree a while ago with the idea of using in another house, but I've never found a good place for it. Inspired by Cinderella Moments, again, I used a new door in my stash that came without a jamb. The little hall trees are fun to make, and I think this one has now found its home.

I borrowed the rug from the upstairs hall and it is just the sort of rug that would end up in the attic all rolled up, so it stays here. I don't remember where I got it. Etsy maybe, but one can just as easily be printed on muslin. 

I made the chair, a House of Miniatures kit and covered it with muslin. It is rough looking, and that is okay for an old chair relegated to the attic. The young teen who is creating this little hideaway nest in the attic will find other "cool" things hidden and stashed way back in the dark corners of the attic. Stay tuned.

It's spring break and my little grandson is here, so I won't get a lot done on either house. He wants to work on his house--yes, his house. He needs some furniture. He says that he is doing a Halloween house, so I think we will make him a bed.  I am close to wrapping up the toy store. I have flooring to install in the loft and I have cut the ceiling paper, and I have a chandelier to install then it I will fill it with toys. The farmhouse needs the attic finished and a roof. Oh how I dread the roof. 

Thanks for stopping by. I hope you enjoyed your visit.

Wednesday, March 15, 2023

Day Sleepin'

 The interior of the Manchester is pretty much finished. I've filled cracks and crevices with painter's white caulking, cut most of the trim to finish hiding rough edges, yet to be glued place, and done most of the touch-up painting. Major tasks left to do: glue the balcony back into place; attach the exterior trim, and the roof. I've considered Greenleaf's Speed Shingles that I used on the Bellingham; the faux asphalt strip shingles that could be costly, single shingles in my lumber stash, or a faux metal roof that would require only paint and strips of wood, glued in place. 

But I can't make up my mind, so the exterior sits in limbo.

Just when I decided that I would not build another large house, I found a shell of the older Real Good Toys Newport on Facebook Market Place located near daughter Heather in Denver for $100. So tempted. It was missing the tower that sits on the mansard the roof, so I emailed RGT to see if they could provide replacement pieces--and they can, along with all the trim, windows, doors, interior walls, etc. I calculated the cost.  Then went to eBay to see what I could see.

Another older Newport kit (now redesigned and renamed the New Haven). The eBay house is $175 with $110 shipping. A bit of calculation reveals that it would be a tad more expensive to get this kit with all the pieces included. I made an offer. It was rejected. So I decided that I just don't need another large house. Do I?

As I mull over the Newport, a Victorian Empire style that would be so much fun to make, I began working on the Manchester attic by making a day bed. Inspired by Carolyn's tutorial on how she makes her little daybeds at Cinderella Moments, I made my first daybed for the Bellingham and loved how easy it was to make and how great it turned out. You can see it here: DayBed, along with the full tutorial. 

The bed is cut from 1/16" basswood, an easy hand-cut project; however, this time I used the Cricut Maker.


With new projects, I always cut a prototype out of thin cardboard--like a cereal box or even computer paper. My cardboard cutout is a GO.

First, writing a Cricut tutorial is tricky because, especially if you are brand new to your machine and want to dive in to make mini furniture making, you have learn how to use certain tools, so I suggest that you search for Youtube Tutorials to learn how to use the tools listed at the top of Design Space work space, along both sides, and the ones in the bottom right hand corner. 

PLEASE before you attempt this bed and if you are new to your machine, learn how to cut basswood by taking a Youtube tutorial. There are many good ones. In addition, you can use craft board or chipboard instead of wood.

Tools to cut wood: Purple Mat, knife blade, painter's tape

This tutorial will demonstrate how to use the Shapes collection on the left and the Slice tool to create custom shapes, and the Attach tool. For this day bed I used a square sized to 5"x7"; used an oval to create the notched corners. Once I had one corner sliced, I used the Flip tool to flip the newly created triangle to move to the opposite side to make an exactly matched notch. You have to play around and use trial error to get the slices perfect. Use Command Z to quickly undo mistakes.

Next I created the sides: 2"x7, the bed of the bed slightly narrower, and the front brace. 

This bed will have a tufted headboard, so I created my template for the tufting, which will be either print and cut or I can use a pen to mark the tufts. Carolyn's tutorial shows how to make a tufted headboard.


With the pieces created, I am ready to cut my wood. I can group my pieces in Design Space after creating them, but when I click Make and see the Make screen I see that Cricut has rearranged the pieces on my wood, waisting precious wood and disregarding the grain of the wood, so there is an easy solution.

For this project I used Circut's basswood--worth the price. It is 6"x12". I create a template of the wood then position my pieces on the template as the wood will be placed on the mat--the grain horizontal or parallel to the left side of the mat. With the pieces in position, I carefully side (drag) the wood template to the side and the pieces stay in place. Next I select all the pieces, not disturbing or moving them and Attach them, holding them in place. Remember command Z to immediately undo a mistake or incorrect move.


Now you can see that all of the pieces are in place and ready to cut. 1/16" basswood takes about 9 of 14 programmed passes, but I am thinking that Cricut has reprogramed the machine to stop cutting at  7 or 8 and I have discovered that the across grain cuts don't go all the way through, so I have to use my X-acto blade to finish the cut. 


The cut results:


I used Gorilla Wood glue to adhere the pieces.


With a large fabric stash, including fabric pieces and scraps for mini-making, I found bed sheets that I had hemmed at one time. Not in the mood to do any sewing this time around, I used the sheets for this bed. 


There are a number of materials that can be used for a mattress. I keep mine simple and use what I have on hand. I cut the mattress from 1/2" foam core board, slightly smaller 1/4" or so all the way around to allow room for bedding. Here, I am using wool batting left over from stuffing cloth dolls. 


While my sheets have finished stitched edges, they don't have to be finished; in fact, the sewed edges create more bulk, so it's better not have finished edges.


Simple wrap bedsheet fabric around the mattress and glue in place. 


I've not decided on the color pallet for the attic, but since I had scraps of the stripe and just wrapped it around and really like it. I had sewed the striped pillow and the other one came from the mini stash--for the moment.


While the bed isn't finished, it does seem to be turning out nicely. A comfortable place for some day sleepin'. 


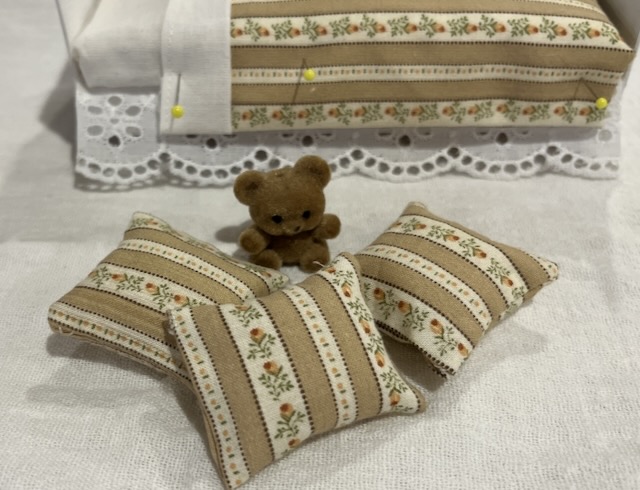
To finish dressing the bed, I added a dust skirt it a piece of eyelet edging from the lace stash. I taped most the fabric in place, and once I am satisfied with the how the bedding looks, I'll glue it all in place.

 I made pillows--very simple: cut a rectangle twice the size of the finished pillow, fold it in half. I pressed the top edge to the inside to create an even hem once the stuffing is added. 

Next I folded the fabric in half then I hand sewed around two edges. After turning the pillow right side out, I added a bit of stuffing and carefully glued the hem edge closed. 


And there you have it: a cozy spot with a comfy bed to do some day sleepin'.


I'm so glad you dropped by. I'd love know what you are up.

Have a great week. 

Ann


Bargains Galore and So Much More: It's nice to back Hello friends. Yes, I have been MIA for quite a long while. I first took a hiatus fr...