Around here, we call this Heather Weather, for our oldest daughter was born on March 27th on the heals of the worst blizzard in 40 years. Forty eight years ago we lived on the farm about 13 miles from the hospital. During a routine visit past my due date, my obgyn told me to go home, get some lunch then check into the hospital. My husband and mother-in-law spent the night in the hospital with me as the blizzard raged outside, forcing road closures, so bad snow storms happen in Northern Colorado in March. No big deal.
While this storm, one of Mother Nature's milder temper tantrums rather a a full-on rage, the bad weather offered ample opportunity to work on the weather vane for the Manchester Country Home. Perhaps you'd like to make one, too.
This project is not my first weather vane. You can visit this two posts on the first two that I assembled: Meeting A Challenge, the unicorn weathervane that I made for Lily's House
The second weather vane project appears in Hamilton Finds a Home. You will enjoy that post about a mouse in the chicken house--a true story.
Inspired by our weather vane installed by a previous owner, I set about last week to create another one, a better designed one than my previous attempts.

I began by searching Cricut Design Space Images for a weather rooster, finding only two: this black one and the same image in red. This screen shows how to create the shapes for the cupola, arrange them, and attach them so that Design Space does not rearrange them in Make.
This simple preparation will save wood, but more importantly allows you to cut pieces according the direct of the wood grain. Here I am using Cricut's 1/16" basswood that measures 6x12". I cut it with the grain length wise down the mat rather than with the grain running across the mat because I would have to cut off 1". When cutting wood, the wood cannot be wider than 11" because when the blade passes over the at the 12" edge, the blade will break.
Here are the measurements in inches for the pieces.
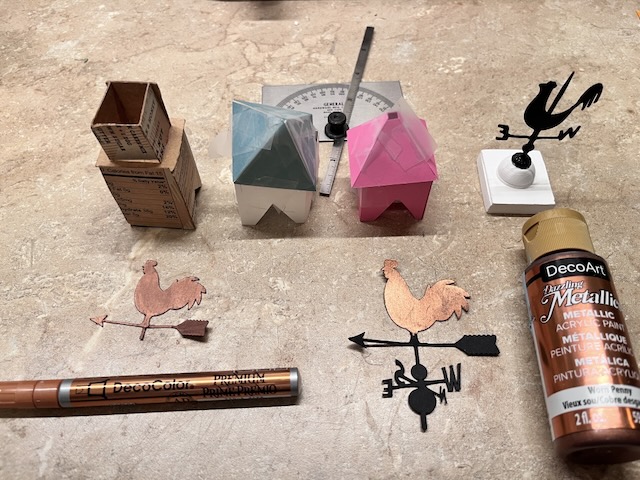
BUT before you cut, you must get the angle for the body of the cupola correct so that it will rest in place. My husband, a machinist by profession, gave me this handy protractor to measure angles that are not visibly 45 or 90 degree angles.
Once I have calculated the angle, I trace it out on paper then fold the paper in half and cut the angle to insure an evenly centered slice. I have not figure this out in Design Space--how to get angles accurate. Perhaps Inkscape might be helpful, so I traced my pattern on the cupola sides and cut them with a X-acto.
Essentially these are the pieces that you need. Be creative, dig in your bead and wood stash to see what you can come up. Google "weather vanes" to see the possibilities besides roosters--like mermaids, witches on their brooms, or pigs flying.
I also cut--but not enough--the tips off the tops of the triangles to fit the vane poll/
The top of the cupola has to be flat for the foundation to sit firmly and evenly on the roof of the cupola. I had to sand it to make the top level.
Not everything has to be perfect, especially if it gets covered up.
Before I got to this stage, I went through a lot of trial and error. The first on the left was my very first attempt to design the chicken house weather vane see at the end--minus to box-- that I need to rebuilt t so that it fits on the chick house roof better. I also experimented with creating a copper weather vane by using a paint pen that now sells for nearly $7 at Hobby Lobby--with good results and the $.189 acrylic metallic copper paint with decent results. However I decided to use with a black rooster.
While the supporting pole general attaches directly to the cupola or the roof, I had to use some sort of foundation to hold my toothpick pole steady. With more work, I might figure out how to mount the vane pole with out the square block, but for now here's how I assembled it.
For the tooth pick vane pole I used a 7/65" drill bit then had to work it a little more so that the eyelet fit then using a hammer to get the eye fully pushed in.
The holes for the directional tooth picks used a 5/64" bit and the tooth picks fit snugly.
The toothpicks are now glued in place. I cut the direction letters off the vane and used a wooden bead to secure the rooster.
These are all the tools and supplies that I used. I especially recommend using an old kitchen cutting board as a base for drilling so that you drill your work top. The shape wood and remove a lot of excess I use course sandpaper, but be careful to take off too much. An emory board is just about right for fine sanding.
I purchase most of these little wooden pieces at Hobby Lobby. Most of them are used in furniture making, but work great for pieces and parts in miniature building.
At one time I tried my hand at jewelry making, so I had a bead stash, but now I search the beading section for supplies for mini making.
I cut several sizes from card stock, with the final cut from Cricut's Kraft Board, a heaving product that cuts nicely, using the purple mat and the knife blade.
As you can see, my copper vinyl cut didn't go well. I prefer the paint because you can create a more realistic patina and aging for the outdoor vane.
While not finished, the weather vane fits and looks like I imagined. I like it.
The letters are cut from the mat board glued place--delicate, yes; sturdy? Not really, but they will work.
WE keep hoping that the weather will warm up, for there is plenty of garden work to do and I'm itching to get outside. The Manchester has one more big project and that's the roof. Stay tuned.
I you are new to the blog, say "hi." I don't sell anything, I don't promote anything; it's just me.
Thanks for visiting.


Wow Ann! Your weather vane is fantastic! I love your clever construction to make it operable and it came out so great! And your tutorial is so helpful in the way you share tools, techniques and options for personalization! You should contact Auralea at American Miniaturist and see about getting it published. I am definitely going to give it a try the next time my project calls for it.
ReplyDeleteWell thank you. I've wondered about ow to get published and I think I should try. I am surprised that you haven't yet--you should.
ReplyDeleteLove the weather vane . It looks fabulous. Unfortunately my dollhouse has a flat roof. Such a shame.
ReplyDeleteWow it's brilliant Ann.
ReplyDelete